11. ROS1_MediaPipe Human-Robot Interaction Courses
11.1 Introduction to MediaPipe
11.1.1 MediaPipe Description
MediaPipe is an open-source framework of multi-media machine learning models. Cross-platform MediaPipe can run on mobile devices, workspace and servers, as well as support mobile GPU acceleration. It is also compatible with TensorFlow and TF Lite Inference Engine, and all kinds of TensorFlow and TF Lite models can be applied on it. Besides, MediaPipe supports GPU acceleration of mobile and embedded platform.

11.1.2 MediaPipe Pros and Cons
MediaPipe Pros
(1) MediaPipe supports various platforms and languages, including iOS, Android, C++, Python, JAVAScript, Coral, etc.
(2) Swift running. Models can run in real-time.
(3) Models and codes are with high reuse rate.
MediaPipe Cons
(1) For mobile devices, MediaPipe will occupy 10M or above.
(2) As it greatly depends on Tensorflow, you need to alter large amount of codes if you want to change it to other machine learning frameworks, which is not friendly to machine learning developer.
(3) It adopts static image which can improve efficiency, but make it difficult to find out the errors.
11.1.3 How to use MediaPipe
The figure below shows how to use MediaPipe. The solid line represents the part to coded, and the dotted line indicates the part not to coded. MediaPipe can offer the result and the function realization framework quickly.
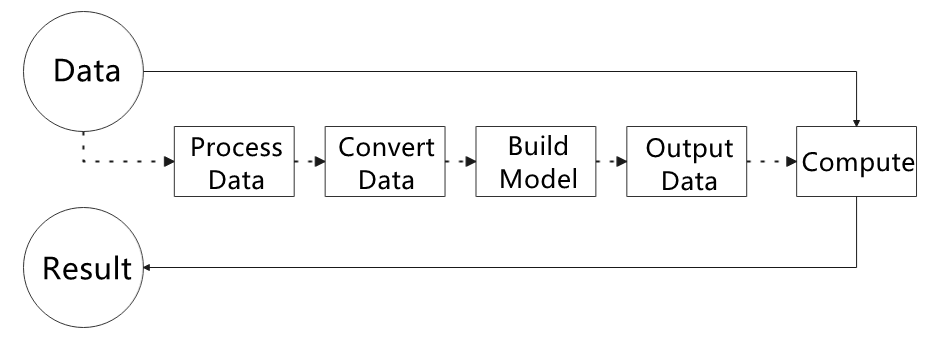
Dependency
MediaPipe utilizes OpenCV to process video, and uses FFMPEG to process audio data. Furthermore, it incorporates other essential dependencies, including OpenGL/Metal, Tensorflow, and Eigen.
For seamless usage of MediaPipe, we suggest gaining a basic understanding of OpenCV. To delve into OpenCV.
MediaPipe Solutions
Solutions is based on the open-source pre-constructed sample of TensorFlow or TFLite. MediaPipe Solutions is built upon a framework, which provides 16 Solutions, including face detection, Face Mesh, iris, hand, posture, human body and so on.
11.1.4 MediaPipe Learning Resources
MediaPipe website:https://developers.google.com/mediapipe
MediaPipe Wiki:http://i.bnu.edu.cn/wiki/index.php?title=Mediapipe
MediaPipe github:https://github.com/google/mediapipe
Dlib website: http://dlib.net/
dlib github: https://github.com/davisking/dlib
11.2 Image Background Segmentation
11.2.1 Program Logic
To begin, import the selfie segmentation model from MediaPipe and subscribe to the corresponding topic to access the live camera feed.
Next, flip the image and apply the segmentation to the background image. For improved boundary segmentation, implement dual-border segmentation.
Finally, complete the process by replacing the background with a virtual background.
11.2.2 Operation Steps
Note
The input command should be case sensitive, and keywords can be complemented using Tab key.
(1) Start the robot, and enter the robot system desktop using VNC.
(2) Click-on  to open the command-line terminal.
(3) Execute the command to navigate to the directory where programs are saved.
cd /home/ubuntu/puppypi/src/puppy_extend_demo/scripts
(4) Enter the following command to start the game.
python3 self_segmentation.py
(5) If you want to exit this game, please use shortcut key Ctrl+C. If the game cannot be closed, please retry.
11.2.3 Program Outcome
Once the game starts, the screen will transition to a gray virtual background. As soon as a human figure appears, the program will automatically execute background removal, effectively separating the human from the virtual background.
11.2.4 Program Analysis
The source code of this program is saved in: /home/ubuntu/puppypi/src/puppy_extend_demo/scripts/self_segmentation.py
Build Selfie Segmentation Model
17 18 19 20 21 22 23 24 25 26 27 28 29 30 | class SegmentationNode: def __init__(self, name): rospy.init_node(name) self.running = True self.mp_selfie_segmentation = mp.solutions.selfie_segmentation self.mp_drawing = mp.solutions.drawing_utils self.image_queue = queue.Queue(maxsize=2) self.BG_COLOR = (192, 192, 192) # gray self.bridge = CvBridge() self.image_sub = rospy.Subscriber('/usb_cam/image_raw', Image, self.image_callback) rospy.loginfo('\033[1;32m%s\033[0m' % 'start') self.cli = rospy.ServiceProxy('/puppy_control/go_home', Empty) self.cli() threading.Thread(target=self.main, daemon=True).start() |
The SegmentationNode is a ROS-based node designed for real-time image processing and selfie segmentation. Upon initialization, it loads MediaPipe’s selfie_segmentation model and sets up an image subscriber to receive raw image data.
Incoming images are handled by the image_callback function, which converts the ROS image messages into NumPy arrays and stores them in a queue with a maximum capacity of two. If the queue is full, the oldest image is discarded to ensure real-time performance.
32 33 34 35 36 37 38 39 40 41 42 | def image_callback(self, ros_image): try: # Convert the ROS image message to a CV2 image rgb_image = self.bridge.imgmsg_to_cv2(ros_image, "bgr8") if self.image_queue.full(): # If the queue is full, discard the oldest image self.image_queue.get() # Put the image into the queue self.image_queue.put(rgb_image) except CvBridgeError as e: rospy.logerr(f"Error converting image: {e}") |
The main function processes the images from the queue and performs selfie segmentation using MediaPipe’s model. A segmentation mask is generated to separate the foreground (typically the person) from the background. The background can be customized—either replaced with a solid color or an external image. The final output, including the processed image and the current FPS (frames per second), is displayed in a window.
44 45 46 47 48 49 50 51 52 53 54 55 56 57 58 59 60 61 62 63 64 65 66 67 68 69 70 71 | def main(self): with self.mp_selfie_segmentation.SelfieSegmentation(model_selection=1) as selfie_segmentation: bg_image = None while self.running: try: image = self.image_queue.get(block=True, timeout=1) except queue.Empty: if not self.running: break else: continue # To improve performance, optionally mark the image as not writeable to # pass by reference. image.flags.writeable = False results = selfie_segmentation.process(image) image.flags.writeable = True # Since the input image is in RGB, directly use it condition = np.stack((results.segmentation_mask,) * 3, axis=-1) > 0.1 if bg_image is None: bg_image = np.zeros(image.shape, dtype=np.uint8) bg_image[:] = self.BG_COLOR output_image = np.where(condition, image, bg_image) # Display image (already in RGB) cv2.imshow('MediaPipe Selfie Segmentation', output_image) key = cv2.waitKey(1) if key == ord('q') or key == 27: # Press q or esc to exit break cv2.destroyAllWindows() |
The code also includes a queue management system to ensure smooth image processing. Users can exit the program at any time by pressing a key. Upon exiting, all OpenCV windows are closed, and ROS resources are properly released.
11.3 Face Detection
11.3.1 Feature Overview
This function performs real-time face detection. Once a face is identified, it is highlighted in the video stream with a bounding box.
Face recognition is one of the most common applications of image recognition in AI. It’s widely used in scenarios such as smart door locks and smartphone facial unlocking.
In this module, a pre-trained face detection model is used. The image is first resized to facilitate detection. After detecting a face, the coordinates are mapped back to the original resolution. The system then identifies the largest detected face and highlights it with a bounding box.
11.3.2 Start and Stop the Game
Note
Commands are case-sensitive. You can use the Tab key to auto-complete commands.
(1) Power on the robot and connect to the Raspberry Pi desktop via VNC.
(2) On the desktop, double-click the Terminator icon to open a terminal window and enter the ROS1 development environment.
(3) Navigate to the program directory by entering:
cd /home/ubuntu/puppypi/src/puppy_extend_demo/scripts
(4) Start the face detection program by running:
python3 face_detect.py
(5) To stop the program, press Ctrl + C in the terminal. If it doesn’t respond immediately, try pressing it again.
11.3.3 Program Outcome
Once the program is running, it will detect faces in the camera feed and highlight them with bounding boxes in real time.

11.3.4 Program Analysis
The corresponding script for this feature is located in the Docker container at:
/home/ubuntu/puppypi/src/puppy_extend_demo/scripts/face_detect.py
This script continuously processes images from the camera using the MediaPipe library for face detection. If no face is detected, the program continues to subscribe to the camera topic to retrieve new frames. Once a face is identified, it is outlined in the image.
Face Detection
The face detector is initialized using the mp.solutions.face_detection() method, which enables facial feature recognition.
16 17 18 19 20 21 22 23 24 25 26 27 28 29 | self.bridge = CvBridge() # cv_bridge is required in ROS1 for image conversion. (ROS1需要cv_bridge进行图像转换) # Initialize Mediapipe. (Mediapipe初始化) self.face = mp.solutions.face_detection self.face_detection = self.face.FaceDetection(min_detection_confidence=0.6) self.img_h, self.img_w = 0, 0 # Image queue and subscriber. (图像队列和订阅者) self.image_queue = queue.Queue(maxsize=2) self.image_sub = rospy.Subscriber('/usb_cam/image_raw', Image, self.image_callback, queue_size=1) rospy.loginfo('\033[1;32m%s\033[0m' % 'start') # Start the processing thread. (启动处理线程) threading.Thread(target=self.main, daemon=True).start() |
Image Processing
31 32 33 34 35 36 37 38 39 40 41 42 43 44 45 46 47 48 49 50 51 52 53 54 55 56 57 58 | def image_callback(self, ros_image): try: # Use cv_bridge to convert ROS image messages. (使用cv_bridge转换ROS图像消息) cv_image = self.bridge.imgmsg_to_cv2(ros_image, "bgr8") except Exception as e: rospy.logerr(e) return img_copy = cv_image.copy() self.img_h, self.img_w = cv_image.shape[:2] # Process using Mediapipe. (Mediapipe处理) imgRGB = cv2.cvtColor(img_copy, cv2.COLOR_BGR2RGB) results = self.face_detection.process(imgRGB) if results.detections: for detection in results.detections: bboxC = detection.location_data.relative_bounding_box bbox = (int(bboxC.xmin * self.img_w), int(bboxC.ymin * self.img_h), int(bboxC.width * self.img_w), int(bboxC.height * self.img_h)) cv2.rectangle(cv_image, bbox, (0,255,0), 2) # Put into queue. (放入队列) if self.image_queue.full(): self.image_queue.get() self.image_queue.put(cv_image) |
A ROS image callback function receives incoming image messages. The MediaPipe model is then used to detect faces, draw bounding boxes, and store the processed images in a queue for further use.
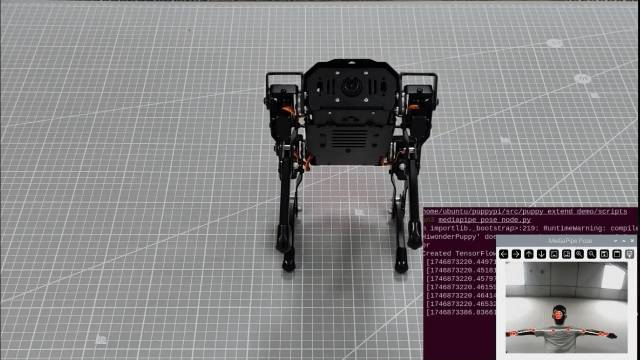
11.4 Skeletal Recognition and Interaction
11.4.1 Program Overview
The system first initializes a human pose estimator to detect and extract key body joint positions. These keypoints are then connected to form a skeletal structure.
Next, the joint positions are analyzed using simple 2D geometric features to determine the arm movements.
When both arms are detected in a horizontal position (T-pose), the system prepares to enter imitation mode. Once the arms are fully extended, the robot begins imitating the movement. It controls four servos—left upper arm, right upper arm, left forearm, and right forearm—to replicate the detected limb actions.
11.4.2 Start and Stop the Game
Note
Commands are case-sensitive. You can use the Tab key to auto-complete commands.
(1) Power on the robot and connect to the Raspberry Pi desktop via VNC.
(2) On the desktop, double-click the Terminator icon to open a terminal window and enter the ROS1 development environment.
(3) Navigate to the program directory by entering:
cd /home/ubuntu/puppypi/src/puppy_extend_demo/scripts
(4) Start the program by running:
python3 mediapipe_pose_node.py
(5) To stop the program, press Ctrl + C in the terminal. If it doesn’t respond immediately, try pressing it again.
11.4.3 Program Outcome
Once the mode is activated, the robot will enter pose imitation standby mode.
(1) Stand in front of the robot’s camera.
The system will detect key points on your body and draw lines to represent limb connections.
(2) Trigger imitation mode:
When the robot detects both arms extended horizontally, it will emit a beep sound, indicating that it’s ready to enter imitation mode.
(3) Start imitation:
Extend your arms horizontally again, and the robot will begin its imitation movements. The robot’s front “arms” will move in sync with your gestures.
(4) Exit imitation mode:
Raise and cross both arms above your head. The robot will recognize this gesture and automatically exit imitation mode.
11.4.4 Program Analysis
The script for this section is located in the Docker container at:
/home/ubuntu/puppypi/src/puppy_extend_demo/scripts/mediapipe_pose_node.py
This program captures video from the robot’s camera and uses the MediaPipe library to perform real-time human pose detection.
If no body landmarks are detected in the current frame, the system continues to subscribe to the camera feed until valid body features are identified. Once detected, it analyzes the pose to determine the user’s movement.
When the system recognizes a specific gesture—such as raising the arms—the robot will automatically perform the corresponding action in response.
Human Pose Recognition
To perform human pose recognition, the program uses the mp.solutions.pose.Pose() function from the MediaPipe library to create a pose estimator, which identifies key body joint landmarks.
The function parameters are explained as follows:
153 154 155 156 157 158 159 160 161 | # Initialize MediaPipe Pose.(初始化 MediaPipe Pose) self.mp_pose = mp.solutions.pose self.pose = self.mp_pose.Pose( static_image_mode=False, model_complexity=1, smooth_landmarks=True, min_detection_confidence=0.5, min_tracking_confidence=0.5 ) |
① static_image_mode: Indicates whether the input is a static image. The default is False, meaning the input is treated as a video stream.
② model_complexity: Specifies the complexity level of the pose estimation model.
③ smooth_landmarks: Determines whether to smooth landmark coordinates over time for video streams. Typically set to True to reduce jitter.
④ min_tracking_confidence: Sets the minimum confidence threshold (between 0 and 1) for the model to consider pose tracking successful. If tracking fails, the model will fall back to detection in the next frame.
⑤ min_detection_confidence: Defines the minimum confidence threshold (between 0 and 1) for the initial pose detection to be considered successful.
Detecting Arm Poses
The detected body keypoints are passed to the is_T_pose function to determine the user’s current arm posture.
By analyzing the angles between the shoulders, elbows, and wrists, the system can recognize whether the user is performing a T-pose (arms extended horizontally) or a crossed-arm gesture, triggering corresponding actions based on the detected pose.
T-Pose Detection and Mode Activation
When a T-pose is detected (i.e., both arms stretched out horizontally), the robot enters Interactive Mode. In this mode, the servo motors are set to specific target angles to perform predefined actions.
The is_T_pose function determines whether the body is in a T-pose by calculating joint angles and comparing them against defined thresholds.
274 275 276 277 278 279 280 281 282 283 284 285 286 287 288 289 290 291 292 293 294 295 296 297 298 299 300 301 302 | def is_T_pose(self, pixel_landmarks): """Determine if it's a T-pose.(判断是否为 T 姿势)""" try: left_shoulder = pixel_landmarks[Landmark.LEFT_SHOULDER.value] right_shoulder = pixel_landmarks[Landmark.RIGHT_SHOULDER.value] left_elbow = pixel_landmarks[Landmark.LEFT_ELBOW.value] right_elbow = pixel_landmarks[Landmark.RIGHT_ELBOW.value] left_wrist = pixel_landmarks[Landmark.LEFT_WRIST.value] right_wrist = pixel_landmarks[Landmark.RIGHT_WRIST.value] except IndexError: rospy.logwarn("检测到的关键点数量不足以判断 T 姿势。") return False angle_threshold = 20 horizontal_threshold = 20 left_arm_angle = self.calculate_angle(left_shoulder, left_elbow, left_wrist) right_arm_angle = self.calculate_angle(right_shoulder, right_elbow, right_wrist) rospy.logdebug(f"左前臂角度: {left_arm_angle:.2f} 度") rospy.logdebug(f"右前臂角度: {right_arm_angle:.2f} 度") left_straight = abs(left_arm_angle - 180) < angle_threshold right_straight = abs(right_arm_angle - 180) < angle_threshold left_horizontal = self.is_horizontal(left_shoulder, left_wrist, horizontal_threshold) right_horizontal = self.is_horizontal(right_shoulder, right_wrist, horizontal_threshold) return left_straight and right_straight and left_horizontal and right_horizontal |
383 384 385 386 387 388 389 390 391 392 393 394 395 396 397 398 399 400 401 402 403 | @staticmethod def calculate_angle(a, b, c): """ Calculate the angle at point b, where points a, b, c have (x, y) coordinates.(计算点 b 处的夹角,点 a, b, c 坐标为 (x, y)) """ try: vector1 = (a[0] - b[0], a[1] - b[1]) vector2 = (c[0] - b[0], c[1] - b[1]) len1 = math.hypot(*vector1) len2 = math.hypot(*vector2) if len1 == 0 or len2 == 0: return 0.0 dot = vector1[0] * vector2[0] + vector1[1] * vector2[1] angle = math.acos(max(min(dot / (len1 * len2), 1.0), -1.0)) * (180.0 / math.pi) return angle except Exception as e: rospy.logwarn(f"计算角度时出错: {e}") return 0.0 |
Threshold Adjustment
287 288 | angle_threshold = 20 horizontal_threshold = 20 |
350 351 352 353 354 355 356 357 358 359 360 361 362 363 364 | elbow_angle_threshold = 50 elbows_bent = left_elbow_angle < elbow_angle_threshold and right_elbow_angle < elbow_angle_threshold rospy.logdebug(f"左肘弯曲角度: {left_elbow_angle:.2f} 度") rospy.logdebug(f"右肘弯曲角度: {right_elbow_angle:.2f} 度") if not elbows_bent: self.hands_crossed_history.append(False) return False hands_distance = abs(left_wrist[0] - right_wrist[0]) hands_distance_threshold = 100 # Pixels.(像素) rospy.logdebug(f"双手水平距离: {hands_distance} 像素") rospy.logdebug(f"双手水平距离阈值: {hands_distance_threshold} 像素") |
① angle_threshold (Angle Threshold): A higher value makes it easier to consider the arms as “straight”, while a lower value increases precision by requiring the arms to be closer to a 180-degree angle.
② horizontal_threshold (Horizontal Threshold): Increasing this value makes it more tolerant when identifying the wrists as horizontal; decreasing it demands a nearly perfect horizontal alignment for detection.
③ elbow_angle_threshold (Elbow Angle Threshold): A higher value allows elbows to be recognized as bent more easily, while a lower value requires a smaller angle to confirm the bend.
④ hands_distance_threshold (Hands Distance Threshold): Raising this value permits a greater distance between the hands to be classified as “crossed”, while lowering it requires the hands to be closer together for the same classification.
Keypoint Connections
506 507 508 | if results.pose_landmarks: self.mp_drawing.draw_landmarks(cv_image, results.pose_landmarks, self.mp_pose.POSE_CONNECTIONS) pixel_landmarks = self.convert_landmarks_to_pixels(cv_image, results.pose_landmarks.landmark) |
Human body keypoints are visualized using the draw_landmarks() function. For example, the following line of code:
self.mp_drawing.draw_landmarks(cv_image, results.pose_landmarks, self.mp_pose.POSE_CONNECTIONS)
includes the following parameters:
① cv_image: The image frame where the pose is detected.
② results.pose_landmarks: The set of detected human pose landmarks (keypoints).
③ self.mp_pose.POSE_CONNECTIONS: The connections between the landmarks, used to draw the skeletal structure of the body.
Motion Imitation
When motion imitation mode is activated, the system analyzes the angles of the arm joints based on the detected keypoints. These angles are then used to control the servos, allowing the robot’s arms to mimic the same posture.
572 573 574 575 576 577 578 579 580 581 582 583 584 585 586 587 588 589 590 591 592 593 594 | # Calculate left upper arm angle.(计算左上臂角度) left_shoulder_angle = self.calculate_shoulder_angle(left_shoulder, left_elbow, nose) self.filtered_angles['left_upper'] = self.apply_low_pass_filter('left_upper', left_shoulder_angle) self.servos['left_upper'].pid.update(left_shoulder_angle) pulse_left_upper = self.map_arm_angle_to_pulse(self.filtered_angles['left_upper'], self.servos['left_upper']) # Calculate right upper arm angle.(计算右上臂角度) right_shoulder_angle = self.calculate_shoulder_angle(right_shoulder, right_elbow, nose) self.filtered_angles['right_upper'] = self.apply_low_pass_filter('right_upper', right_shoulder_angle) self.servos['right_upper'].pid.update(right_shoulder_angle) pulse_right_upper = self.map_arm_angle_to_pulse(self.filtered_angles['right_upper'], self.servos['right_upper']) # Calculate left forearm angle.(计算左前臂角度) left_forearm_angle = self.calculate_angle(left_shoulder, left_elbow, left_wrist) self.filtered_angles['left_forearm'] = self.apply_low_pass_filter('left_forearm', left_forearm_angle) self.servos['left_forearm'].pid.update(left_forearm_angle) pulse_left_forearm = self.map_arm_angle_to_pulse(self.filtered_angles['left_forearm'], self.servos['left_forearm']) # Calculate right forearm angle.(计算右前臂角度) right_forearm_angle = self.calculate_angle(right_shoulder, right_elbow, right_wrist) self.filtered_angles['right_forearm'] = self.apply_low_pass_filter('right_forearm', right_forearm_angle) self.servos['right_forearm'].pid.update(right_forearm_angle) pulse_right_forearm = self.map_arm_angle_to_pulse(self.filtered_angles['right_forearm'], self.servos['right_forearm']) |
Exiting the Mode
To exit the motion imitation mode, simply cross both arms in front of the chest. This gesture will be recognized as the signal to stop the current mode.
610 611 | if self.is_hands_crossed_on_chest(pixel_landmarks): self.exit_play_mode() |