22. JetArm and Electrical Conveyor Belt Integration Course
22.1 Conveyor Belt Installation
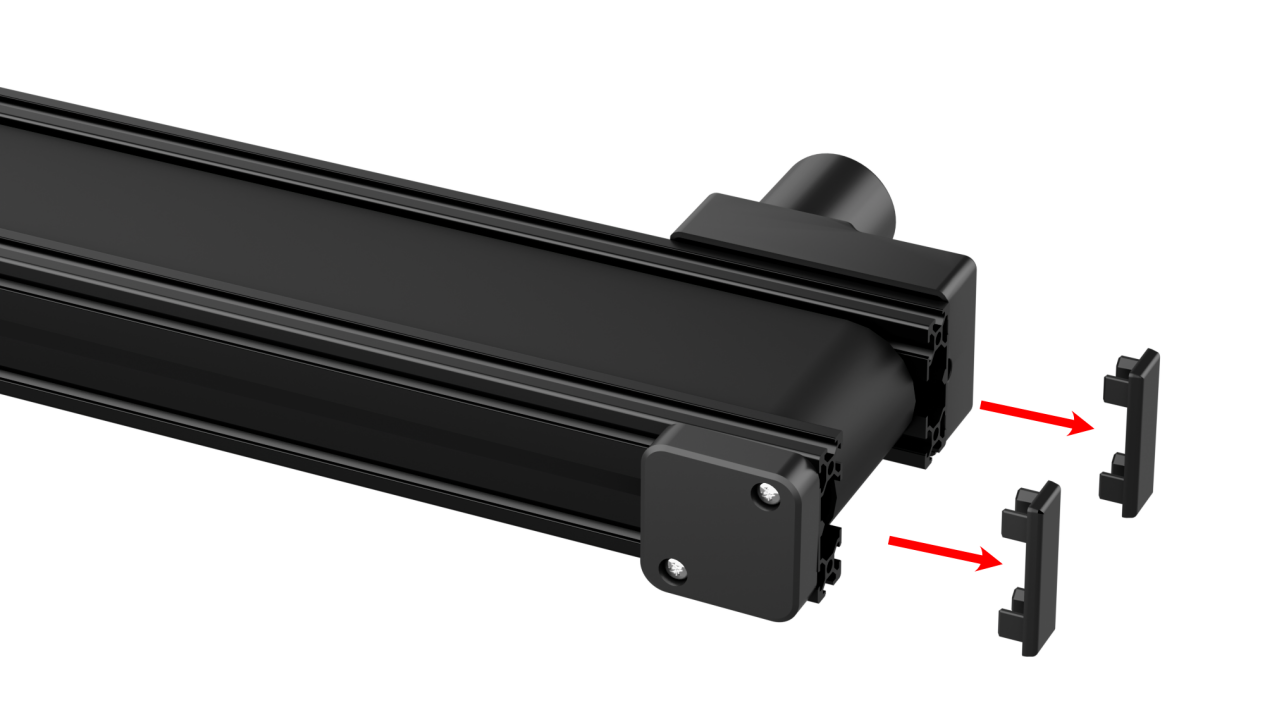
(1) Remove the plastic part near the motor end.
(2) Use M4*10 pan head screws and M4 nuts to secure the acrylic plate onto the conveyor belt, then reattach the plastic part.
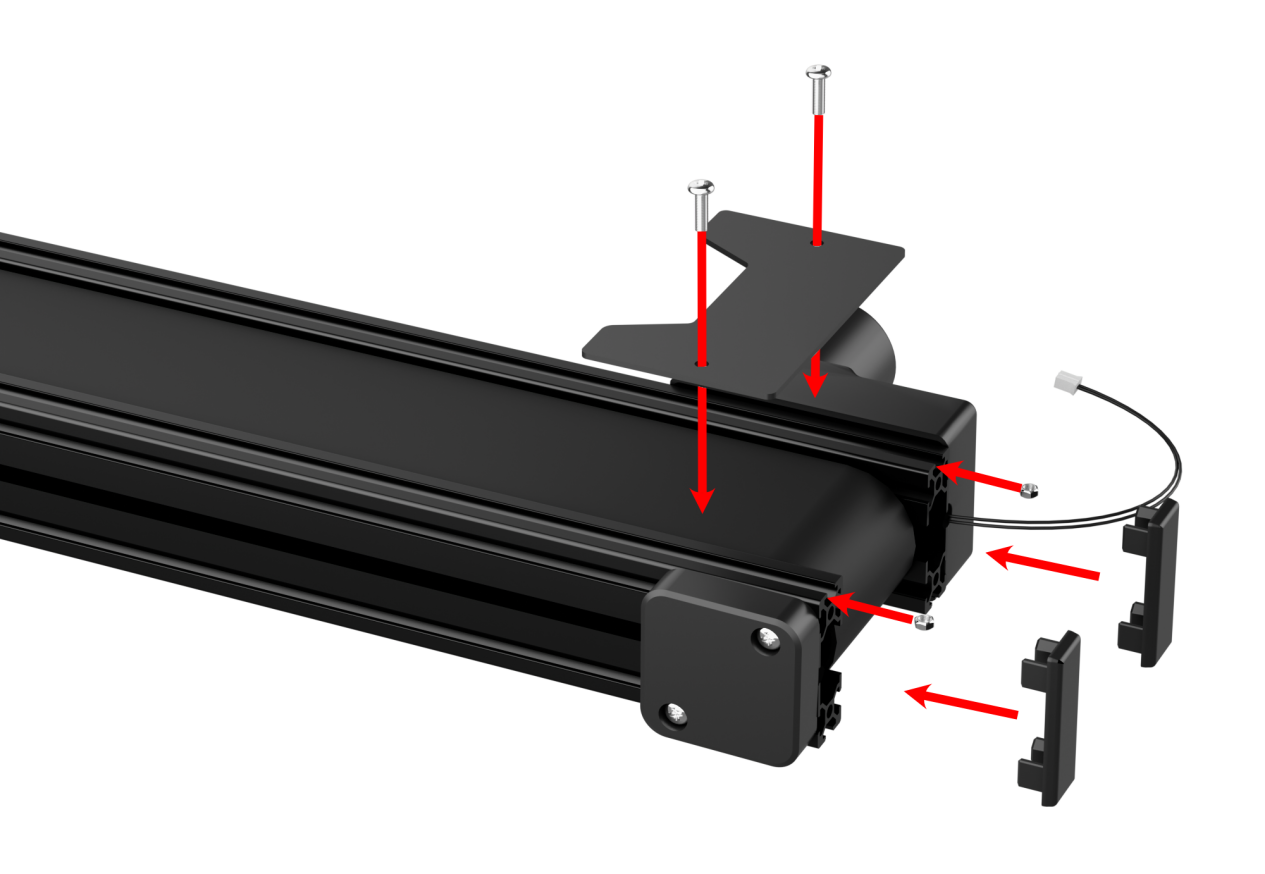
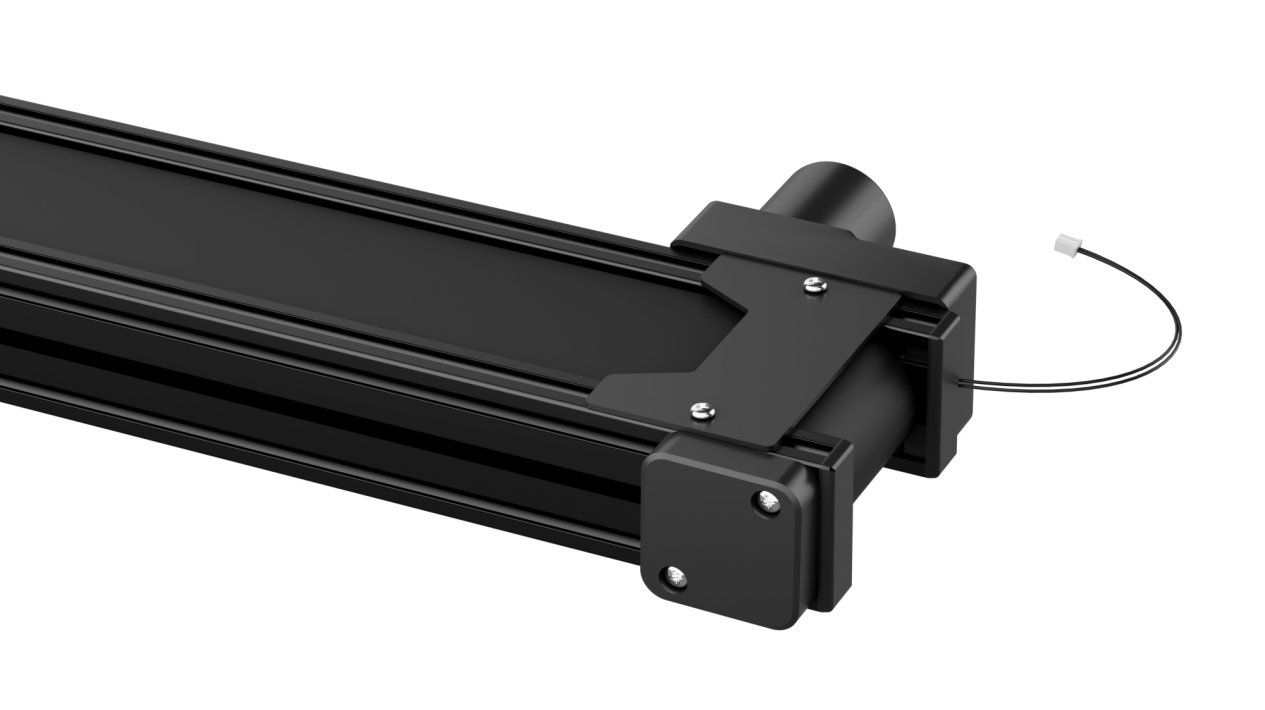
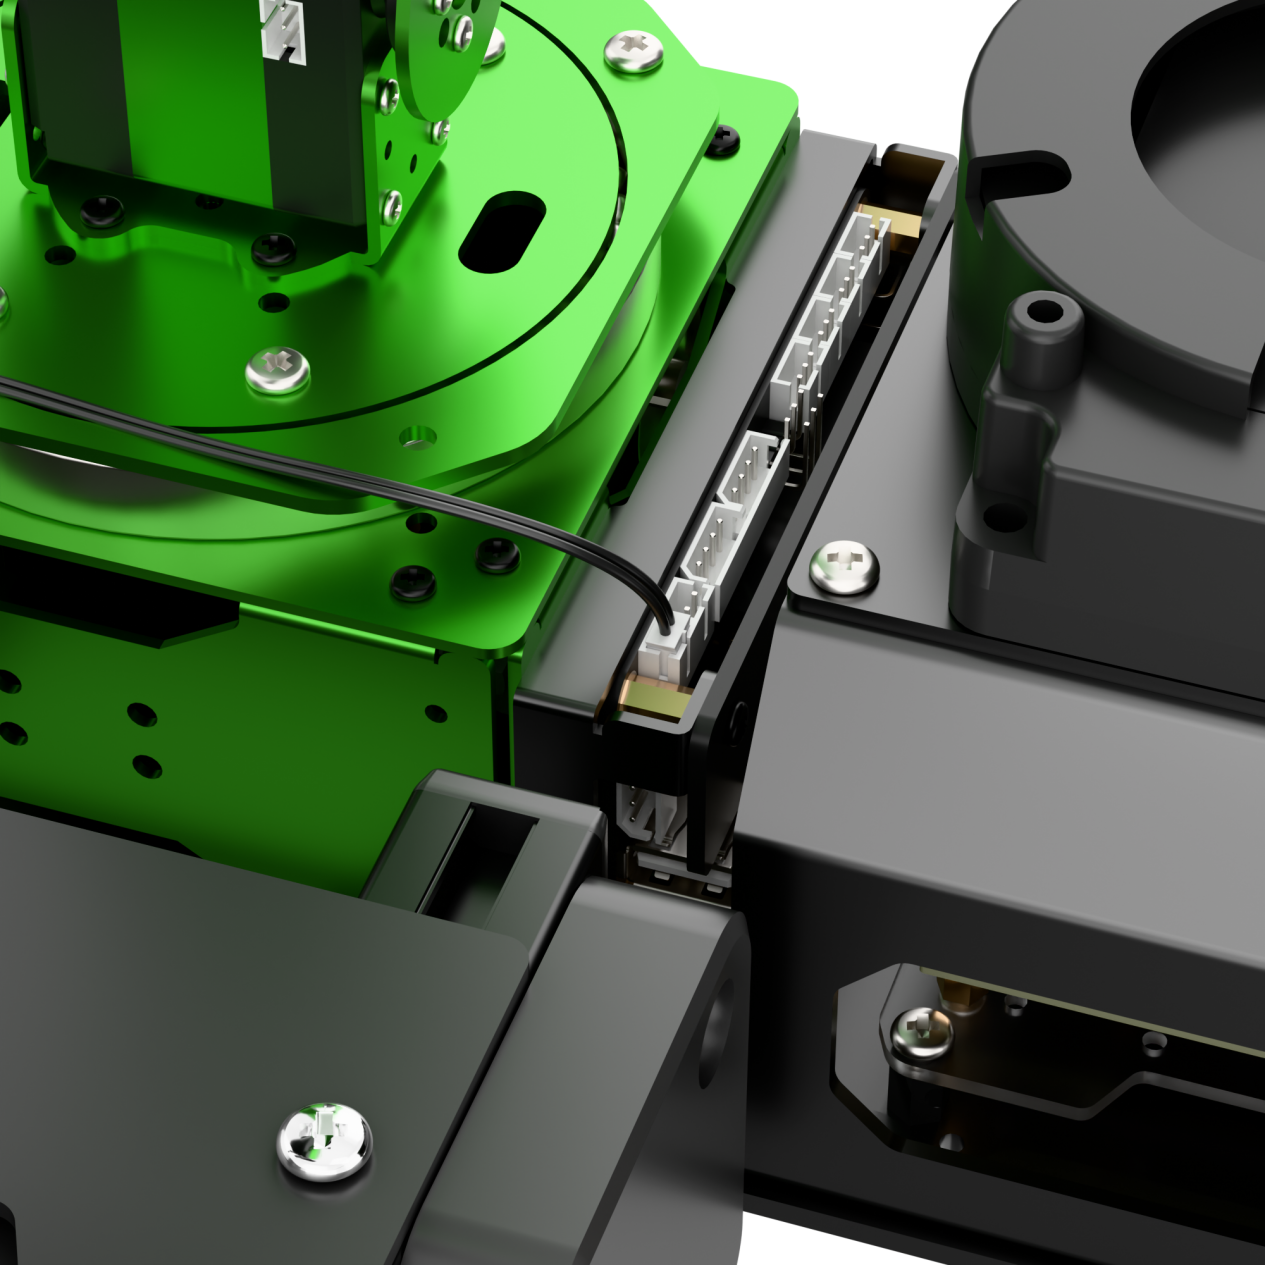
(3) Place the conveyor belt on the left side of the robotic arm, and connect the motor cable to Motor Port 1 on the STM32 controller.
22.2 Selecting the Robot Type
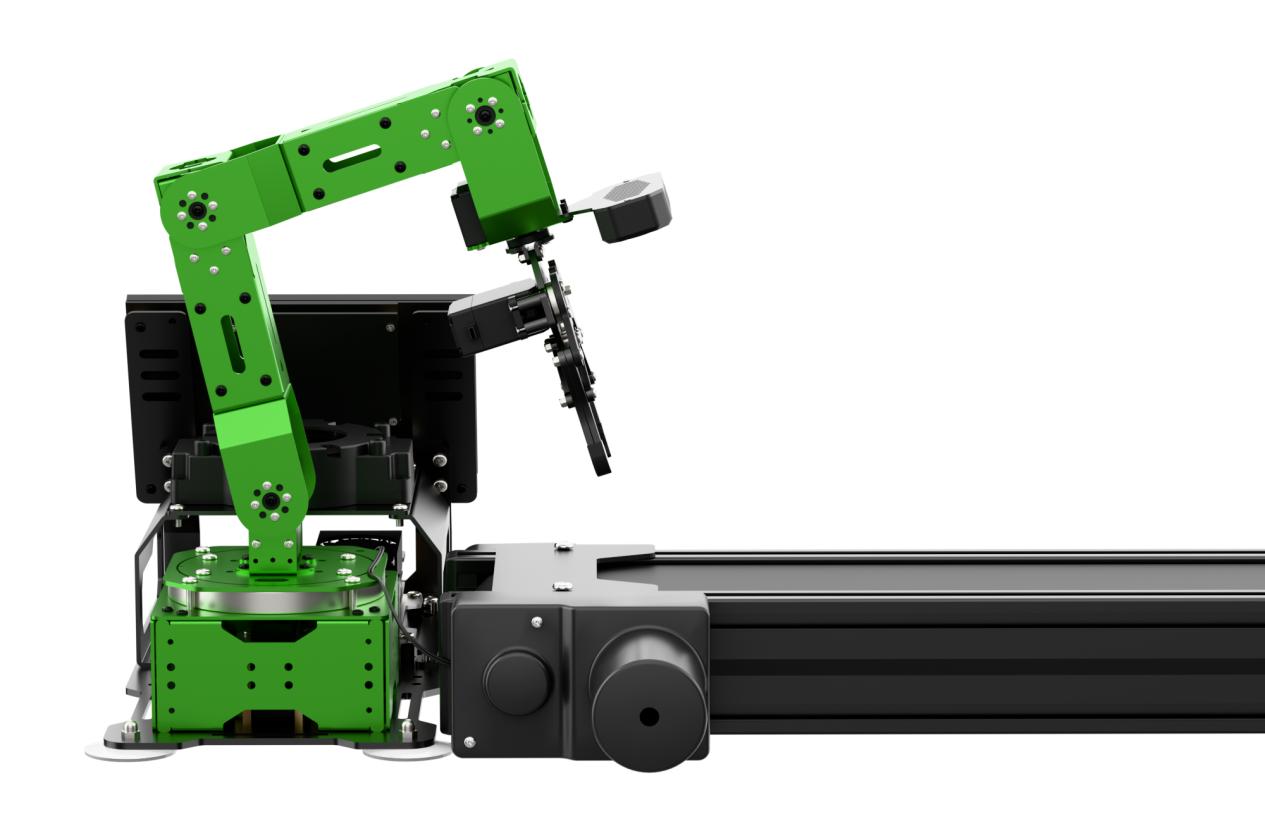
JetArm’s expansion accessories come in four types: tank chassis, Mecanum wheel chassis, sliding rail, and conveyor belt. After installation, you must switch the device version according to the installed accessory for proper operation.
Note
If you don’t switch or select the wrong version, the motor may run unpredictably, causing malfunctions or even damaging the device.
Step-by-step instructions:
(1) Power on the robotic arm and connect it to the remote control software NoMachine. For installation and connection of the remote desktop tool, see 1.6 Development Environment Setup and Configuration.
(2) Double-click the model configuration tool on the desktop.
(3) Select the appropriate options based on the robotic arm version, camera version, and accessory type:
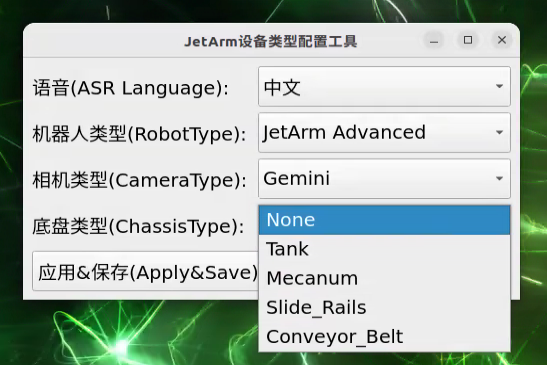
Tank refers to the tracked chassis. Mecanum refers to the mecanum wheel chassis. Slide_Rails refers to the slide rails. Conveyor_Belt refers to the conveyor belt.
(4) After making your selection, click “Apply & Save” to save the configuration.
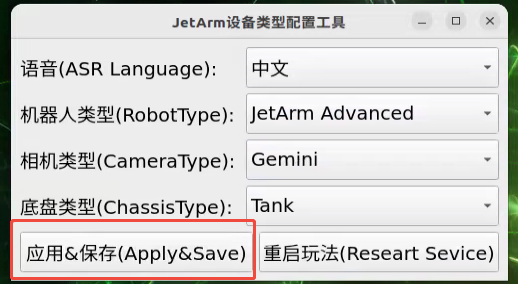
(5) Click “Restart” to reload the configuration.
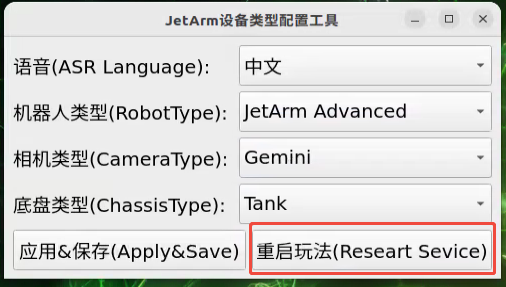
Wait for the buzzer to beep once—this indicates the restart is complete and the new configuration is now active.
22.3 Wireless Handle Control
22.3.1 Getting Started
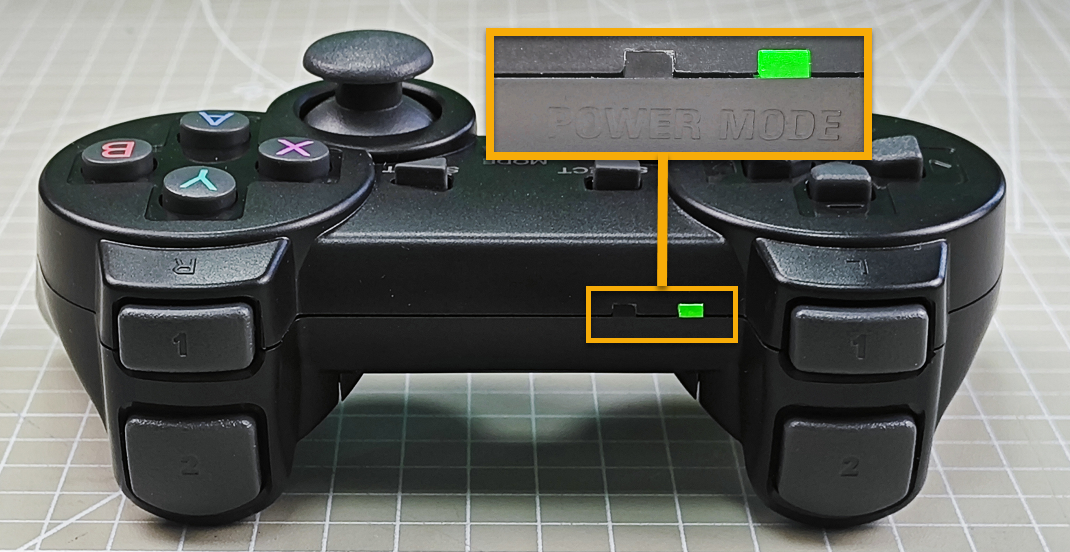
(1) Before powering on the device, make sure the wireless handle receiver is properly inserted. This can be ignored if the receiver was pre-inserted at the factory.
(2) Pay attention to battery polarity when placing the batteries.

(3) Each time the robot is powered on, the APP auto-start service will launch which includes the wireless handle control service. If this service has not been closed, no additional actions are needed—simply connect and control.
(4) Since wireless handle signals can interfere with each other, it is recommended not to use this function when multiple robots are in the same area, to avoid misconnection or unintended control.
(5) After turning on the wireless handle, if it does not connect to the robot within 30 seconds, or remains unused for 5 minutes after connection, it will enter sleep mode automatically. To wake up the wireless handle and exit sleep mode, press the “START” button.
22.3.2 Device Connection
(1) After the robot powers on, slide the wireless handle switch to the “ON” position. At this point, the red and green LED indicators on the wireless handle will start flashing simultaneously.
(2) Wait a few seconds for the robot and wireless handle to pair automatically. Once pairing is successful, the green LED will remain solid while the red LED turns off.
22.3.3 Control Modes
The wireless handle supports two control modes: Coordinate Mode and Single Servo Mode. After a successful connection, the default mode is Coordinate Mode.
Single Servo Mode: In this mode, the wireless handle buttons can be used to control the forward and reverse rotation of individual servos on the robotic arm.
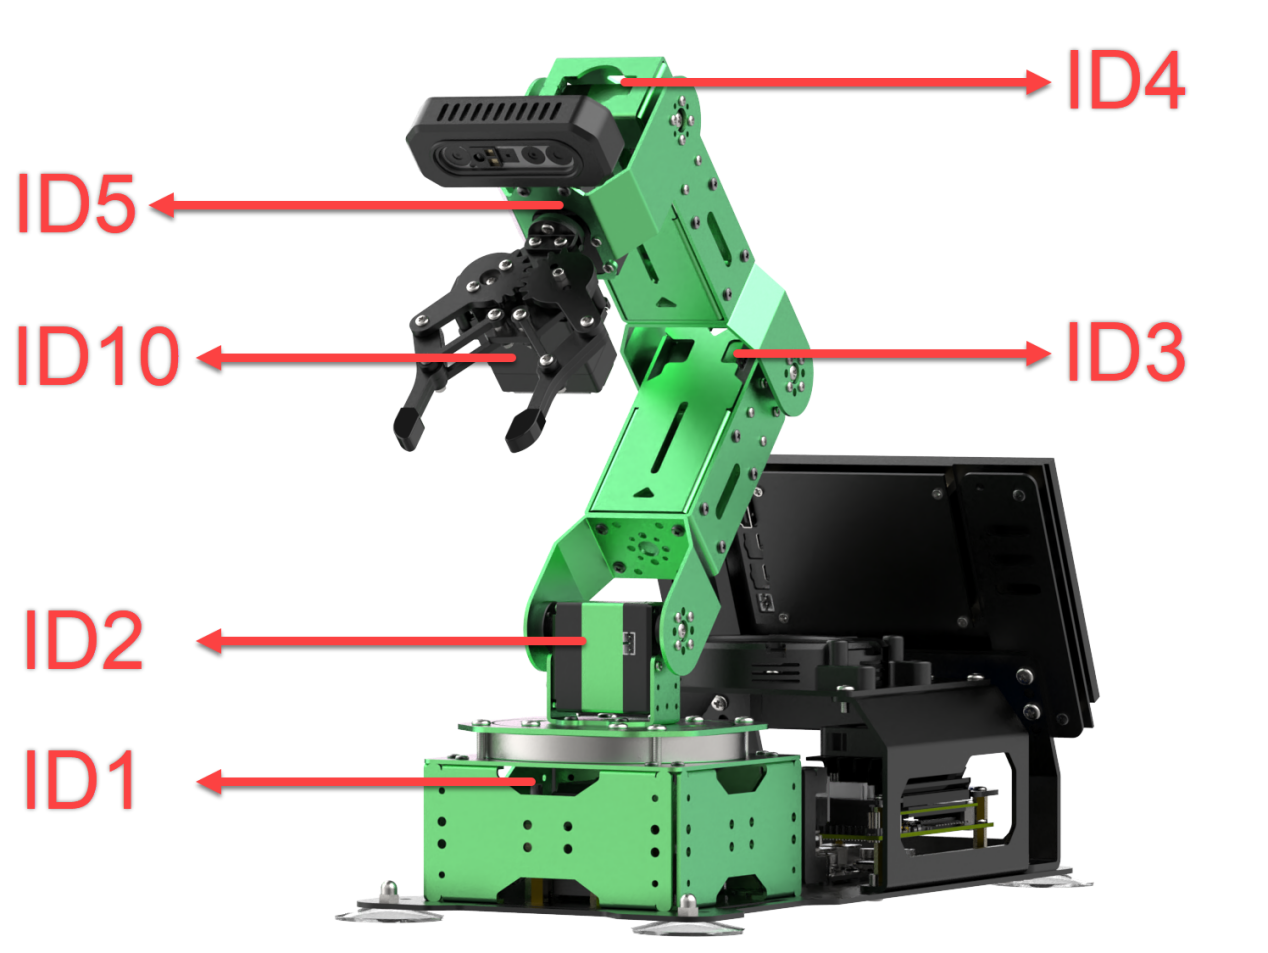
Button Functions in Single Servo Mode:
| Button | Function (from the robotic arm's first-person perspective) |
|---|---|
| START | Reset the robotic arm |
| SELECT+START | Switch control mode (Single Servo / Coordinate) |
| UP / ↑ | Raise Servo 2 |
| DOWN / ↓ | Lower Servo 2 |
| LEFT / ← | Rotate Servo 1 to the left |
| RIGHT / → | Rotate Servo 1 to the right |
| Y | Close the gripper (Servo 10) |
| A | Open the gripper (Servo 10) |
| B | Rotate Servo 5 to the right (Gripper turns right) |
| X | Rotate Servo 5 to the left (Gripper turns left) |
| L1 | Raise Servo 3 |
| L2 | Lower Servo 3 |
| R1 | Raise Servo 4 |
| R2 | Lower Servo 4 |
| Left Joystick Left | Conveyor belt moves left |
| Left Joystick Right | Conveyor belt moves right |
Coordinate Mode: In Coordinate Mode, the robotic arm moves as a whole along the X, Y, and Z axes and can also adjust its tilt angle based on button inputs.
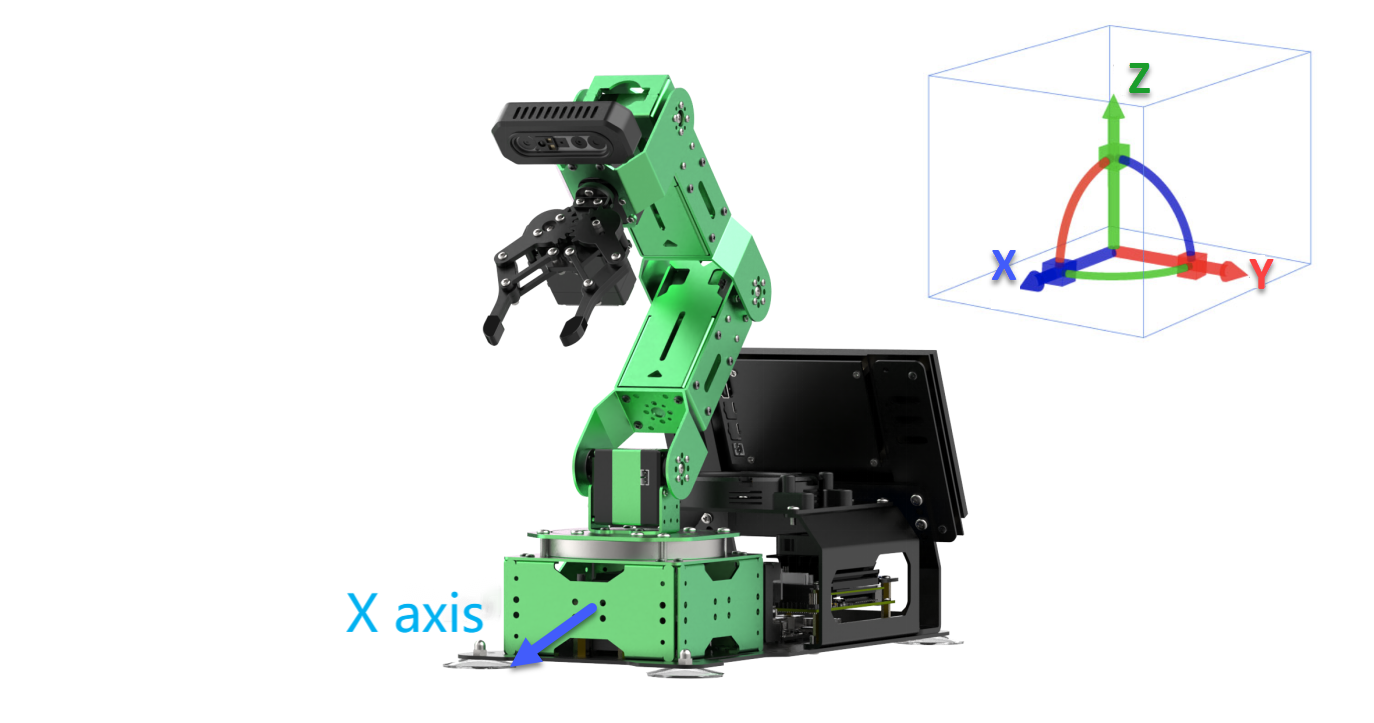
Button Functions in Coordinate Mode:
| Button | Function (from the robotic arm's first-person perspective) |
|---|---|
| START | Reset the robotic arm |
| SELECT+START | Switch control mode (Single Servo / Coordinate) |
| UP / ↑ | Move arm in the positive X direction (forward) |
| DOWN / ↓ | Move arm in the negative X direction (backward) |
| LEFT / ← | Move arm in the positive Y direction (left) |
| RIGHT / → | Move arm in the negative Y direction (right) |
| Y | Close the gripper (Servo 10) |
| A | Open the gripper (Servo 10) |
| B | Rotate Servo 5 to the right (Gripper turns right) |
| X | Rotate Servo 5 to the left (Gripper turns left) |
| L1 | Move arm upward along Z axis |
| L2 | Move arm downward along Z axis |
| R1 | Increase gripper pitch angle |
| R2 | Decrease gripper pitch angle |
| Left Joystick Left | Conveyor belt moves left |
| Left Joystick Right | Conveyor belt moves right |
Switching Between Modes: To switch between modes, press both SELECT and START buttons. A sound prompt indicates the switch was successful.
(1) Two beeps: Switched from Single Servo Mode to Coordinate Mode.
(2) Two beeps: Switched from Single Servo Mode to Coordinate Mode.
22.4 Color Sorting
22.4.1 Project Process
First, subscribe to the topic published by the color recognition node to obtain detected color information.
Choose the target color. Once the target color is detected, obtain the center position of the target object in the image.
Use the object’s center position to guide the robotic arm for gripping and placing the color block into the corresponding area.
22.4.2 Enabling the Feature
(1) Power on the robotic arm and connect it to the remote control software NoMachine. For installation and connection of the remote desktop tool, see 1.6 Development Environment Setup and Configuration.
(2) Click the terminal icon  in the system desktop to open a command-line window.
(3) Enter the following command and press Enter to stop the auto-start service:
sudo systemctl stop start_app_node.service
(4) Entering the following command to start the feature.
ros2 launch motor color_sorting.launch.py
(5) After the program starts successfully, click on the camera display window and press “a” to start sorting, then press “s” to stop sorting.
(6) To exit the feature, press “Ctrl+C” in the terminal. If the program does not close successfully, try pressing “Ctrl+C” again.
(7) If you want to experience the mobile app features again later, enter the command and press Enter to start the app service. Wait for the robotic arm to return to its initial position — a beep from the buzzer will indicate it’s ready.
sudo systemctl start start_app_node.service
22.4.3 Action Performed
After starting the program, place the color blocks within the robotic arm’s camera view. The returned image will highlight the recognized target color, and the robotic arm will sort the corresponding color blocks into their designated areas.
22.4.4 Launch File Analysis
The Launch files are located at:
/home/ubuntu/ros2_ws/src/motor/launch/color_sorting.launch.py
launch_setup()Function
10 11 12 13 14 15 16 17 18 19 20 21 22 23 24 25 26 27 28 29 30 31 32 33 34 35 36 37 38 39 | def launch_setup(context): compiled = os.environ['need_compile'] if compiled == 'True': sdk_package_path = get_package_share_directory('sdk') peripherals_package_path = get_package_share_directory('peripherals') else: sdk_package_path = '/home/ubuntu/ros2_ws/src/driver/sdk' peripherals_package_path = '/home/ubuntu/ros2_ws/src/peripherals' depth_camera_launch = IncludeLaunchDescription( PythonLaunchDescriptionSource( os.path.join(peripherals_package_path, 'launch/depth_camera.launch.py')), ) sdk_launch = IncludeLaunchDescription( PythonLaunchDescriptionSource( os.path.join(sdk_package_path, 'launch/jetarm_sdk.launch.py')), ) color_sorting_node = Node( package='motor', executable='color_sorting', output='screen', ) return [ sdk_launch, depth_camera_launch, color_sorting_node, ] |
The main purpose of this function is to configure and launch a set of ROS2 nodes and programs to enable the robot’s color block sorting functionality in a specific context. The function follows these steps:
(1) Retrieve Compilation Status:
11 12 13 | compiled = os.environ['need_compile'] if compiled == 'True': sdk_package_path = get_package_share_directory('sdk') |
The function first reads a flag from the environment variable need_compile to determine whether related packages need to be recompiled. If the value of this variable is ‘True’, it indicates that compilation is required.
(2) Set Paths:
15 16 17 | else: sdk_package_path = '/home/ubuntu/ros2_ws/src/driver/sdk' peripherals_package_path = '/home/ubuntu/ros2_ws/src/peripherals' |
If compilation is needed, the function uses get_package_share_directory to obtain the paths of the sdk and peripherals packages.
If compilation is not needed, it directly uses predefined paths such as /home/ubuntu/ros2_ws/src/driver/sdk, etc.
(3) Define Nodes and Launch Items:
19 20 21 22 23 24 25 26 27 28 29 30 31 32 33 | depth_camera_launch = IncludeLaunchDescription( PythonLaunchDescriptionSource( os.path.join(peripherals_package_path, 'launch/depth_camera.launch.py')), ) sdk_launch = IncludeLaunchDescription( PythonLaunchDescriptionSource( os.path.join(sdk_package_path, 'launch/jetarm_sdk.launch.py')), ) color_sorting_node = Node( package='motor', executable='color_sorting', output='screen', ) |
A GroupAction is created, which contains multiple IncludeLaunchDescription entries and a Node.
IncludeLaunchDescription is used to include other launch files:
It includes
jetarm_sdk.launch.pyto launch SDK-related nodes.A
Nodeis created to start the executable filecolor_sorting, which will output data to the screen.
(4) Return the Launch Item List:
35 36 37 38 39 | return [ sdk_launch, depth_camera_launch, color_sorting_node, ] |
Finally, the function returns a list containing object_tracking_node and passes it to the generate_launch_description function, enabling ROS2’s launch system to execute these configurations.
22.4.5 Python Source Code Analysis
The Launch files are located at:
/home/ubuntu/ros2_ws/src/motor/motor/color_sorting.py
(1) Import the necessary libraries
5 6 7 8 9 10 11 12 13 14 15 16 17 18 19 20 21 22 23 24 25 26 27 28 | import os import cv2 import yaml import time import math import queue import rclpy import signal import threading import numpy as np from rclpy.node import Node from sdk import common, fps from cv_bridge import CvBridge from interfaces.srv import SetStringBool from std_srvs.srv import Trigger, SetBool from sensor_msgs.msg import Image, CameraInfo from rclpy.executors import MultiThreadedExecutor from servo_controller_msgs.msg import ServosPosition from rclpy.callback_groups import ReentrantCallbackGroup from kinematics.kinematics_control import set_pose_target from kinematics_msgs.srv import GetRobotPose, SetRobotPose from servo_controller.bus_servo_control import set_servo_position from ros_robot_controller_msgs.msg import MotorsState, MotorState from servo_controller.action_group_controller import ActionGroupController |
① os: Provides functions for interacting with the operating system, such as path manipulation and accessing environment variables.
② cv2: OpenCV, a powerful library for image processing and computer vision tasks.
③ yaml: Used for parsing and generating YAML-formatted data, commonly used in configuration files.
④ time: Offers time-related functions such as delays and retrieving current timestamps.
⑤ math: Supplies basic mathematical operations, including trigonometric and other mathematical functions.
⑥ queue: Provides thread-safe queues, useful for passing data between threads in multithreaded environments.
⑦ rclpy: The ROS 2 Python client library, enabling node creation, topic publishing/subscribing, services, and more.
⑧ signal: Handles asynchronous signals such as interrupts, allowing graceful termination or custom signal handling.
⑨ threading: Enables the execution of code in multiple threads for concurrent operations.
⑩ numpy: A fundamental package for scientific computing, offering fast array manipulation and advanced mathematical operations.
⑪ rclpy.node.Node: The base class for ROS 2 nodes in Python, which is essential for building ROS 2 applications.
⑫ sdk: A custom SDK that provides interfaces to specific hardware components or functional modules.
⑬ cv_bridge: A bridge library between ROS and OpenCV, used to convert ROS image messages to OpenCV images and vice versa.
⑭ interfaces.srv.SetStringBool: A custom service interface designed to handle messages containing both a string and a boolean value.
⑮ std_srvs.srv.Trigger: A standard ROS 2 service used to trigger an action without requiring input parameters.
⑯ std_srvs.srv.SetBool: A standard ROS 2 service interface used to set or toggle a boolean state.
⑰ sensor_msgs.msg.Image: A standard sensor message type for transmitting image data.
⑱ sensor_msgs.msg.CameraInfo: A message type that provides intrinsic and extrinsic parameters of a camera, such as focal length and distortion coefficients.
⑲ rclpy.executors.MultiThreadedExecutor: An executor that allows multiple threads to handle callbacks concurrently, improving system responsiveness.
⑳ rclpy.callback_groups.ReentrantCallbackGroup: A callback group that supports reentrant callbacks, allowing concurrent execution within the same group.
㉑ kinematics.kinematics_control.set_pose_target: A custom function module used to set the robot’s target pose.
㉒ kinematics_msgs.srv.GetRobotPose: A service interface for retrieving the current pose of the robot.
㉓ kinematics_msgs.srv.SetRobotPose: A service interface for setting the desired target pose of the robot.
㉔ servo_controller.bus_servo_control.set_servo_position: A custom function used to control the position of servo motors.
㉕ ros_robot_controller_msgs.msg.MotorsState: A message type representing the overall state of multiple motors.
㉖ ros_robot_controller_msgs.msg.MotorState: A message type representing the state of a single motor.
㉗ servo_controller.action_group_controller.ActionGroupController: A custom action group controller designed to manage the execution of a group of actions in coordination.
(2) Specifying Target Positions
30 31 32 33 34 | PLACE_POSITION = { 'red': [0.15, -0.08, 0.01], 'green': [0.15, 0.0, 0.01], 'blue': [0.15, 0.08, 0.01], } |
This is a dictionary used to store target positions for different colors, such as red, green, and blue. This structure simplifies quickly locating the corresponding position based on color during the robot’s tasks. The coordinates for each color are represented in the robotic arm’s base coordinate system.
(3) ColorSortingNode Class __init__ Function: This code initializes a ROS2 node, sets up subscriptions and publications related to image processing, configures relevant parameters, and prepares service clients related to robotic kinematics. Using multithreading, the main logic can run concurrently, enabling coordinated operation between image processing and motion control.
① Initializing the ROS2 Node
39 40 | rclpy.init() super().__init__(name, allow_undeclared_parameters=True, automatically_declare_parameters_from_overrides=True) |
The ROS2 initialization function is called to prepare for node operation.
The super().__init__ calls the parent class constructor, passing the node name, allowing undeclared parameters, and enabling automatic parameter declaration from overrides.
② Initialization of Instance Variables
42 43 44 45 46 47 48 49 50 51 52 53 54 55 56 57 58 | self.running = True self.start_count = False self.lock = threading.RLock() self.image_queue = queue.Queue(maxsize=2) self.fps = fps.FPS() # frame rate counter 帧率统计器 self.bridge = CvBridge() # Used for the conversion between ROS Image messages and OpenCV images. 用于ROS Image消息与OpenCV图像之间的转换 self.center_imgpts = None self.offset = 0.005 # Adjustment of the clamping position deviation. 夹取位置偏差调节 self.pick_pitch = 80 self.count = 0 self.data = common.get_yaml_data("/home/ubuntu/ros2_ws/src/app/config/lab_config.yaml") self.lab_data = self.data['/**']['ros__parameters'] self.camera_type = os.environ['CAMERA_TYPE'] self.min_area = 500 self.max_area = 15000 self.target = None self.image_sub = None |
③ Initializing Controllers and Publishers
60 61 | self.motor_pub = self.create_publisher(MotorsState, '/ros_robot_controller/set_motor', 1) self.joints_pub = self.create_publisher(ServosPosition, '/servo_controller', 1) |
④ Subscribing to Image Topic
62 | self.image_sub = self.create_subscription(Image, '/depth_cam/rgb/image_raw', self.image_callback, 1) |
Subscribes to the ROS image topic /depth_cam/rgb/image_raw, with the callback function self.image_callback designated to handle incoming images.
⑤ Creating Service Clients
63 64 65 66 67 68 69 | timer_cb_group = ReentrantCallbackGroup() self.client = self.create_client(Trigger, '/controller_manager/init_finish', callback_group=timer_cb_group) self.client.wait_for_service() self.get_current_pose_client = self.create_client(GetRobotPose, '/kinematics/get_current_pose', callback_group=timer_cb_group) self.get_current_pose_client.wait_for_service() self.kinematics_client = self.create_client(SetRobotPose, '/kinematics/set_pose_target') self.kinematics_client.wait_for_service() |
get_current_pose_client: Used to get the robot’s current pose.kinematics_client: Used to set the robot’s target pose. The code waits for these services to become available.
⑥ Starting the Main Thread
70 71 | set_servo_position(self.joints_pub, 1.0, ((1, 850), (2, 630), (3, 90), (4, 85), (5, 480), (10, 200))) threading.Thread(target=self.main).start() |
Starts a new thread to run the self.main method, ensuring other parts of the program can run concurrently.
(4) set_motor Function: Used to set the motor’s rotational speed.
74 75 76 77 78 79 80 | def set_motor(self,id, rps): data = MotorState() data.id = id data.rps = rps msg = MotorsState() msg.data.append(data) self.motor_pub.publish(msg) |
① id: Identifier of the motor, used to distinguish between different motors.
② rps: Target rotational speed of the motor, in revolutions per second.
(5) send_request Function: Used to send asynchronous requests to ROS2 services and wait for their responses. This function simplifies interaction with ROS2 services, making service calls more intuitive and efficient.
82 83 84 85 86 | def send_request(self, client, msg): future = client.call_async(msg) while rclpy.ok(): if future.done() and future.result(): return future.result() |
① Sending Asynchronous Requests
Uses the call_async method of a service client (client) to send an asynchronous request (msg). This immediately returns a future object, which is used to track the status and result of the request.
② Waiting for Service Response
A while loop continuously checks if the ROS2 system is still running (
rclpy.ok()).It checks whether the future is completed (
future.done()) and has a valid result (future.result()).Once the request completes and a result is available, the method returns the result (
future.result()) and exits the loop.
(6) adaptive_threshold Function: Used to apply adaptive thresholding on a grayscale image. Adaptive thresholding is an image processing technique that effectively binarizes an image under uneven lighting conditions, improving the separation of foreground and background.
88 89 90 91 92 93 | def adaptive_threshold(self, gray_image): # The adaptive threshold is used for segmentation first to filter out the sides. 用自适应阈值先进行分割, 过滤掉侧面 # cv2.ADAPTIVE_THRESH_MEAN_C: The weight values of all pixel points in the neighborhood are consistent. 邻域所有像素点的权重值是一致的 # cv2.ADAPTIVE_THRESH_GAUSSIAN _C : It is related to the distance from each pixel point in the neighborhood to the center point, and the weight values of each point are obtained through the Gaussian equation. 与邻域各个像素点到中心点的距离有关,通过高斯方程得到各个点的权重值 binary = cv2.adaptiveThreshold(gray_image, 255, cv2.ADAPTIVE_THRESH_GAUSSIAN_C, cv2.THRESH_BINARY, 41, 7) return binary |
(7) canny_proc Function: Mainly used to perform edge detection on the input color image in BGR format for subsequent image segmentation.
95 96 97 98 99 | def canny_proc(self, bgr_image): # Edge extraction is used for further segmentation when two objects of the same color are placed close together, they can only be distinguished by the edge. 边缘提取,用来进一步分割(当两个相同颜色物体靠在一起时,只能靠边缘去区分) mask = cv2.Canny(bgr_image, 9, 41, 9, L2gradient=True) mask = 255 - cv2.dilate(mask, cv2.getStructuringElement(cv2.MORPH_RECT, (11, 11))) # Thicken the boundary and reverse the black and white. 加粗边界,黑白反转 return mask |
① Edge Detection — Canny Algorithm
cv2.Canny: The Canny edge detection function in OpenCV, used to detect edges within an image.
② Parameter Explanation
bgr_image: The input image in BGR color format.9: Low threshold (threshold1), used for edge linking during edge detection. Typically set to about one-half to one-third of the high threshold.41: High threshold (threshold2), gradient values above this threshold are classified as edges.9: Aperture size of the Sobel operator (apertureSize), used for calculating the image gradient. Here it is set to 9, but usually odd values like 3, 5, or 7 are used.L2gradient=True: Uses a more precise gradient calculation method, Euclidean distance, improving the accuracy of edge detection.
③ Output
mask is a binary image where edges are represented by 255 (white) and non-edges by 0 (black).
(8) get_top_surface Function: Mainly used to process the input RGB image to extract the top surface of the object. It applies a series of image processing techniques such as color space conversion, filtering, thresholding, and edge detection to generate a mask image containing only the target region.
101 102 103 104 105 106 107 108 109 110 111 112 | def get_top_surface(self, rgb_image): # In order to extract only the topmost surface of the object. 为了只提取物体最上层表面 # Convert the image to the HSV color space. 将图像转换到HSV颜色空间 image_scale = cv2.convertScaleAbs(rgb_image, alpha=2.5, beta=0) image_gray = cv2.cvtColor(image_scale, cv2.COLOR_RGB2GRAY) image_mb = cv2.medianBlur(image_gray, 3) # Median filtering 中值滤波 image_gs = cv2.GaussianBlur(image_mb, (5, 5), 5) # Gaussian blur denoising 高斯模糊去噪 binary = self.adaptive_threshold(image_gs) # Threshold adaptation 阈值自适应 mask = self.canny_proc(image_gs) # Edge detection 边缘检测 mask1 = cv2.bitwise_and(binary, mask) # Merge the two extracted images and retain their common parts. 合并两个提取出来的图像,保留他们共有的地方 roi_image_mask = cv2.bitwise_and(rgb_image, rgb_image, mask=mask1) # Mask the original image to retain the areas that need to be identified. 和原图做遮罩,保留需要识别的区域 return roi_image_mask |
① Image Scaling
Performs linear transformation on the input RGB image to increase its contrast and brightness.
alpha = 2.5: Scaling factor used to control the contrast. The larger the value, the higher the contrast.beta = 0: Offset used to control brightness. Here it is set to 0, meaning no brightness adjustment is performed.
② Convert to Grayscale
The RGB image is converted to a grayscale image to simplify the data and reduce computational complexity, preparing it for subsequent filtering and edge detection.
③ Median Filtering
Median filtering is applied to remove salt-and-pepper noise in the image.
3: The kernel size, i.e., a 3x3 neighborhood.
④ Gaussian Blur for Noise Reduction
A Gaussian blur is applied to further smooth the image and remove high-frequency noise.
(5, 5): The size of the Gaussian kernel, i.e., a 5x5 neighborhood.5: The standard deviation of the Gaussian kernel, controlling the amount of blur.
⑤ Adaptive Thresholding
Adaptive thresholding is applied to the Gaussian-blurred grayscale image to binarize it.
⑥ Edge Detection
Apply Canny edge detection on the grayscale image after Gaussian blur to extract edges.
⑦ Dilation Operation
Use an 11x11 rectangular structuring element to dilate the edges, effectively thickening them.
⑧ Black-White Inversion
Perform an inversion of the mask by 255 - mask to convert white edges to black and background to white.
⑨ Combining Binary Image and Edge Mask
Perform a bitwise AND operation between the adaptive threshold binary image and the edge mask. This retains only the common regions between the two images, enhancing the accuracy of the target area and reducing false positives.
⑩ Return Result
Return the processed mask image which contains only the top surface of the object.
(9) image_callback Function: This function processes the image messages received from the camera topic and stores the processed images in a queue for further use.
114 115 116 117 118 119 120 121 122 | def image_callback(self, ros_image): # Convert ros format images to opencv format. 将ros格式图像转换为opencv格式 cv_image = self.bridge.imgmsg_to_cv2(ros_image, "rgb8") rgb_image = np.array(cv_image, dtype=np.uint8) if self.image_queue.full(): # # If the queue is full, discard the oldest image. 如果队列已满,丢弃最旧的图像 self.image_queue.get() # # Put the image into the queue. 将图像放入队列 self.image_queue.put(rgb_image) |
① Receiving ROS Image Messages
The
image_callbackmethod is automatically triggered when a new image message arrives on the/depth_cam/rgb/image_rawtopic.The
ros_imageparameter is the image message received from the ROS topic/depth_cam/rgb/image_raw, and it is usually of the typesensor_msgs.msg.Image.
② Converting ROS Image to OpenCV Format
self.bridge.imgmsg_to_cv2(ros_image, "rgb8"):Using the
CvBridgeinstance (self.bridge) to convert the ROS image message into an OpenCV format image (cv_image).“rgb8” specifies the image encoding format as RGB with 8-bit depth. This ensures that during conversion, the color space and bit depth of the image match the expected format.
rgb_image = np.array(cv_image, dtype=np.uint8):Converts the OpenCV image (
cv_image) into a NumPy array (rgb_image), specifying the data type asuint8(unsigned 8-bit integer), which is the standard data type used by OpenCV for image processing.
③ Managing the image queue
self.image_queue.full()checks whether the image queue has reached its maximum capacity (here,maxsize=2).If the queue is full, it means at least two images are waiting to be processed.
④ Discard the oldest image
self.image_queue.get() removes the earliest image from the queue.
⑤ Add the new image
self.image_queue.put(rgb_image) puts the newly received image (rgb_image) at the end of the queue, waiting for further processing.
(10) image_processing Function: This function retrieves one RGB image frame from the image queue, performs color segmentation and contour detection, identifies red, green, and blue targets in the image, and annotates the detected target positions, indices, and angle information on the resulting image.
124 125 126 127 128 | def image_processing(self): rgb_image = self.image_queue.get() result_image = np.copy(rgb_image) target_list = [] index = 0 |
① Get and copy the image
self.image_queue.get()retrieves one RGB image from the queue for processing.result_image = np.copy(rgb_image)creates a copy of the image for drawing the detected targets, preserving the original image.
② Initialize target list and index
target_list: Used to store the detected target information, where each target contains color, index number, center coordinates, and angle.index: Records the target’s sequence number, starting from 0 and incrementing.
③ Determine whether to start counting
129 | if self.start_count : |
self.start_count: A boolean variable controlling whether to begin image processing and target detection. If set to True, subsequent image processing steps are executed.
④ Get image dimensions
130 | img_h, img_w = rgb_image.shape[:2] |
img_h and img_w: Retrieve the height and width of the image, respectively.
⑤ Get top surface and convert color space
132 133 | rgb_image = self.get_top_surface(rgb_image) image_lab = cv2.cvtColor(rgb_image, cv2.COLOR_RGB2LAB) # Convert to LAB space. 转换到 LAB 空间 |
self.get_top_surface(rgb_image): Calls a custom method to extract the top surface of the image.cv2.cvtColor(rgb_image, cv2.COLOR_RGB2LAB): Converts the RGB image to LAB color space, which facilitates more accurate color segmentation because LAB better aligns with human visual perception.
⑥ Iterate over target colors for processing, including red, green, and blue
134 | for i in ['red', 'green', 'blue']: |
Loop through the color list: Perform color segmentation and target detection for each color.
⑦ Color segmentation and binarization
136 | mask = cv2.inRange(image_lab, tuple(self.lab_data['color_range_list'][i]['min']), tuple(self.lab_data['color_range_list'][i]['max'])) # 二值化 |
cv2.inRange: Binarizes the image based on a predefined color range, generating a binary mask where the target color regions are white (255), and all other areas are black (0).self.lab_data['color_range_list'][i]['min']andmax: Retrieve the minimum and maximum LAB values for the current color from the configuration. These values are used to define the color range for segmentation.
⑧ Morphological processing to smooth edges, remove small regions, and merge nearby blobs
138 139 | eroded = cv2.erode(mask, cv2.getStructuringElement(cv2.MORPH_RECT, (3, 3))) dilated = cv2.dilate(eroded, cv2.getStructuringElement(cv2.MORPH_RECT, (3, 3))) |
cv2.erode: Performs erosion to remove noise and small isolated regions in the binary mask.cv2.dilate: Performs dilation to restore the shape of the target area and further eliminate noise. The combination of erosion followed by dilation is known as opening, which helps smooth the edges and remove small artifacts.
⑨ Contour detection
141 | contours = cv2.findContours(dilated, cv2.RETR_EXTERNAL, cv2.CHAIN_APPROX_NONE)[-2] # Find all contours. 找出所有轮廓 |
cv2.findContours: Finds contours in the binary image.cv2.RETR_EXTERNAL: Retrieves only the outermost contours, ignoring nested or internal contours.cv2.CHAIN_APPROX_NONE: Stores all contour points without compression.[-2]: Used to adapt to different OpenCV versions and ensure the correct extraction of the contour list.
⑩ Contour filtering and area calculation
142 143 | contours_area = map(lambda c: (math.fabs(cv2.contourArea(c)), c), contours) # Calculate contour area. 计算轮廓面积 contours = map(lambda a_c: a_c[1], filter(lambda a: self.min_area <= a[0] <= self.max_area, contours_area)) |
Contour area calculation: Use
cv2.contourAreato compute the area of each contour. The absolute value is taken to ensure the result is positive.Contour filtering: Only retain contours whose area falls within the specified range between
self.min_areaandself.max_area. This helps eliminate noise from overly small or large regions.
⑪ Processing each valid contour
144 145 146 147 148 149 150 151 152 153 154 | for c in contours: area = math.fabs(cv2.contourArea(c)) rect = cv2.minAreaRect(c) # Obtain the minimum bounding rectangle. 获取最小外接矩形 (center_x, center_y), _ = cv2.minEnclosingCircle(c) center_x, center_y = center_x, center_y cv2.circle(result_image, (int(center_x), int(center_y)), 8, (0, 0, 0), -1) corners = list(map(lambda p: (p[0], p[1]), cv2.boxPoints(rect))) # Obtain the four corner points of the smallest circumscribed rectangle and convert them back to the coordinates of the original graph. 获取最小外接矩形的四个角点, 转换回原始图的坐标 cv2.drawContours(result_image, [np.intp(corners)], -1, (0, 255, 255), 2, cv2.LINE_AA) # Draw the rectangular outline. 绘制矩形轮廓 index += 1 # Serial number increment. 序号递增 angle = int(round(rect[2])) # Rectangular Angle 矩形角度 target_list.append([i, index, (center_x, center_y), angle]) |
Contour area calculation: The contour area is computed again. This could be optimized by reusing the previously calculated area.
Get the minimum bounding rectangle: Use
cv2.minAreaRectto obtain the smallest bounding rectangle of the contour. It returns the center point, width and height, and the rotation angle of the rectangle.Get the minimum enclosing circle: Use
cv2.minEnclosingCircleto find the smallest circle that completely encloses the contour. This is mainly used to determine the center position of the object.Draw center point: Draw a solid black circle on
result_imageto mark the center of the detected object.Get and draw rectangle corners: Use
cv2.boxPointsto obtain the four corner points of the minimum bounding rectangle, and draw the yellow rectangle contour onresult_image.Update index and angle: Increment the object index and round the rectangle’s rotation angle to the nearest integer.
Add target info to list: Add the current target’s color, index, center coordinates, and rotation angle to the
target_list.
⑫ Return target list and result image
157 | return target_list, result_image |
target_list: Contains all detected target information. Each target is represented as a list that includes its color, index, center coordinates, and angle.result_image: An image where all detected targets are annotated with their position and contours, making it easier for visual verification and further processing.
(11) move Function: Used to control the motion of the robotic arm. This function determines the X-axis position of the robotic arm based on the provided center_y value, and then performs a series of steps to pick up and place the object.
159 160 | def move(self, center_y): if self.running: |
① Check if running
The function first checks self.running. If it is True, the movement and object manipulation actions proceed.
② Calculate Target Position
161 162 163 | y = ((center_y - 235) / (335 -235)) * (0.11 - 0.16) + 0.16 # Determine the distance of the color block on the X-axis of the robotic arm based on the center point of the recognized contour. 根据识别轮廓的中心点确定色块在机械臂X轴上的距离 y = y + self.offset position = [0, y, 0.08] |
The target position on the X-axis is calculated based on the given center_y value. The calculation uses a linear interpolation formula with fixed constants (235 and 335), along with an offset defined by self.offset.
③ Perform Grasping Operation
165 166 167 168 169 170 171 172 173 174 175 176 177 178 179 180 181 182 183 184 185 186 | if self.running: position[2] += 0.02 msg = set_pose_target(position, self.pick_pitch, [-180.0, 180.0], 1.0) res = self.send_request(self.kinematics_client, msg) servo_data = res.pulse set_servo_position(self.joints_pub, 1.0, ((1, servo_data[0]), )) time.sleep(1) set_servo_position(self.joints_pub, 1.0, ((2, servo_data[1]), (3, servo_data[2]), (4, servo_data[3]))) time.sleep(1) if self.running: position[2] -= 0.03 msg = set_pose_target(position, self.pick_pitch, [-90.0, 90.0], 1.0) res = self.send_request(self.kinematics_client, msg) servo_data = res.pulse set_servo_position(self.joints_pub, 1.0, ((1, servo_data[0]), (2, servo_data[1]), (3, servo_data[2]), (4, servo_data[3]))) time.sleep(1) set_servo_position(self.joints_pub, 1.0, ((10, 600),)) time.sleep(1) |
The robotic arm moves above the target by gradually adjusting the Z value in the position array.
After each adjustment, a pose-setting message,
set_pose_target, is sent using theself.send_requestfunction to thekinematicsclient.The received servo data is used to set the servo positions, and
time.sleepis used to pause the system, ensuring the motion is completed properly.
④ Place the Object
188 189 190 191 192 193 194 195 196 197 198 199 200 201 202 203 204 205 206 207 208 209 210 211 212 213 214 215 216 217 218 219 220 221 222 223 | if self.running: position[2] += 0.04 msg = set_pose_target(position, self.pick_pitch, [-180.0, 180.0], 1.0) res = self.send_request(self.kinematics_client, msg) servo_data = res.pulse set_servo_position(self.joints_pub, 1.0, ((2, servo_data[1]), (3, servo_data[2]), (4, servo_data[3]))) time.sleep(1) set_servo_position(self.joints_pub, 1.0, ((1, 850), (2, 630), (3, 90), (4, 85), (5, 480))) time.sleep(1) position = PLACE_POSITION[self.target[0]] # Obtain the placement position. 获取放置位置 if self.running: position[2] += 0.03 msg = set_pose_target(position, self.pick_pitch, [-90.0, 90.0], 1.0) res = self.send_request(self.kinematics_client, msg) servo_data = res.pulse set_servo_position(self.joints_pub, 2.0, ((1, servo_data[0]),)) time.sleep(2) set_servo_position(self.joints_pub, 1.0, ((2, servo_data[1]), (3, servo_data[2]), (4, servo_data[3]))) time.sleep(1) if self.running: position[2] -= 0.03 msg = set_pose_target(position, self.pick_pitch, [-90.0, 90.0], 1.0) res = self.send_request(self.kinematics_client, msg) servo_data = res.pulse self.get_logger().info('\033[1;32m%s\033[0m' %servo_data) set_servo_position(self.joints_pub, 1.0, ((1, servo_data[0]), (2, servo_data[1]), (3, servo_data[2]), (4, servo_data[3]))) time.sleep(1) set_servo_position(self.joints_pub, 1.0, ((10, 200),)) time.sleep(1) |
A new target position is set to move the object to a predefined drop-off location. This process is similar to grasping—adjusting the pose and sending the request message.
⑤ End Operation
234 235 236 237 238 239 240 | if not self.running: set_servo_position(self.joints_pub, 1.0, ((2, 630), (3, 90), (4, 85), (5, 480), (10, 200))) time.sleep(1) set_servo_position(self.joints_pub, 2.0, ((1, 850),)) time.sleep(2) self.target = None |
If self.running is False, the servo positions are set to return the robotic arm to a safe position before the function ends.
(12) main Function: Main Loop Function used to control the motion of the robotic arm. This function determines the X-axis position of the robotic arm based on the provided center_y value, and then performs a series of steps to pick up and place the object.
242 243 | def main(self): while True: |
① Retrieve Target List and Image Result
245 246 | target_list, result_image = self.image_processing() if target_list and self.running: |
In each loop, the function calls self.image_processing() to attempt image processing. It returns a list of detected target objects (target_list) and the processed image (result_image).
② Target Tracking and Counting
246 247 248 249 250 251 252 253 254 255 256 257 258 259 | if target_list and self.running: if self.target is not None : if self.target[0] == target_list[0][0]: self.count += 1 else: self.target = target_list[0] self.count = 0 else : self.target = target_list[0] if self.count > 65: self.count = 0 self.start_count = False threading.Thread(target=self.move,args=(target_list[0][2][0],), daemon=True).start() |
If
target_listis not empty and the system is running (self.runningis True), the program checks whether a target (self.target) is already being tracked.If the current target is the same as the previous one, the counter
self.countis incremented.If the target differs, the tracked target is updated, and the counter is reset.
Once the counter exceeds 65, the system resets the counter and
start_count, then starts a new thread to callself.move()with the target’s Y-coordinate to begin robotic arm movement.
③ Image Display and User Input
261 262 263 264 265 266 267 268 269 270 271 272 273 274 | if result_image is not None : self.fps.update() result_image = cv2.cvtColor(result_image, cv2.COLOR_BGR2RGB) cv2.imshow('result_image', result_image) key = cv2.waitKey(1) if key != -1: if key == 97: #A self.running = True self.start_count = True self.set_motor(1, -100.0) if key == 115: # S self.running = False self.count = 0 self.set_motor(1, 0.0) |
If
result_imageis not None, the frame rate is updated, and the image is converted to RGB format using OpenCV and displayed in a window.The system also checks for the key pressed by user. If the user presses the ‘a’ key, the system will start processing. If the ‘s’ key is pressed, the system will stop running, reset the counter, and halt the robotic arm’s movement.
(13) Main Function: Program Entry Point
277 278 279 280 281 282 283 | def main(): node = ColorSortingNode('color_sorting') executor = MultiThreadedExecutor() executor.add_node(node) executor.spin() node.destroy_node() rclpy.shutdown() |
① Creates a ColorSortingNode instance
② Sets up MultiThreadedExecutor for concurrent processing
③ Adds the node to the executor
④ Starts the executor to process callbacks
⑤ Cleans up resources when shutting down
22.4.6 Adjusting the Gripping Offset
Due to slight variations between different JetArm robotic arms, the gripping position may be inaccurate. If there is a deviation in the gripping position, you can correct it by modifying the offset value in the source code file. The location of the Python source file can be found in the Program Analysis section of the corresponding tutorial.
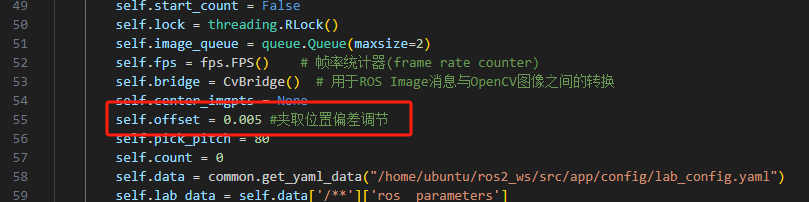
Increasing the offset value allows the arm to grip farther. Decreasing the value brings the grip position closer.