9. MediaPipe Human-robot Interaction
9.1 MediaPipe Introduction
9.1.1 MediaPipe Description
MediaPipe is an open-source framework of multi-media machine learning models. Cross-platform MediaPipe can run on mobile devices, workspace and servers, as well as support mobile GPU acceleration. It is also compatible with TensorFlow and TF Lite Inference Engine, and all kinds of TensorFlow and TF Lite models can be applied on it. Besides, MediaPipe supports GPU acceleration of mobile and embedded platform.

9.1.2 MediaPipe Pros and Cons
MediaPipe Pros
(1) MediaPipe supports various platforms and languages, including iOS, Android, C++, Python, JAVAScript, Coral, etc.
(2) Swift running. Models can run in real-time.
(3) Models and codes are with high reuse rate.
MediaPipe Cons
(1) For mobile devices, MediaPipe will occupy 10M or above.
(2) As it greatly depends on Tensorflow, you need to alter large amount of codes if you want to change it to other machine learning frameworks, which is not friendly to machine learning developer.
(3) It adopts static image which can improve efficiency, but make it difficult to find out the errors.
9.1.3 How to use MediaPipe
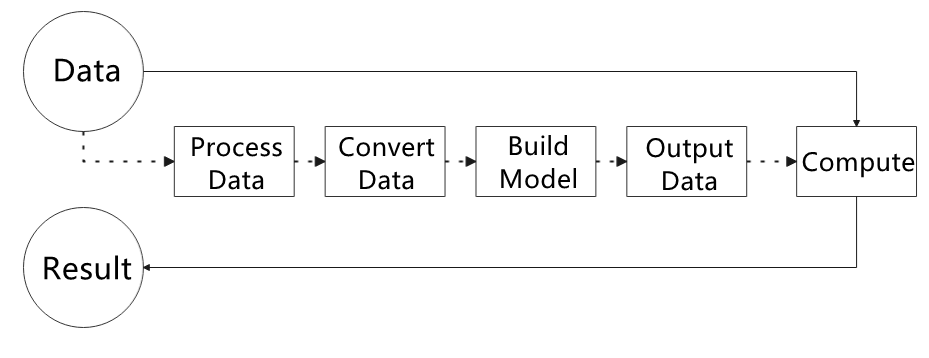
The figure below shows how to use MediaPipe. The solid line represents the part to be coded, and the dotted line indicates the part not to be coded. MediaPipe can offer the result and the function realization framework quickly.
Dependency
MediaPipe utilizes OpenCV to process video, and uses FFMPEG to process audio data. Furthermore, it incorporates other essential dependencies, including OpenGL/Metal, Tensorflow, and Eigen.
For seamless usage of MediaPipe, we suggest gaining a basic understanding of OpenCV. To delve into OpenCV, you can find detailed information in “OpenCV Computer Vision Lesson”.
MediaPipe Solutions
Solutions is based on the open-source pre-constructed sample of TensorFlow or TFLite. MediaPipe Solutions is built upon a framework, which provides 16 Solutions, including face detection, Face Mesh, iris, hand, posture, human body and so on.
9.1.4 MediaPipe Learning Resources
MediaPipe website:https://developers.google.com/mediapipe
MediaPipe Wiki:http://i.bnu.edu.cn/wiki/index.php?title=Mediapipe
MediaPipe github:https://github.com/google/mediapipe
Dlib website: http://dlib.net/
dlib github: https://github.com/davisking/dlib
9.2 Fingertip Trajectory Recognition
Identify hand joints using MediaPipe’s hand detection model. Once a specific gesture is recognized, the robot will initiate fingertip locking on the screen, track the fingertips, and generate their movement trajectory.
9.2.1 Program Logic
First, invoke the MediaPipe hand detection model to capture the camera image. Next, flip and process the image to extract hand information. Utilizing the connection lines between key points of the hand calculates the finger angles to determine the gesture.
Upon recognition of a specific gesture, the robot will proceed to identify and lock the fingertips on the screen, simultaneously tracing the movement trajectory of the fingertips on the display.
9.2.2 Operation Steps
Note
The input command should be case sensitive, and the keyword can be complemented by “Tab” key.
(1) Start the robot, and enter the robot system desktop using VNC.
(2) Click-on  to open the command-line terminal.
(3) Run the command to disable app auto-start app service.
~/.stop_ros.sh
(4) Enter the command to enable the depth camera service.
ros2 launch peripherals depth_camera.launch.py
(5) Open a new terminal. Enter the command to navigate to the directory of the game.
cd ros2_ws/src/example/example/mediapipe_example
(6) Type the command. Press “Enter” to run the program.
python3 hand_gesture.py
(7) If you want to exit the game, press “Ctrl+C” in the terminal interface.
After experiencing the game, you can enable the app service through commands or by restarting the robot. If the app is not enabled, the related app functions will not work. If the robot is restarted, the app will be automatically enabled.
Click  and enter the command. Press “Enter” to start the app, and wait for the buzzer to beep.
sudo systemctl restart start_node.service
9.2.3 Program Outcome
Once the game is enabled, position your hand within the camera’s field of view. When your hand is recognized, the hand key points will be highlighted on the live camera feed.
If the robot detects the “1” gesture, the trajectory of your fingertip motion will begin to be recorded on the live camera feed. If it detects the “5” gesture, the recorded fingertip trajectory will be cleared.
9.2.4 Program Analysis
The program file is saved in:/home/ubuntu/ros2_ws/src/example/example/mediapipe_example/hand_gesture.py
Note
Prior to making any alterations to the program, ensure to create a backup of the original factory program. Modify it only after creating the backup. Directly editing the source code file is prohibited to prevent inadvertent parameter modifications that could render the robot dysfunctional and irreparable!
Based on the game’s impact, the process logic of this game is organized as depicted in the figure below:
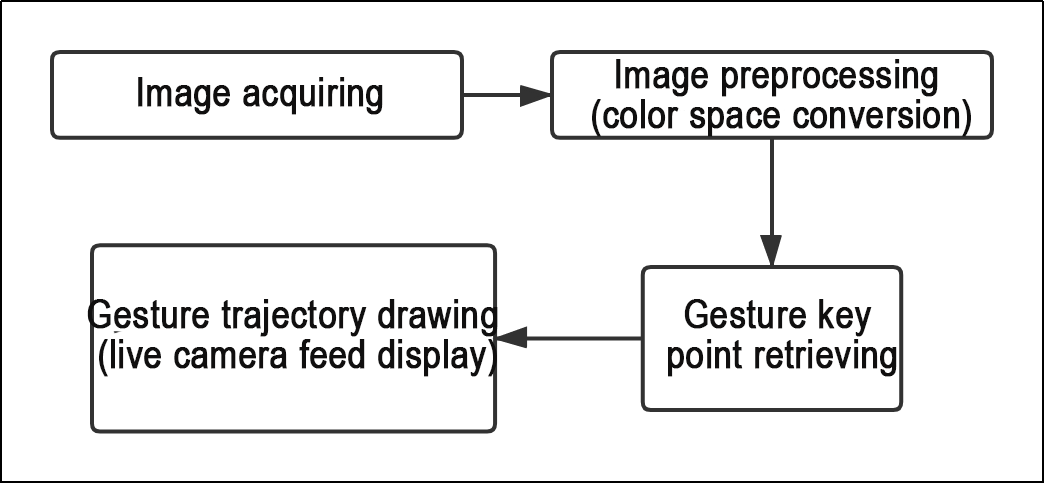
As depicted in the image above, the purpose of this game is to capture an image using the camera. Preprocess it by converting its color space for easier identification. Extract feature points corresponding to hand gestures from the converted image. Determine different gestures (based on angles) through logical analysis of key feature points. Next, the trajectory of the recognized gesture is drawn on the live camera feed.
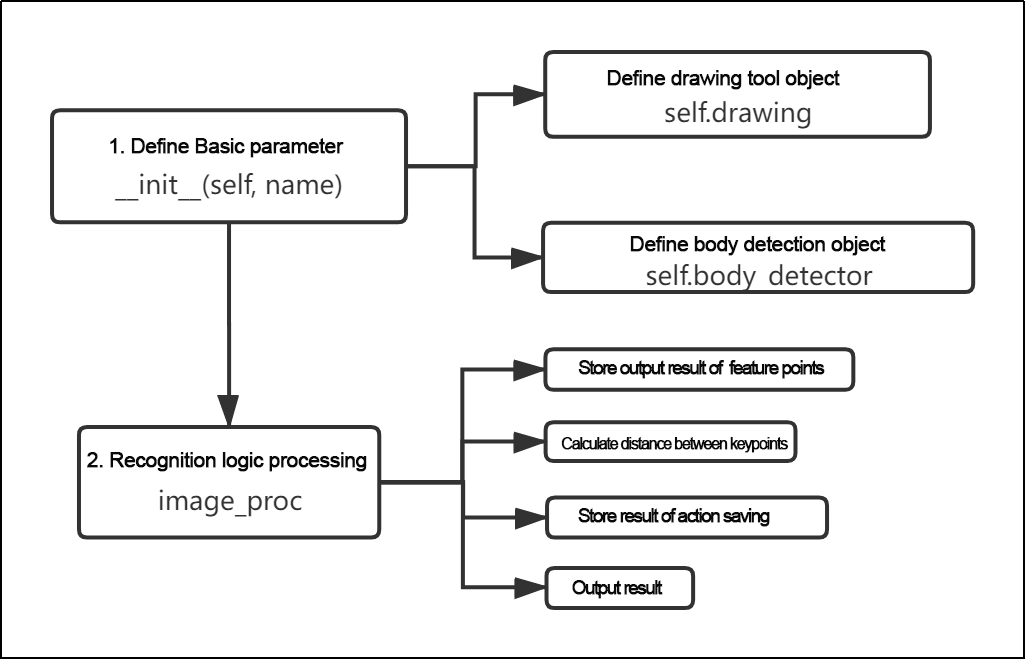
The program’s logic flowchart extracted from the program files is illustrated in the figure below.
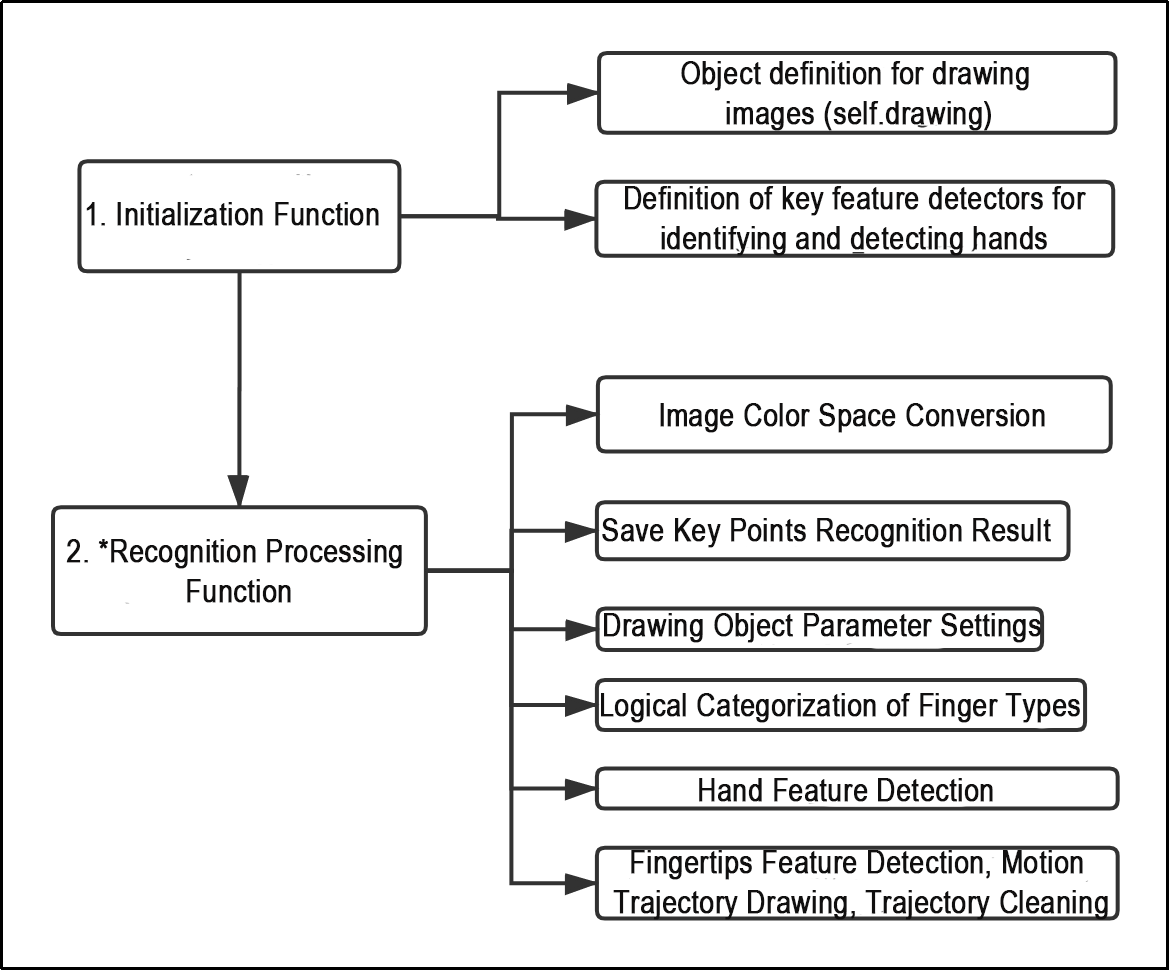
From the above diagram, it can be seen that the program’s logical flow is mainly divided into initialization functions and recognition processing functions. The following document content will be written according to the program logic flow chart mentioned above.
(1) Initialization function (init__(self, name))
The program starts with the initialization function of the HandTrajectoryNode class, which defines some basic parameters. The important ones include the drawing object for drawing the hand landmarks and the hand detector for detecting the hand landmarks.
(2) Define image drawing (self.drawing)
121 | self.drawing = mp.solutions.drawing_utils |
self.drawing is the drawing tool for the joint key points. It is used to connect the detected key points and visualize the hand trajectory. “mp” represents the mediapipe recognition module, which extracts the hand features. The “drawing_utils” package from mediapipe is used for drawing the hand landmarks.
(3) Define detector for recognizing hand feature (self.hand_detector)
123 124 125 126 127 128 | self.hand_detector = mp.solutions.hands.Hands( static_image_mode=False, max_num_hands=1, min_tracking_confidence=0.05, min_detection_confidence=0.6 ) |
self.hand_detector is the hand feature detector. mp represents the mediapipe recognition module. hands.Hands is the hand feature extraction module. The following parameters are important:
| static_image_mode | When the parameter is set to False, it will locate the maximum number of hands based on the value set by "**max_num_hands**". By default, this parameter is set to False. |
| max_num_hands | Set the maximum number of hands to be detected, which is 1 by default. |
| min_detection_confidence | The minimum confidence threshold for the hand detection model ranges between 0 and 1. Only hands with confidence scores higher than this threshold will be detected. If the recognition performance is not optimal, you can adjust the threshold by ±0.1. However, it should not be set lower than 0. |
| min_tracking_confidence | This parameter is used for hand tracking and localization. It sets the minimum confidence threshold for the hand detection model to recognize and track a hand. If the confidence level of a detected hand falls below this threshold, it will be considered stationary and not tracked. If the recognition performance is not optimal, you can adjust the threshold by ±0.1. It should not be set lower than 0. |
(4) Recognition processing function (image_proc(self))
After defining the basic tool parameters, the logical recognition process can be initiated. The following points include the main code analysis from the initial image preprocessing (color space conversion) to the final drawing of fingertip trajectories.
(5) Image color space conversion
158 | image_flip = cv2.cvtColor(cv2.flip(image, 1), cv2.COLOR_BGR2RGB) |
The input image needs to be converted from the BGR color space to the RGB color space to achieve accurate hand detection. The “cv2.cvtColor()” function is used for this purpose. “cv2.COLOR_RGB2BGR” is the color space conversion method. “bgr_image” is the output image. Keep the parameters as default.
(6) Store keypoints recognition result
161 | results = self.hand_detector.process(image_flip) |
The “process” function in “self.hand_detector” is responsible for extracting the key points of the hand. The results, which include the positions of the key points in the image, are stored in the “results” variable. It is used for subsequent logical processing.
(7) Set drawing object parameter
161 162 163 164 | self.drawing.draw_landmarks( result_image, hand_landmarks, mp.solutions.hands.HAND_CONNECTIONS) |
Once the key feature points are detected, the drawing tool needs to be defined for drawing the hand landmarks and connections. The “bgr_image” parameter represents the input image; “hand_landmarks” represents the detected hand landmarks; “HAND_CONNECTIONS” defines the connections between the landmarks, based on the standard hand gesture feature point numbering.
(8) Logical classification of finger types
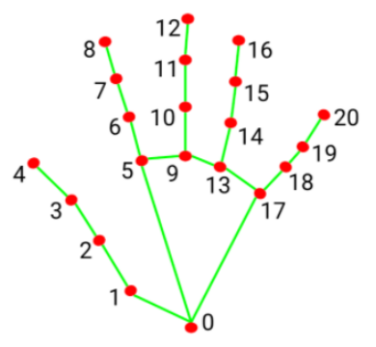
30 31 32 33 34 35 36 37 38 39 40 41 42 43 44 45 46 47 48 49 50 51 52 53 | def hand_angle(landmarks): """ 计算各个手指的弯曲角度(calculate the bending angle of each finger) :param landmarks: 手部关键点(the key points of the hand) :return: 各个手指的角度(each finger's angle) """ angle_list = [] # thumb 大拇指 angle_ = vector_2d_angle(landmarks[3] - landmarks[4], landmarks[0] - landmarks[2]) angle_list.append(angle_) # index 食指 angle_ = vector_2d_angle(landmarks[0] - landmarks[6], landmarks[7] - landmarks[8]) angle_list.append(angle_) # middle 中指 angle_ = vector_2d_angle(landmarks[0] - landmarks[10], landmarks[11] - landmarks[12]) angle_list.append(angle_) # ring 无名指 angle_ = vector_2d_angle(landmarks[0] - landmarks[14], landmarks[15] - landmarks[16]) angle_list.append(angle_) # pink 小拇指 angle_ = vector_2d_angle(landmarks[0] - landmarks[18], landmarks[19] - landmarks[20]) angle_list.append(angle_) angle_list = [abs(a) for a in angle_list] return angle_list |
After extracting the hand points into the “results” variable, logical processing is required to identify the specific type of finger (e.g. thumb or index finger) by determining the angle relationships between the feature points. The “hand_angle” function is the input feature point set “landmarks(results)”. The “vector_2d_angle” function is used to calculate the angles between the corresponding feature points. The feature points corresponding to the elements in the “landmarks” set are shown in the following figure:
(9) Detect gesture feature
55 56 57 58 59 60 61 62 63 64 65 66 67 68 69 70 71 72 73 74 75 76 77 78 79 80 81 82 83 84 85 86 87 88 89 90 91 92 93 94 95 96 97 | def h_gesture(angle_list): """ 通过二维特征确定手指所摆出的手势(Determine the gesture made by the fingers based on the two-dimensional features) :param angle_list: 各个手指弯曲的角度(the angles of each finger's bending) :return : 手势名称字符串(gesture name string) """ thr_angle = 65. thr_angle_thumb = 53. thr_angle_s = 49. gesture_str = "none" if (angle_list[0] > thr_angle_thumb) and (angle_list[1] > thr_angle) and (angle_list[2] > thr_angle) and ( angle_list[3] > thr_angle) and (angle_list[4] > thr_angle): gesture_str = "fist" elif (angle_list[0] < thr_angle_s) and (angle_list[1] < thr_angle_s) and (angle_list[2] > thr_angle) and ( angle_list[3] > thr_angle) and (angle_list[4] > thr_angle): gesture_str = "hand_heart" elif (angle_list[0] < thr_angle_s) and (angle_list[1] < thr_angle_s) and (angle_list[2] > thr_angle) and ( angle_list[3] > thr_angle) and (angle_list[4] < thr_angle_s): gesture_str = "nico-nico-ni" elif (angle_list[0] < thr_angle_s) and (angle_list[1] > thr_angle) and (angle_list[2] > thr_angle) and ( angle_list[3] > thr_angle) and (angle_list[4] > thr_angle): gesture_str = "hand_heart" elif (angle_list[0] > 5) and (angle_list[1] < thr_angle_s) and (angle_list[2] > thr_angle) and ( angle_list[3] > thr_angle) and (angle_list[4] > thr_angle): gesture_str = "one" elif (angle_list[0] > thr_angle_thumb) and (angle_list[1] < thr_angle_s) and (angle_list[2] < thr_angle_s) and ( angle_list[3] > thr_angle) and (angle_list[4] > thr_angle): gesture_str = "two" elif (angle_list[0] > thr_angle_thumb) and (angle_list[1] < thr_angle_s) and (angle_list[2] < thr_angle_s) and ( angle_list[3] < thr_angle_s) and (angle_list[4] > thr_angle): gesture_str = "three" elif (angle_list[0] > thr_angle_thumb) and (angle_list[1] > thr_angle) and (angle_list[2] < thr_angle_s) and ( angle_list[3] < thr_angle_s) and (angle_list[4] < thr_angle_s): gesture_str = "OK" elif (angle_list[0] > thr_angle_thumb) and (angle_list[1] < thr_angle_s) and (angle_list[2] < thr_angle_s) and ( angle_list[3] < thr_angle_s) and (angle_list[4] < thr_angle_s): gesture_str = "four" elif (angle_list[0] < thr_angle_s) and (angle_list[1] < thr_angle_s) and (angle_list[2] < thr_angle_s) and ( angle_list[3] < thr_angle_s) and (angle_list[4] < thr_angle_s): gesture_str = "five" elif (angle_list[0] < thr_angle_s) and (angle_list[1] > thr_angle) and (angle_list[2] > thr_angle) and ( angle_list[3] > thr_angle) and (angle_list[4] < thr_angle_s): gesture_str = "six" |
After identifying the different finger types of the hand and determining their positions on the image, logical recognition processing of various gestures can be performed by implementing the “h_gesture” function.
In the “h_gesture” function depicted above, the parameters “thr_angle=65”, “thr_angle_thenum=53”, and “thr_angle_s=49” represent the angle threshold values for corresponding gesture logic points. These values have been empirically tested to ensure stable recognition effects. It is not recommended to alter them unless the logic processing effect is unsatisfactory, in which case adjustments within a range of ±5 values are sufficient. The angle_list\[0,1,2,3,4\] corresponds to the five finger types associated with the palm.
Here’s an example using the gesture “one”:
77 78 79 | elif (angle_list[0] > 5) and (angle_list[1] < thr_angle_s) and (angle_list[2] > thr_angle) and ( angle_list[3] > thr_angle) and (angle_list[4] > thr_angle): gesture_str = "one" |
The code presented represents the logical angle evaluation of the fingers for the “one” gesture. “angle_list[0]>5” checks whether the angle value of the thumb joint feature point in the image is greater than 5. “angle_list[1]<thr_angle_s” checks if the angle feature of the index finger joint feature point is less than the predetermined value “thr_angle_s”. Similarly, “angle_list[2]<thr_angle” verifies if the angle feature of the middle finger feature point is less than the predetermined value “thr_angle”. The logical processing for the other two fingers, “angle_list[3]” and “angle_list[4]”, follows a similar method. When the above conditions are met, the current gesture feature is recognized as “one”, and the same principle applies to recognizing other gesture features.
Different gesture recognition involves distinct logical processing, but the overall logical framework remains similar. For recognizing other gesture features, refer to the previous paragraph.
(9) Detect fingertip feature, draw motion trajectory, and clear trajectory
The fingertip feature detection is shown below:
174 175 176 177 178 179 180 181 182 | if self.state != State.TRACKING: if gesture == "one": # 检测食指手势, 开始指尖追踪(detect index finger gesture and start fingertip tracking) self.count += 1 if self.count > 5: self.count = 0 self.state = State.TRACKING self.points = [] else: self.count = 0 |
The code above shows the logic judgement for when the gesture “one” is detected. The “self.count” is used for counting the number of frames that the current hand gesture has been held. If “self.count” is greater than 5, the gesture is confirmed as “one”. The duration of the gesture can be adjusted to get different recognition accuracies, usually set to around 5 to 7 frames. Once the gesture is confirmed as “one”, the current gesture state is set to “TRACKING”, indicating that you can move your hand. “self.points” and “points_list” are initialized to keep track of the position of the hand’s adjacent points and the collection of feature points used to draw the trajectory line, respectively.
The motion trajectory drawing is as below:
184 185 186 187 188 189 190 191 192 193 194 195 | elif self.state == State.TRACKING: if gesture != "two": if len(self.points) > 0: last_point = self.points[-1] if distance(last_point, index_finger_tip) < 5: self.count += 1 else: self.count = 0 self.points.append(index_finger_tip) else: self.points.append(index_finger_tip) draw_points(result_image, self.points) |
During the sliding process, the custom function “distance” calculates the distance between the previous and current points. A logical judgment is then made using “distance(last_point, index_finger_tip) < 5”. “5” is the distance in pixels between the two points. If you need to detect faster movements while maintaining accurate recognition, increase this value appropriately. It is recommended not to exceed 10. The movement feature points of the fingertip are stored, and “pixels” is an object used to store the fingertip information (x, y) for pixelization and drawing of the image.
The trajectory clearing process is shown below:
196 197 198 199 | if gesture == "five": self.state = State.NULL self.points = [] draw_points(result_image, self.points) |
When the gesture is recognized as “five”, the gesture recognition state is set to NULL (empty). The collection of current points, which is the position information of the trajectory points, will be cleared.
9.3 Hand following
9.3.1 Program Instruction
What are the applications of hand following?
Virtual reality: In virtual reality games, it allows players to control game characters’ movements, attacks, and other actions through gestures.
Medical field: It can be used in rehabilitation training to help patients recover hand function.
Education field: It allows students to interactively learn through gestures.
Smart homes: It allows users to control home devices’ switches, adjustments, and other operations through gestures.
Industrial production: It allows workers to control robots’ operations through gestures, improving production efficiency.
The hand feature detection algorithm library used in this robot is MediaPipe. MediaPipe is an open-source framework of multi-media machine learning models. Cross-platform MediaPipe can run on mobile devices, workspace and servers, as well as support mobile GPU acceleration. It is also compatible with TensorFlow and TF Lite Inference Engine, and all kinds of TensorFlow and TF Lite models can be applied on it. Besides, MediaPipe supports GPU acceleration of mobile and embedded platform.
First, a hand recognition model needs to be built, and the topic messages published by the camera node need to be subscribed to obtain the image. Then, the image is processed by flipping and other methods to detect the hand information in the image. Next, the position of the hand center point is obtained based on the connection of the hand key points. Finally, the monocular camera pan-tilt is controlled to follow the center point of the recognized hand to move up and down.
9.3.2 Operation Steps
Note
The input command should be case sensitive, and keywords can be complemented using Tab key.
This game is only applicable to 2D pan-tilt monocular camera version.
(1) Start the robot and connect it to the remote control software VNC.
(2) Click on  on the system desktop to open the command line terminal.
(3) Run the command to stop the automatic startup service of the app.
~/.stop_ros.sh
(4) Enter the command to start the game.
ros2 launch example hand_track_node.launch.py
(5) If you want to exit the game, press “Ctrl+C” in the terminal interface.
After experiencing the game, you can enable the app service through commands or by restarting the robot. If the app is not enabled, the related app functions will not work. If the robot is restarted, the app will be automatically enabled.
Click  and enter the command. Press enter to start the app, and wait for the buzzer to beep.
sudo systemctl restart start_node.service
9.3.3 Program Outcome
After starting the game, the 2D pan-tilt will return to its initial position. Place your hand in front of the camera of the 2D pan-tilt, and move your hand up and down. The 2D pan-tilt will follow your hand to move up and down.
Note: Displaying the live camera feed in this game may cause the program to get stuck. Therefore, it is not recommended to display the feedback image during the game. If you need to view the live camera feed, open a new command line terminal and enter the command “rqt_image_view”.
9.3.4 Program Analysis
The source code of the program is located at:/home/ubuntu/ros2_ws/src/example/example/hand_track/hand_track_node.py
(1) Subscribe and publish node
A publisher message “/ros_robot_controller/pwm_servo/set_state” is published to control the rotation of the pan-tilt servo.
A topic message of the hand detection “/hand_detect/center” is subscribed to obtain the center point of the hand.
35 36 37 38 | self.pwm_pub = self.create_publisher(SetPWMServoState,'ros_robot_controller/pwm_servo/set_state',10) self.mecanum_pub = self.create_publisher(Twist, '/controller/cmd_vel', 1) self.image_sub = self.create_subscription(Point2D, '/hand_detect/center', self.get_hand_callback, 1) |
(2) Update PID data
The PID algorithm is used to update the coordinates of the X and Z axes.
81 82 83 84 85 86 87 88 89 90 91 92 93 94 95 | def get_hand_callback(self, msg): if msg.width != 0: self.center = msg else: self.center = None def main(self): while self.running: if self.center is not None: t1 = time.time() self.pid_y.SetPoint = self.center.width / 2 self.pid_y.update(self.center.width - self.center.x) self.y_dis += self.pid_y.output if self.y_dis < 800: self.y_dis = 800 |
The center position coordinate of the image is obtained by dividing the height or width of the image by 2. Compare the result with the center point coordinate of the hand to obtain the deviation for updating the PID data. The output result of the PID algorithm updates the coordinates of the X and Z axes.
(3) Publish pan-tilt servo angle
Call custom servo message type to publish the position information of the pan-tilt servo.
45 46 47 48 49 50 51 52 53 | msg = SetPWMServoState() msg.duration = 0.2 for i in range(len(position_data)): pos = PWMServoState() pos.id = [i+1] pos.position = [int(position_data[i])] pwm_list.append(pos) msg.state = pwm_list self.pwm_pub.publish(msg) |
9.4 Posture Control
Through the human pose estimation model in the MediaPipe machine learning framework, the human body can be detected on the live camera feed. The joint-related positions of the human body can be marked. Then, various actions can be recognized in sequence, thereby achieving direct control of the robot through human body.
From the perspective of the robot, when you raise your left arm, the robot will move to the right; when you raise your right arm, the robot will move to the left; when your left leg is raised, the robot will move forward; and when your right leg is raised, the robot will move backward.
9.4.1 Program Logic
First, import the human pose estimation model from MediaPipe and subscribe to topic messages to obtain real-time footage from the camera.
Then, process the image, such as flipping, to detect human body information in the image. Based on the lines connecting the key points of the human body, calculate the limb height to determine the body movement.
Finally, if you make specified actions, the robot will perform the corresponding actions.
9.4.2 Operation Steps
Note
the input command should be case sensitive, and keywords can be complemented using Tab key.
(1) Start the robot, and enter the robot system desktop using VNC.
(2) Click-on  to open the command line terminal.
(3) Run the command to disable app auto-start app service.
~/.stop_ros.sh
(4) Run the following command and hit Enter key to initiate the game.
ros2 launch example body_control.launch.py
If you want to exit the game, press “Ctrl+C” in the terminal interface.
After experiencing the game, you can enable the app service through commands or by restarting the robot. If the app is not enabled, the related app functions will not work. If the robot is restarted, the app will be automatically enabled.
Click  and enter the command. Press enter to start the app, and wait for the buzzer to beep.
sudo systemctl restart start_node.service
9.4.3 Program Outcome
Once the game starts, ensure the human body remains as fully within the camera’s field of view as possible. Upon recognizing the human body, the key points will be highlighted in the returned image.
From the perspective of the robot, when you raises you left arm, the robot will turn left; when your right arm is raised, the robot will turn right; when your left leg is raised, the robot will move forward; and when your right leg is raised, the robot will move backward.
9.4.4 Program Analysis
The program file is saved in: ros2_ws/src/example/example/body_control/include/body_control.py
Note
Prior to making any alterations to the program, ensure to create a backup of the original factory program. Modify it only after creating the backup. Directly editing the source code file is prohibited to prevent inadvertent parameter modifications that could render the robot dysfunctional and irreparable!
Based on the game’s effectiveness, the procedural logic is delineated as follows:
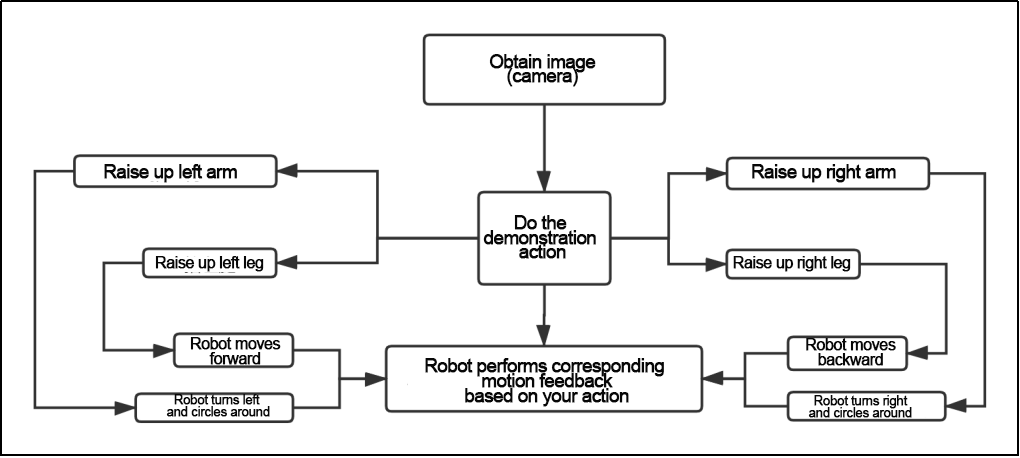
Obtaining the image through the camera, the robot will execute corresponding action after you make a pose. Taking the perspective of the robot, when you raise your left arm, the robot will turn left; when your right arm is raised, it will turn right; when your left leg is raised, it will move forward; and when your right leg is raised, it will move backward.
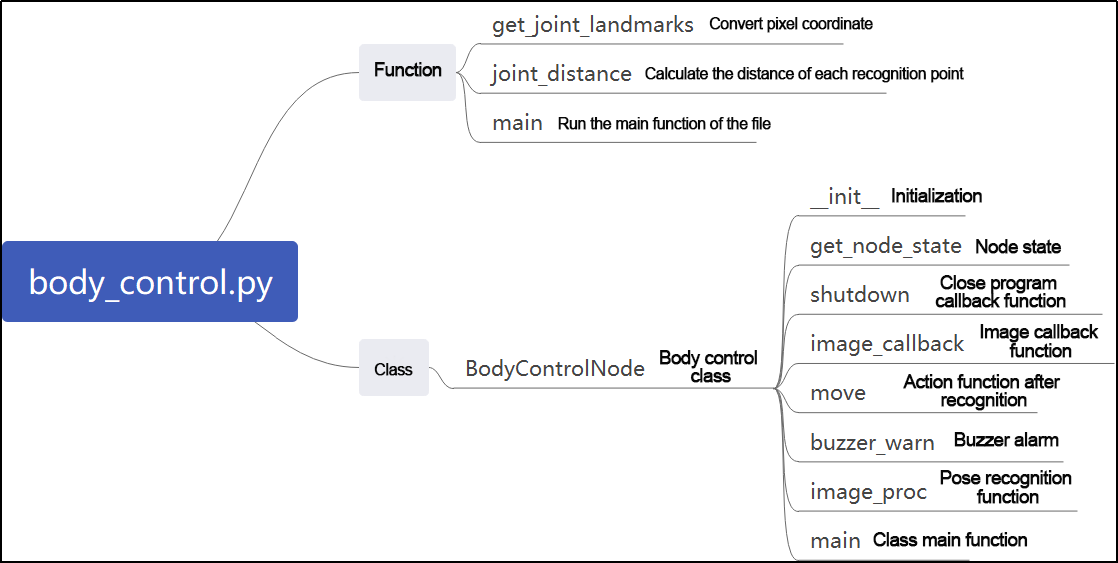
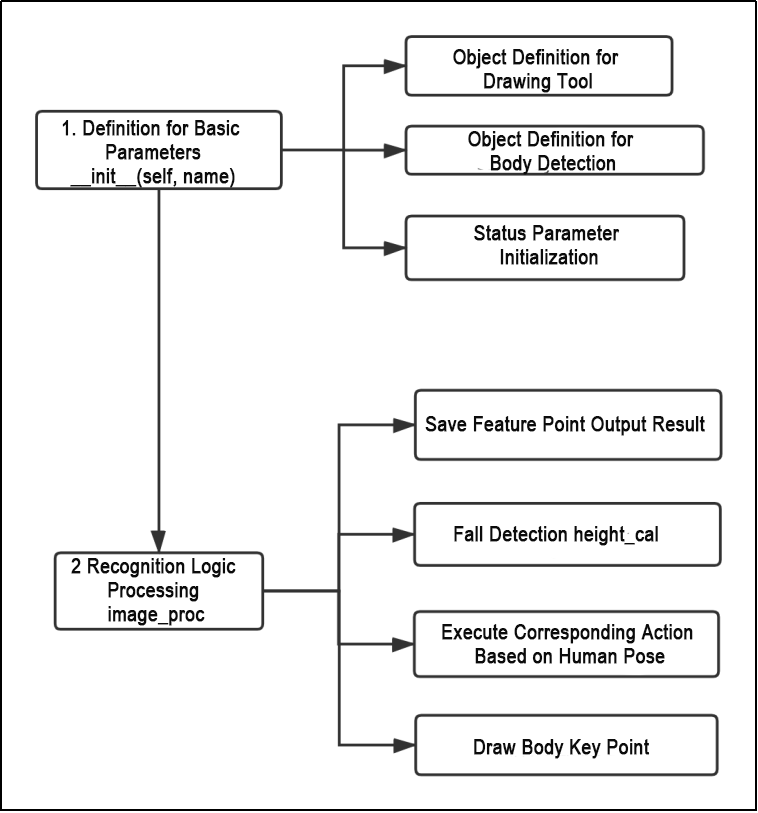
The program logic flow chart obtained from the program files is depicted in the figure below.
Define relevant parameters through the initialization function “init(self.name)”, including the image tool “self.drawing” object used to draw the recognized feature points, and the the body detection object “self.body_detector”. Then, perform the recognition logic processing for the output results of the recognized feature points. Judge the distance between the key points to save the actions. Finally, output the results to make the robot perform the corresponding actions.
Function
(1) Main:
325 326 327 328 | def main(): node = BodyControlNode('body_control') rclpy.spin(node) node.destroy_node() |
Used to start the body sensation control node.
(2) get_joint_landmarks:
44 45 46 47 48 49 50 51 52 53 | def get_joint_landmarks(img, landmarks): """ 将landmarks从medipipe的归一化输出转为像素坐标(Convert landmarks from medipipe's normalized output to pixel coordinates) :param img: 像素坐标对应的图片(picture corresponding to pixel coordinate) :param landmarks: 归一化的关键点(normalized keypoint) :return: """ h, w, _ = img.shape landmarks = [(lm.x * w, lm.y * h) for lm in landmarks] return np.array(landmarks) |
Used to convert the recognized information into pixel coordinates.
(3) joint_distance:
55 56 57 58 59 60 61 62 63 64 65 66 67 68 69 70 71 72 73 74 75 76 77 78 79 80 | def joint_distance(landmarks): distance_list = [] d1 = landmarks[LEFT_HIP] - landmarks[LEFT_SHOULDER] d2 = landmarks[LEFT_HIP] - landmarks[LEFT_WRIST] dis1 = d1[0]**2 + d1[1]**2 dis2 = d2[0]**2 + d2[1]**2 distance_list.append(round(dis1/dis2, 1)) d1 = landmarks[RIGHT_HIP] - landmarks[RIGHT_SHOULDER] d2 = landmarks[RIGHT_HIP] - landmarks[RIGHT_WRIST] dis1 = d1[0]**2 + d1[1]**2 dis2 = d2[0]**2 + d2[1]**2 distance_list.append(round(dis1/dis2, 1)) d1 = landmarks[LEFT_HIP] - landmarks[LEFT_ANKLE] d2 = landmarks[LEFT_ANKLE] - landmarks[LEFT_KNEE] dis1 = d1[0]**2 + d1[1]**2 dis2 = d2[0]**2 + d2[1]**2 distance_list.append(round(dis1/dis2, 1)) d1 = landmarks[RIGHT_HIP] - landmarks[RIGHT_ANKLE] d2 = landmarks[RIGHT_ANKLE] - landmarks[RIGHT_KNEE] dis1 = d1[0]**2 + d1[1]**2 dis2 = d2[0]**2 + d2[1]**2 distance_list.append(round(dis1/dis2, 1)) |
Used to calculate the distance between each key point based on the pixel coordinate.
Class
84 85 86 87 88 89 90 91 92 93 94 95 96 97 98 99 100 101 102 103 104 105 | class BodyControlNode(Node): def __init__(self, name): rclpy.init() super().__init__(name, allow_undeclared_parameters=True, automatically_declare_parameters_from_overrides=True) self.name = name self.drawing = mp.solutions.drawing_utils self.body_detector = mp_pose.Pose( static_image_mode=False, min_tracking_confidence=0.7, min_detection_confidence=0.7) self.running = True self.fps = fps.FPS() # fps计算器(FPS calculator) signal.signal(signal.SIGINT, self.shutdown) self.move_finish = True self.stop_flag = False self.left_hand_count = [] self.right_hand_count = [] self.left_leg_count = [] self.right_leg_count = [] self.detect_status = [0, 0, 0, 0] |
This class is the body control node.
(1) Init:
85 86 87 88 89 90 91 92 93 94 95 96 | def __init__(self, name): rclpy.init() super().__init__(name, allow_undeclared_parameters=True, automatically_declare_parameters_from_overrides=True) self.name = name self.drawing = mp.solutions.drawing_utils self.body_detector = mp_pose.Pose( static_image_mode=False, min_tracking_confidence=0.7, min_detection_confidence=0.7) self.running = True self.fps = fps.FPS() # fps计算器(FPS calculator) signal.signal(signal.SIGINT, self.shutdown) |
Initialize the parameters required for body control, read the camera’s image callback node, initialize nodes such as servo, chassis, buzzer, motor, and others, and finally start the main function within the class.
(2) get_node_state:
126 127 128 | def get_node_state(self, request, response): response.success = True return response |
Set the initialization state of the current node.
(3) shutdown:
130 131 | def shutdown(self, signum, frame): self.running = False |
Program exit callback function used to terminate recognition.
(4) image_callback:
133 134 135 136 137 138 139 140 | def image_callback(self, ros_image): cv_image = self.bridge.imgmsg_to_cv2(ros_image, "rgb8") rgb_image = np.array(cv_image, dtype=np.uint8) if self.image_queue.full(): # 如果队列已满,丢弃最旧的图像(if the queue is full, discard the oldest image) self.image_queue.get() # 将图像放入队列(put the image into the queue) self.image_queue.put(rgb_image) |
Image node callback function: used to process images and enqueue them.
(5) Move:
142 143 144 145 146 147 148 149 150 151 152 153 154 155 156 157 158 159 160 161 162 163 164 165 166 167 168 169 170 171 172 173 174 175 176 177 178 | def move(self, *args): if args[0].angular.z == 1: time.sleep(0.2) motor1 = MotorState() motor1.id = 2 motor1.rps = 0.1 motor2 = MotorState() motor2.id = 4 motor2.rps = -1.0 msg = MotorsState() msg.data = [motor1, motor2] self.motor_pub.publish(msg) time.sleep(11) motor1 = MotorState() motor1.id = 2 motor1.rps = 0.0 motor2 = MotorState() motor2.id = 4 motor2.rps = 0.0 msg = MotorsState() msg.data = [motor1, motor2] self.motor_pub.publish(msg) elif args[0].angular.z == -1: time.sleep(0.2) motor1 = MotorState() motor1.id = 2 motor1.rps = 1.0 motor2 = MotorState() motor2.id = 4 motor2.rps = -0.1 msg = MotorsState() msg.data = [motor1, motor2] self.motor_pub.publish(msg) time.sleep(12) motor1 = MotorState() motor1.id = 2 motor1.rps = 0.0 |
Movement strategy function that moves the vehicle according to the recognized limb height.
(6) buzzer_warn:
193 194 195 196 197 198 199 | def buzzer_warn(self): msg = BuzzerState() msg.freq = 1900 msg.on_time = 0.2 msg.off_time = 0.01 msg.repeat = 1 self.buzzer_pub.publish(msg) |
Buzzer control function used for buzzer alarms.
(7) image_proc:
201 202 203 204 205 206 207 208 209 210 211 212 213 214 215 216 217 | def image_proc(self, image): image_flip = cv2.flip(cv2.cvtColor(image, cv2.COLOR_RGB2BGR), 1) results = self.body_detector.process(image) if results is not None and results.pose_landmarks is not None: if self.move_finish: twist = Twist() landmarks = get_joint_landmarks(image, results.pose_landmarks.landmark) distance_list = (joint_distance(landmarks)) if distance_list[0] < 1: self.detect_status[0] = 1 if distance_list[1] < 1: self.detect_status[1] = 1 if 0 < distance_list[2] < 2: self.detect_status[2] = 1 if 0 < distance_list[3] < 2: self.detect_status[3] = 1 |
Function for recognizing limbs, which invokes the model to draw key points of the human body based on the recognized information, and moves according to the recognized height.
(8) Main:
289 290 291 292 293 294 295 296 297 298 299 300 301 302 303 304 305 306 307 308 309 310 311 | def main(self): while self.running: try: image = self.image_queue.get(block=True, timeout=1) except queue.Empty: if not self.running: break else: continue try: result_image = self.image_proc(np.copy(image)) except BaseException as e: self.get_logger().info('\033[1;32m%s\033[0m' % e) result_image = cv2.flip(cv2.cvtColor(image, cv2.COLOR_RGB2BGR), 1) self.fps.update() result_image = self.fps.show_fps(result_image) cv2.imshow(self.name, result_image) key = cv2.waitKey(1) if key == ord('q') or key == 27: # 按q或者esc退出(press Q or Esc to exit) self.mecanum_pub.publish(Twist()) self.running = False rclpy.shutdown() |
The main function within the BodyControlNode class, used to input image information into the recognition function and display the live camera feed.
9.5 Pose Detection
Through the human pose estimation model in the MediaPipe machine learning framework, the human body posture is detected. When the robot detects a person falling, it will sound an alarm and sway from side to side.
9.5.1 Program Logic
First, import the human pose estimation model from MediaPipe and subscribe to topic messages to obtain real-time footage from the camera.
Then, process the image, such as flipping, to detect human body information in the image. Based on the lines connecting the key points of the human body, calculate the limb height to determine the body movement.
Finally, if “falling” is detected, the robot will sound an alarm and move forwards and backwards.
9.5.2 Operation Steps
Note
the input command should be case sensitive, and keywords can be complemented using Tab key.
(1) Start the robot, and enter the robot system desktop using VNC.
(2) Click-on  to open the command-line terminal.
(3) Run the command to disable app auto-start app service.
~/.stop_ros.sh
(4) Enter the command. Press “Enter” to run the program.
ros2 launch example fall_down_detect.launch.py
(5) If you want to close this game, press the “ESC” key in the image interface to exit the camera image interface.
(6) Then, press “Ctrl+C” in the command line terminal interface. If it fails, please try again.
After experiencing the game, you can enable the app service through commands or by restarting the robot. If the app is not enabled, the related app functions will not work. If the robot is restarted, the app will be automatically enabled.
Click  and enter the command. Press enter to start the app, and wait for the buzzer to beep.
sudo systemctl restart start_node.service
9.5.3 Program Outcome
Once the game starts, ensure the human body remains as fully within the camera’s field of view as possible. Upon recognizing the human body, the key points will be highlighted in the returned image.
At this point, the individual can sit down briefly. Upon detecting the “falling” posture, the robot will continuously sound an alarm and make repeated forward and backward movements as a reminder.
9.5.4 Program Analysis
The program file is saved in: ros2_ws/src/example/example/body_control/include/fall_down_detect.py
Note
Prior to making any alterations to the program, ensure to create a backup of the original factory program. Modify it only after creating the backup. Directly editing the source code file is prohibited to prevent inadvertent parameter modifications that could render the robot dis-functional and irreparable!
Based on the game’s effectiveness, the procedural logic is delineated as follows:
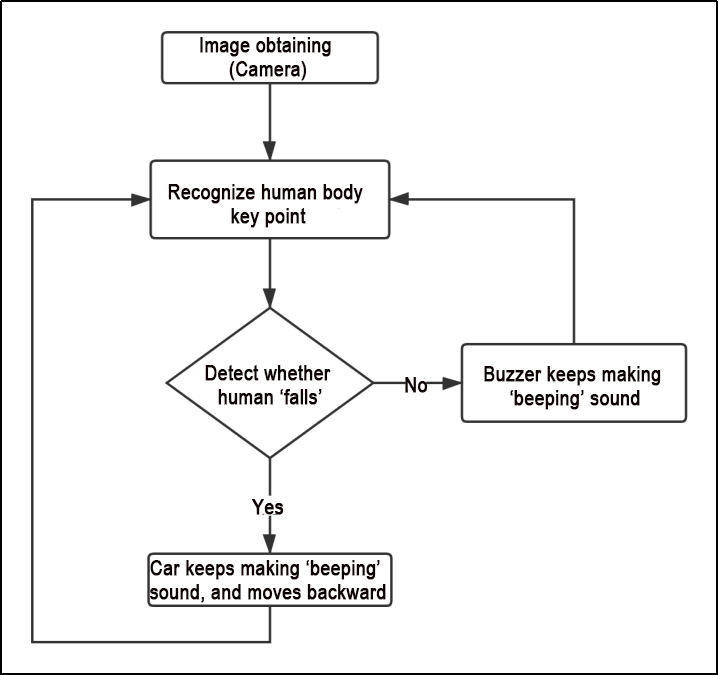
The robot captures images via the camera, identifies the key feature points of the human body, and assesses whether the current posture indicates a “fall”. If a fall is detected, the robot’s buzzer will emit a continuous “beep” sound while the robot moves backward. Otherwise, the buzzer will only emit a single “beep” sound.
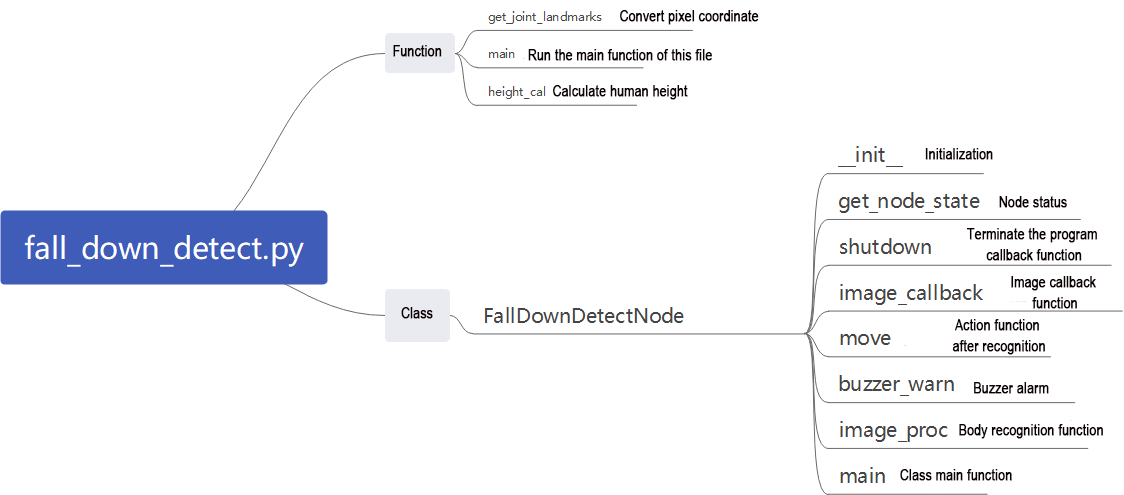
The program logic flow chart obtained from the program files is depicted in the figure below.
Function
(1) Main:
313 314 315 316 | def main(): node = BodyControlNode('fall_down_detect') rclpy.spin(node) node.destroy_node() |
Used to start the body sensation control node.
get_joint_landmarks:
44 45 46 47 48 49 50 51 52 53 | def get_joint_landmarks(img, landmarks): """ 将landmarks从medipipe的归一化输出转为像素坐标(Convert landmarks from medipipe's normalized output to pixel coordinates) :param img: 像素坐标对应的图片(picture corresponding to pixel coordinate) :param landmarks: 归一化的关键点(normalized keypoint) :return: """ h, w, _ = img.shape landmarks = [(lm.x * w, lm.y * h) for lm in landmarks] return np.array(landmarks) |
Used to convert the recognized information into pixel coordinates.
height_cal:
54 55 56 57 58 59 60 | def height_cal(landmarks): y = [] for i in landmarks: y.append(i[1]) height = sum(y)/len(y) return height |
Calculates the height of the limbs based on the recognized information.
(1) Class
62 63 64 65 66 67 68 69 70 71 72 73 74 75 76 77 78 79 80 | class FallDownDetectNode(Node): def __init__(self, name): rclpy.init() super().__init__(name, allow_undeclared_parameters=True, automatically_declare_parameters_from_overrides=True) self.name = name self.drawing = mp.solutions.drawing_utils self.body_detector = mp_pose.Pose( static_image_mode=False, min_tracking_confidence=0.7, min_detection_confidence=0.7) self.running = True self.fps = fps.FPS() # fps计算器(FPS calculator) self.fall_down_count = [] self.move_finish = True self.stop_flag = False signal.signal(signal.SIGINT, self.shutdown) self.bridge = CvBridge() self.image_queue = queue.Queue(maxsize=2) |
This class is the fall detection node.
(2) Init:
Initialize the parameters required for body control, read the camera’s image callback node, initialize nodes such as chassis, buzzers, and others, and finally start the main function within the class.
(3) get_node_state:
93 94 95 | def get_node_state(self, request, response): response.success = True return response |
Set the initialization state of the current node.
(4) shutdown:
97 98 | def shutdown(self, signum, frame): self.running = False |
Program exit callback function: used to terminate recognition.
(5) image_callback:
{lineno-start=}
    def image_callback(self, ros_image):
        cv_image = self.bridge.imgmsg_to_cv2(ros_image, "rgb8")
        rgb_image = np.array(cv_image, dtype=np.uint8)
        if self.image_queue.full():
            # 如果队列已满,丢弃最旧的图像(if the queue is full, discard the oldest image)
            self.image_queue.get()
        # 将图像放入队列(put the image into the queue)
        self.image_queue.put(rgb_image)
Image node callback function: used to process images and enqueue them.
(6) Move:
109 110 111 112 113 114 115 116 117 118 119 120 121 | def move(self): for i in range(5): twist = Twist() twist.linear.x = 0.2 self.mecanum_pub.publish(twist) time.sleep(0.2) twist = Twist() twist.linear.x = -0.2 self.mecanum_pub.publish(twist) time.sleep(0.2) self.mecanum_pub.publish(Twist()) self.stop_flag =True self.move_finish = True |
Movement strategy function that moves the robot based on the recognized limb height.
(7) buzzer_warn:
123 124 125 126 127 128 129 130 131 132 133 134 135 136 137 138 139 | def buzzer_warn(self): if not self.stop_flag: while not self.stop_flag: msg = BuzzerState() msg.freq = 1000 msg.on_time = 0.1 msg.off_time = 0.1 msg.repeat = 1 self.buzzer_pub.publish(msg) time.sleep(0.2) else: msg = BuzzerState() msg.freq = 1900 msg.on_time = 0.2 msg.off_time = 0.01 msg.repeat = 1 self.buzzer_pub.publish(msg) |
Buzzer control function: used for buzzer alarms.
(8) image_proc:
141 142 143 144 145 146 147 148 149 150 151 152 153 154 155 156 157 158 159 | def image_proc(self, image): image_flip = cv2.flip(cv2.cvtColor(image, cv2.COLOR_RGB2BGR), 1) results = self.body_detector.process(image) if results is not None and results.pose_landmarks: if self.move_finish: landmarks = get_joint_landmarks(image, results.pose_landmarks.landmark) h = height_cal(landmarks) if h > image.shape[:-2][0] - 120: self.fall_down_count.append(1) else: self.fall_down_count.append(0) if len(self.fall_down_count) == 3: count = sum(self.fall_down_count) self.fall_down_count = [] if self.stop_flag: if count <= 1: self.buzzer_warn() self.stop_flag = False |
Function for recognizing limbs, which invokes the model to draw key points of the human body based on the recognized information, and moves according to the recognized height.
(9) Main:
175 176 177 178 179 180 181 182 183 184 185 186 187 188 189 190 191 192 193 194 195 | def main(self): while self.running: try: image = self.image_queue.get(block=True, timeout=1) except queue.Empty: if not self.running: break else: continue try: result_image = self.image_proc(np.copy(image)) except BaseException as e: self.get_logger().info('\033[1;32m%s\033[0m' % e) result_image = cv2.flip(cv2.cvtColor(image, cv2.COLOR_RGB2BGR), 1) self.fps.update() result_image = self.fps.show_fps(result_image) cv2.imshow(self.name, result_image) key = cv2.waitKey(1) if key == ord('q') or key == 27: # 按q或者esc退出(press Q or Esc to exit) self.mecanum_pub.publish(Twist()) self.running = False |
The main function within the “FallDownDetectNode” class: used to input image information into the recognition function and display the returned image.