SO-ARM101 Open-Source 6-Axis Robotic Arm User Manual
1. LeRobot Introduction
LeRobot is an open-source robotic learning framework developed by Hugging Face, specifically designed for robot behavior cloning and reinforcement learning. The framework provides researchers and developers with a unified platform for training, deploying, and evaluating robotic policies.
1.1 Core Features
Multimodal Data Support: Supports various sensor data including visual, tactile, and audio.
Flexible Policy Architecture: Supports multiple learning paradigms such as behavior cloning and reinforcement learning.
Extensive Robot Support: Compatible with various robotic platforms and hardware configurations.
Cloud Training Support: Supports distributed training and cloud deployment.
Easy Extensibility: Modular design facilitates adding new robot types and algorithms.
1.2 Technical Architecture
LeRobot is built on PyTorch and utilizes a modern deep learning technology stack:
Data Processing: Efficient data loading and preprocessing pipelines.
Model Training: Supports various neural network architectures and training strategies.
Real-Time Inference: Optimized inference engine supporting real-time robotic control.
Visualization Tools: Comprehensive data visualization and training monitoring tools.
1.3 Application Scenarios
Industrial Automation: Tasks such as assembly, sorting, and welding.
Service Robots: Home services, medical assistance, and educational robots.
Research and Development: Robotics learning algorithm research and prototype validation.
Education and Training: Teaching robotics and artificial intelligence.
1.4 Ecosystem
LeRobot is deeply integrated with the Hugging Face ecosystem:
Model Sharing: Share trained models via Hugging Face Hub.
Dataset Management: Unified dataset storage and version control.
Community Support: Active open-source community with extensive documentation.
Continuous Updates: Regular release of new features and performance optimizations.
1.5 Development Prospect
The SO-ARM101 open-source 6-axis robotic arm represents a significant direction in the field of robot learning. By lowering the barrier to robot learning, it accelerates the adoption and application of robotic technologies. With continuous advancements in artificial intelligence, the SO-ARM101 open-source 6-axis robotic arm will continue to drive innovation and progress in robotic learning technologies.
2 Hardware and Environment Preparation
2.1 Hardware List
2.2 Environment Setup
2.2.1 Install Miniconda
Windows System Installation
① Download the Miniconda Package
Miniconda Official Installer
Locate Miniconda3-py311_25.7.0-2-Windows-x86_64.exe and download it to your computer. Alternatively, directly use: Software Tools & Source Code\Software Tools.

Note
For users in mainland China, it is recommended to use the Tsinghua University mirror.
Index of /anaconda/miniconda/ | Tsinghua Open Source Mirror
Click the above link to download, selecting Miniconda3-py310_25.7.0-2-Windows-x86_64.exe.

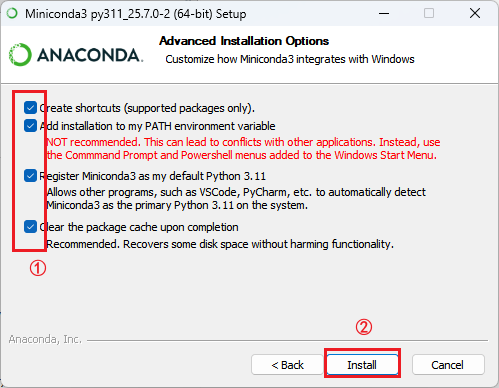
②Install Miniconda
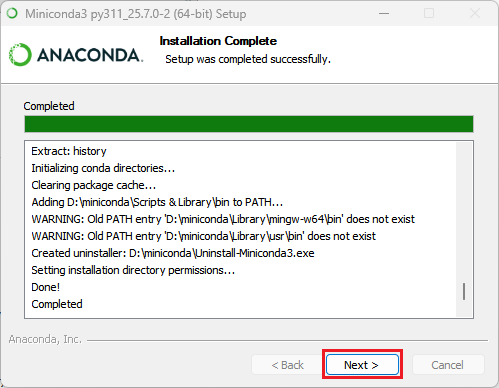
Locate the downloaded Miniconda installer and double-click to install.

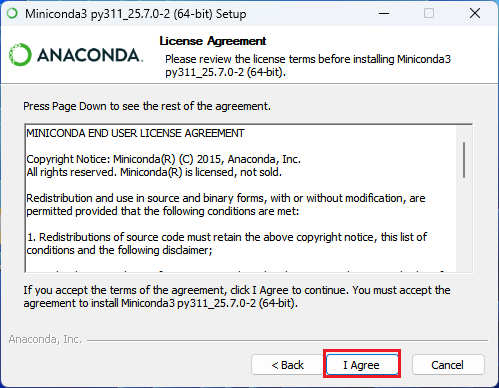
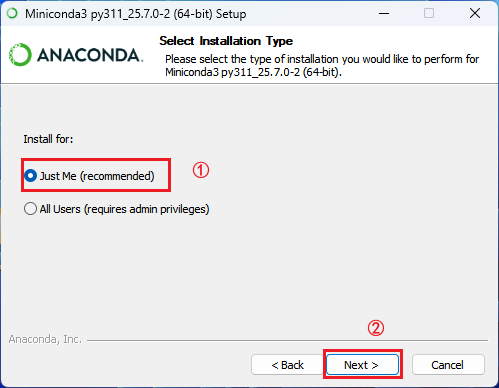
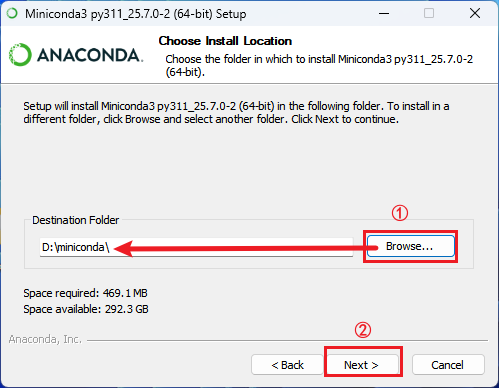
Ensure all options at the bottom are checked to avoid environment configuration issues.
③ Change the Package Source
anaconda | Mirror Site Help | Tsinghua Open Source Mirror
Click the link to access the Miniconda software repository and locate the third-party source highlighted in the figure below.
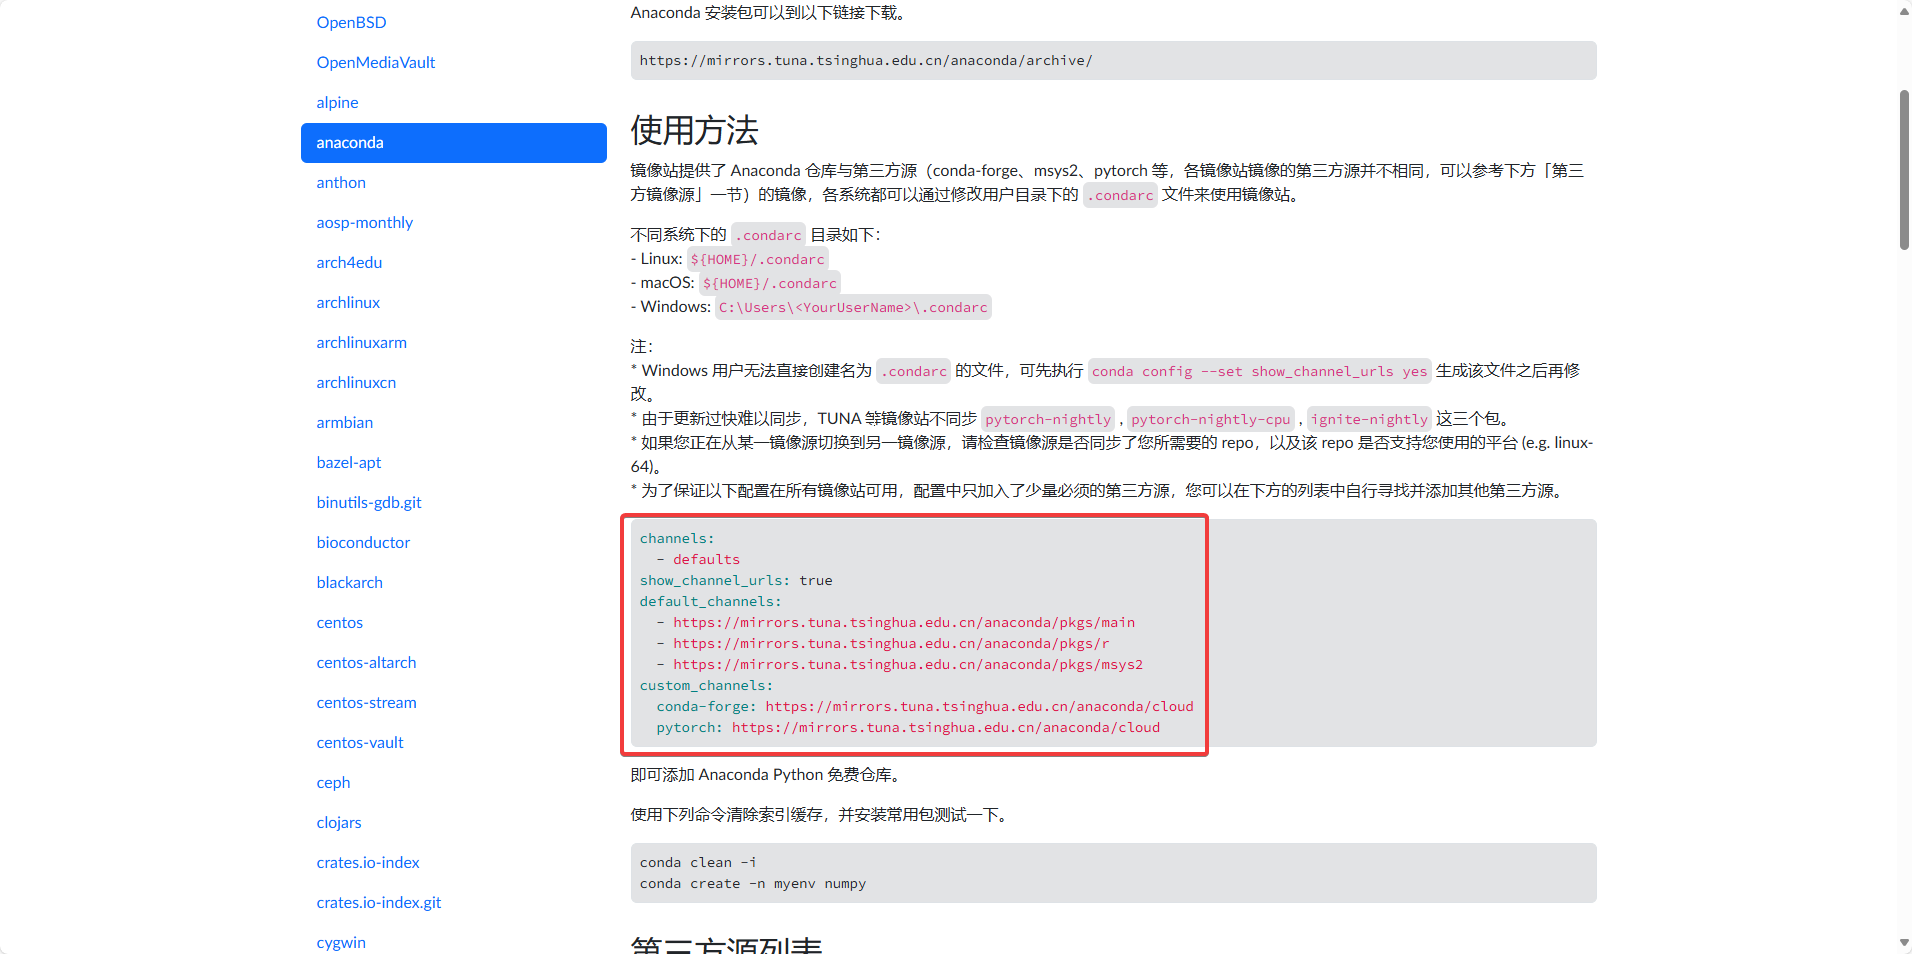
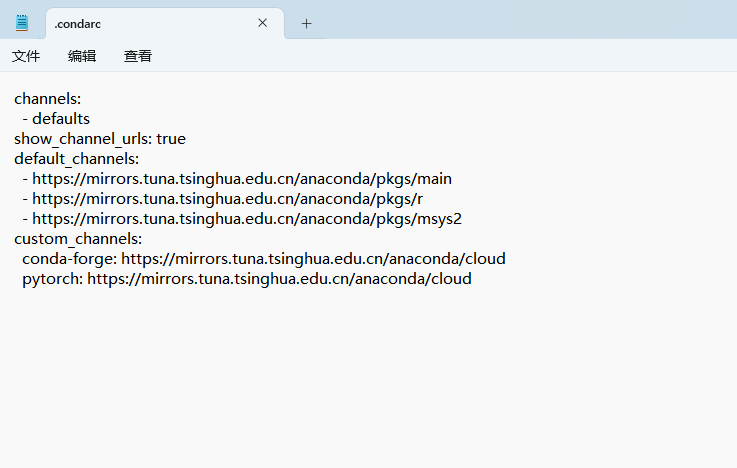
channels:
  - defaults
show_channel_urls: true
default_channels:
  - https://mirrors.tuna.tsinghua.edu.cn/anaconda/pkgs/main
  - https://mirrors.tuna.tsinghua.edu.cn/anaconda/pkgs/r
  - https://mirrors.tuna.tsinghua.edu.cn/anaconda/pkgs/msys2
custom_channels:
  conda-forge: https://mirrors.tuna.tsinghua.edu.cn/anaconda/cloud
  pytorch: https://mirrors.tuna.tsinghua.edu.cn/anaconda/cloud
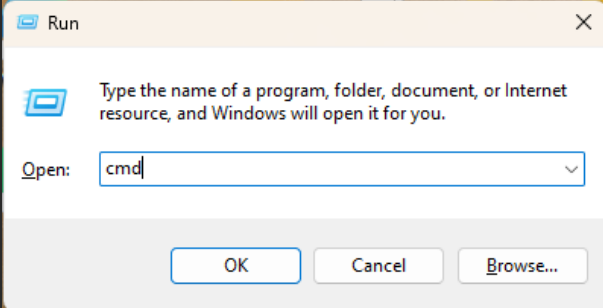
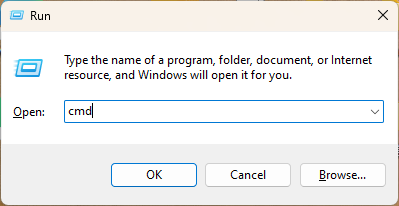
Press Win + R to open the Control Panel, type cmd, and open the terminal.
Enter the command in the terminal to generate .condarc file.
conda config --set show_channel_urls yes

The .condarc file is generally located in the user directory, for example, C:\Users\Admin. Open .condarc and replace its contents as shown below:
Run the command to clear the index cache.
conda clean -i

Ubuntu System Installation
① Download the Miniconda Package
Press Ctrl+Alt+T to open the terminal and enter the command to download the Miniconda package.
wget https://repo.anaconda.com/miniconda/Miniconda3-py311_25.7.0-2-Linux-x86_64.sh

②Install Miniconda
Enter the command to start the Miniconda installation.
sh Miniconda3-py311_25.7.0-2-Linux-x86_64.sh

Press Enter to continue.

Type yes and press Enter to proceed.

By default, Miniconda will be installed to /home/ubuntu/miniconda3; press Enter to accept. To change the installation directory, input the desired path and press Enter.

Type yes and press Enter to complete the installation.

Close the terminal and reopen it to see the interface shown below.

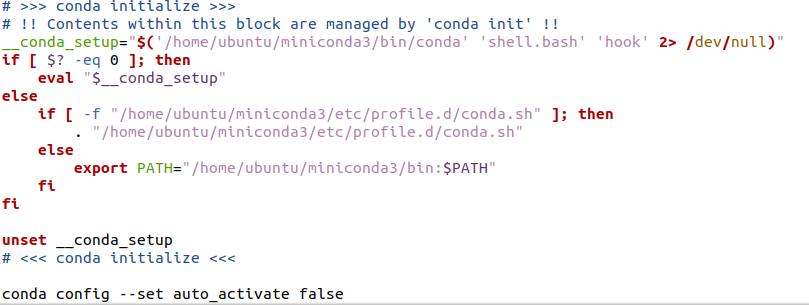
If you do not want to use Miniconda’s Python environment by default, add a line to the .bashrc file:
Enter the command to open the .bashrc file.
gedit .bashrc

Locate the conda initialize code and add the specified line below it. Press Ctrl+S to save, close the file, and reopen the terminal to apply the changes.
conda config --set auto_activate false
③ Change the Package Source
anaconda | Mirror Site Help | Tsinghua Open Source Mirror
Click the link to access the Miniconda software repository and locate the third-party source highlighted in the figure below.
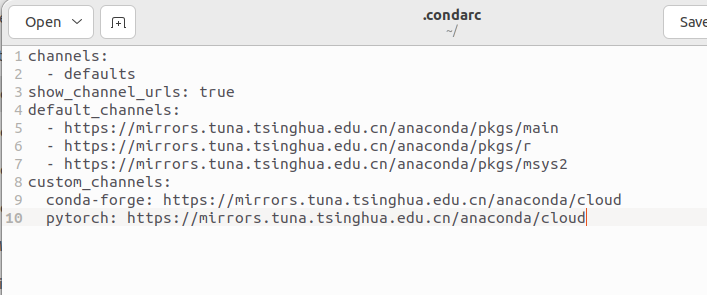
channels:
  - defaults
show_channel_urls: true
default_channels:
  - https://mirrors.tuna.tsinghua.edu.cn/anaconda/pkgs/main
  - https://mirrors.tuna.tsinghua.edu.cn/anaconda/pkgs/r
  - https://mirrors.tuna.tsinghua.edu.cn/anaconda/pkgs/msys2
custom_channels:
  conda-forge: https://mirrors.tuna.tsinghua.edu.cn/anaconda/cloud
  pytorch: https://mirrors.tuna.tsinghua.edu.cn/anaconda/cloud
Enter the command in the terminal to generate .condarc file.
conda config --set show_channel_urls yes

The .condarc file is generally located in the user directory, for example, /home/ubuntu. Open .condarc with the gedit tool and enter the command to replace its contents as shown below.
gedit .condarc
Run the command to clear the index cache, type y, and press Enter.
conda clean -i

2.2.2 Configure Virtual Environment
Windows Virtual Environment Setup
① Open the Terminal
Press Win + R to open the Control Panel, type cmd, and open the terminal.
② Create the Virtual Environment
Enter the command and press Enter to create the virtual environment and install the ffmpeg package , recommended version 7.1.1, which supports libsvtav1 encoding.
conda create -n lerobot python=3.10.18 ffmpeg=7.1.1 -c conda-forge

When prompted, press y and then Enter to continue.

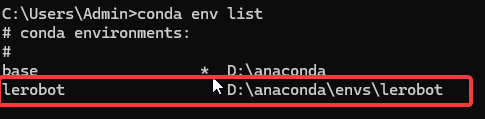
After creation, enter the command to verify the newly created virtual environment.
conda env list
③ Activate the Virtual Environment
conda activate lerobot

④ Download the Code Repository
SO-ARM101 open-source 6-axis robotic arm project path: Software Tools & Source Code\Source Code\lerobot.zip
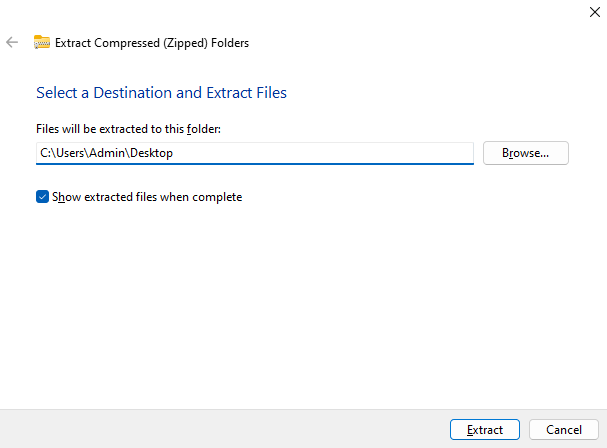
Right-click Extract All.
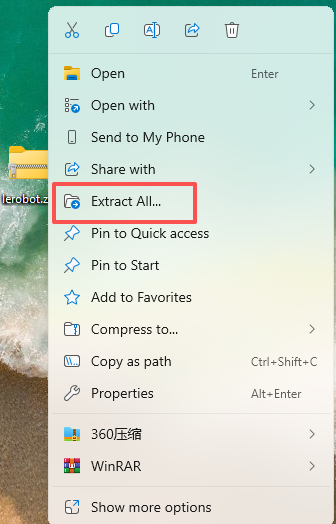
Extract the lerobot project folder to the desktop.
⑤ Install Dependency Packages
Navigate to the lerobot directory, install the dependencies for lerobot, and include the drivers for Feetech servos.
cd Desktop\lerobot
pip install -e ".[feetech]" -i https://pypi.tuna.tsinghua.edu.cn/simple

Ubuntu Virtual Environment Setup
① Create the Virtual Environment
Press Ctrl+Alt+T to open the terminal, enter the command, and press Enter to create the virtual environment and install the ffmpeg package, recommended version 7.1.1, which supports libsvtav1 encoding.
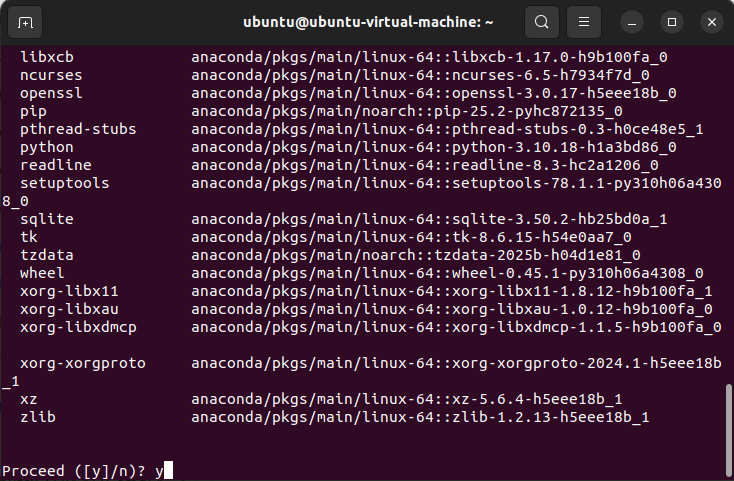
conda create -n lerobot python=3.10.18 ffmpeg=7.1.1 -c conda-forge
When prompted, press y and then Enter to continue.
After creation, enter the command to verify the newly created virtual environment.
conda env list

② Activate the Virtual Environment
conda activate lerobot

③ Download the Code Repository
SO-ARM101 open-source 6-axis robotic arm project path: Software Tools & Source Code\Source Code\lerobot.zip
Copy the SO-ARM101 open-source 6-axis robotic arm project package to the Ubuntu system and place it under /home/ubuntu. Use unzip to extract the package, then enter the command to unzip it.
unzip lerobot.zip

Enter the command in the terminal to view the files.
ls

④ Install Dependency Packages
Navigate to the lerobot directory, install the dependencies for lerobot, and include the drivers for Feetech servos.
cd lerobot
pip install -e ".[feetech]" -i https://pypi.tuna.tsinghua.edu.cn/simple

3. Robotic Arm Assembly
The subsequent steps are the same for both Ubuntu and Windows systems; Here use Windows as an example.
Note
On Ubuntu systems, it may be necessary to grant access to USB ports by running the following commands:
sudo chmod 666 /dev/ttyACM0
sudo chmod 666 /dev/ttyACM1
3.1 Servo ID Setting (Optional for DIY Kit Only)
Note
This section is only applicable to the DIY Kit. Check the kit version before proceeding.
For Pre-assembled Kits: Skip this section. The robotic arm comes fully configured and factory-calibrated out of the box. Feel free to proceed directly to the next chapter!
For DIY Kit: Please follow these steps. When assembling the robotic arm from scratch, the servo IDs must be assigned according to the instructions below prior to mechanical assembly.
Refer to the related videos: 1. Leader Arm ID Setting 2. Follower Arm ID Setting
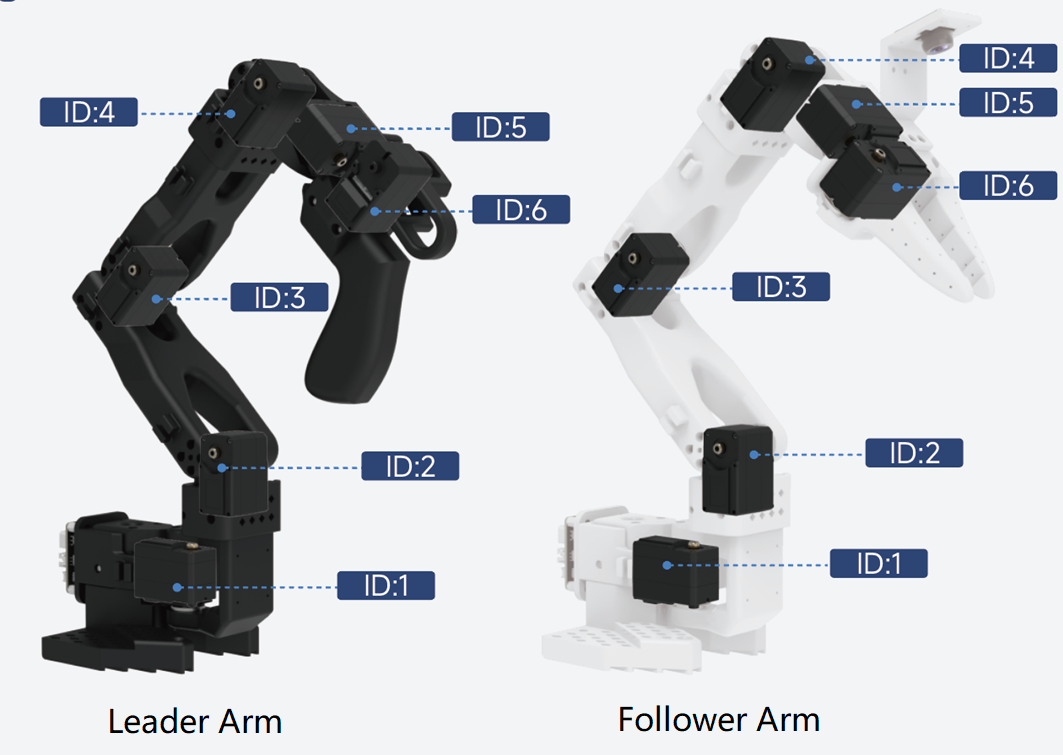
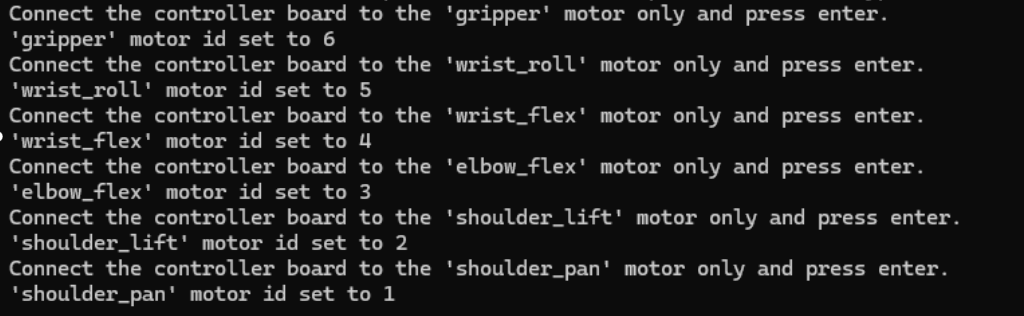
The servo names from top to bottom of the robotic arm are as follows: gripper, wrist_roll, wrist_flex, elbow_flex, shoulder_lift, and shoulder_pan, corresponding to ID6 to ID1.
Note
When setting the servo ID, only one servo should be connected to the board. The signal lines of the other servos should be disconnected.
3.1.1 Follower arm
Press Win+R to open the Control Panel, type cmd, and open the terminal.
Enter the command to activate the virtual environment.
conda activate lerobot

Use the cd tool to navigate to the project folder, then enter the command to proceed with the ID setup.
cd Desktop\lerobot
lerobot-setup-motors --robot.type=so101_follower --robot.port=COM24

For each servo name prompt, ensure the corresponding servo ID is inserted individually, then press Enter for automatic setup. When the next servo name prompt appears, it indicates that the previous servo setup is complete. Repeat the connection and press Enter for subsequent servos.
Note
Be sure to clearly label the configured ID numbers and do not mix them up. Each ID must be installed on its corresponding joint.
3.1.2 Leader arm
Enter the command to perform the ID setup.
lerobot-setup-motors --teleop.type=so101_leader --teleop.port=COM22
Follow the same steps as for the follower arm.
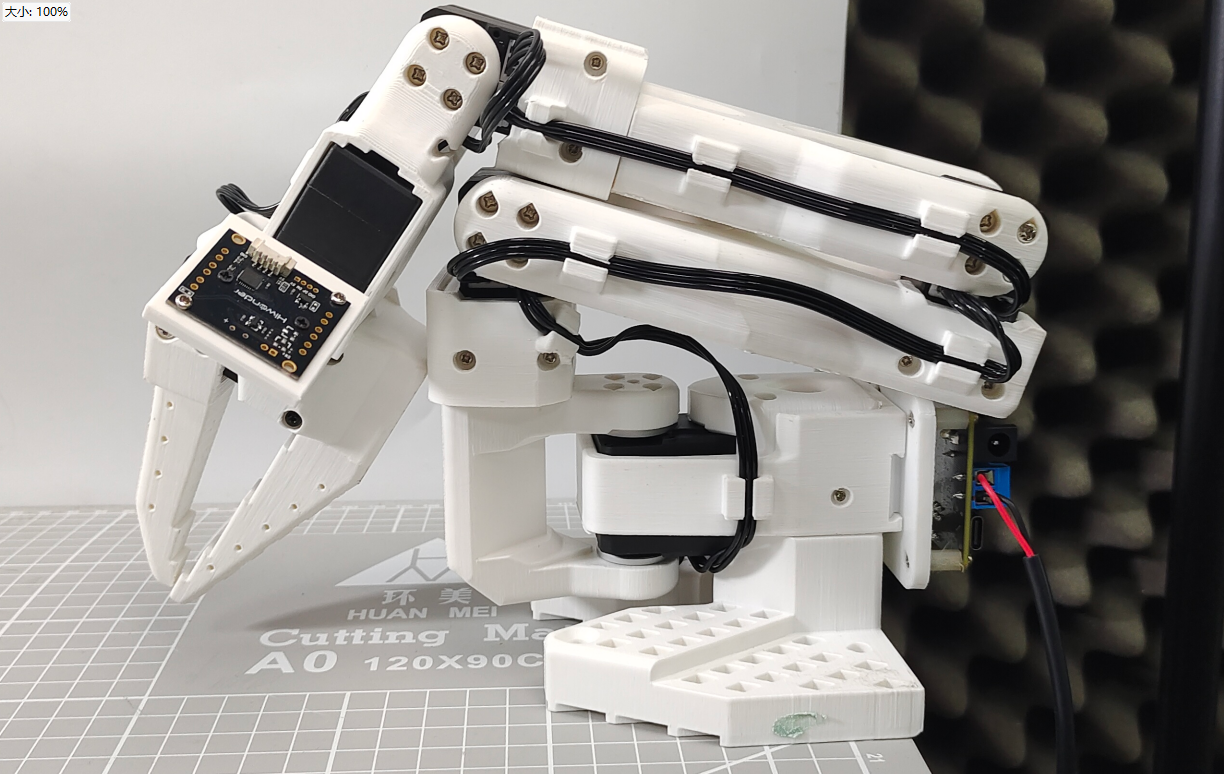
3.2 Hardware Assembly
Refer to the related video: 1.Tutorials\Video Tutorials\3.1 Hardware Assembly
3.3 Camera Installation
Refer to the related video: 1.Tutorials\Video Tutorials\3.2 Camera Installation Tutorial
3.4 Circuit Connection
Refer to the related video: 1.Tutorials\Video Tutorials\3.3 Circuit Connection Tutorial
3.5 Check the Port Number
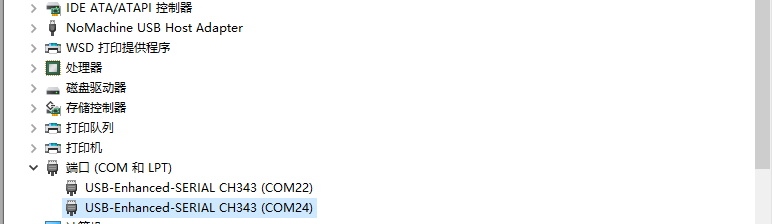
First, connect the follower arm, open Device Manager, and check the port number.
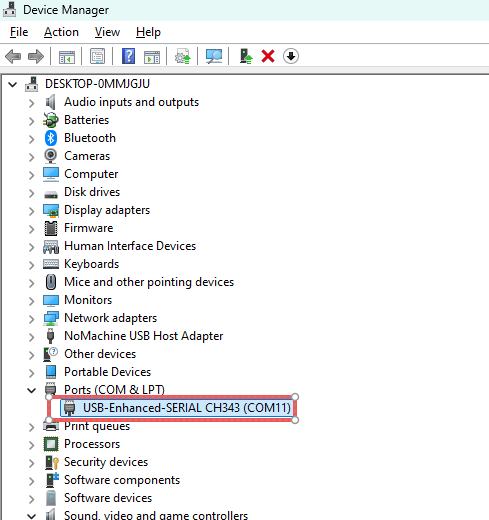
Then connect the leader arm and check the newly added port number.
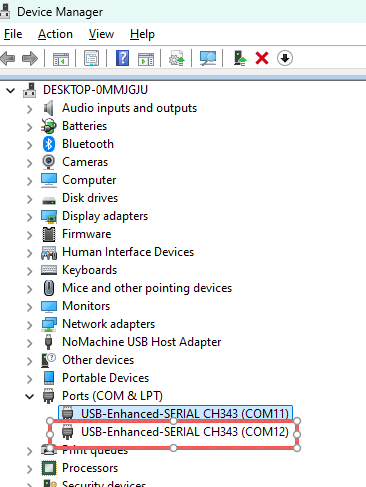
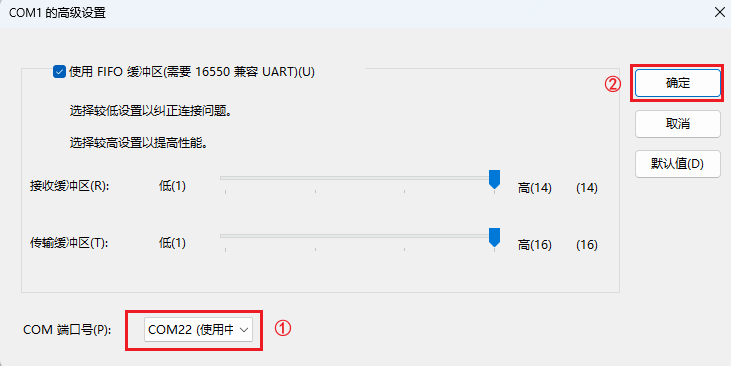
To simplify future use, set fixed port numbers: Right-click the COM icon and select
Properties→Port Settings→Advanced.
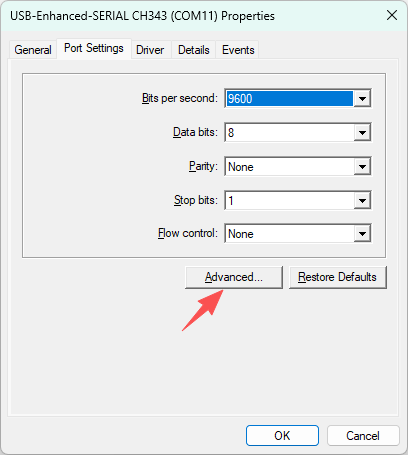
In the port number options, set the leader arm port to COM22 and the follower arm port to COM24. If COM22 is already marked as “in use,” it indicates that the port is occupied.
After setting the leader arm and follower arm port numbers to 22 and 24 respectively, the configuration is complete when displayed as shown in the figure.
4. Robotic Arm Control
4.1 Calibration
Note
Calibration is not required for the pre-assembled kit, and this section can be skipped. This procedure applies only to the DIY kit.
Calibrate the robot to ensure that the main robotic arm and the follower robotic arm have the same position values when in the same physical position.
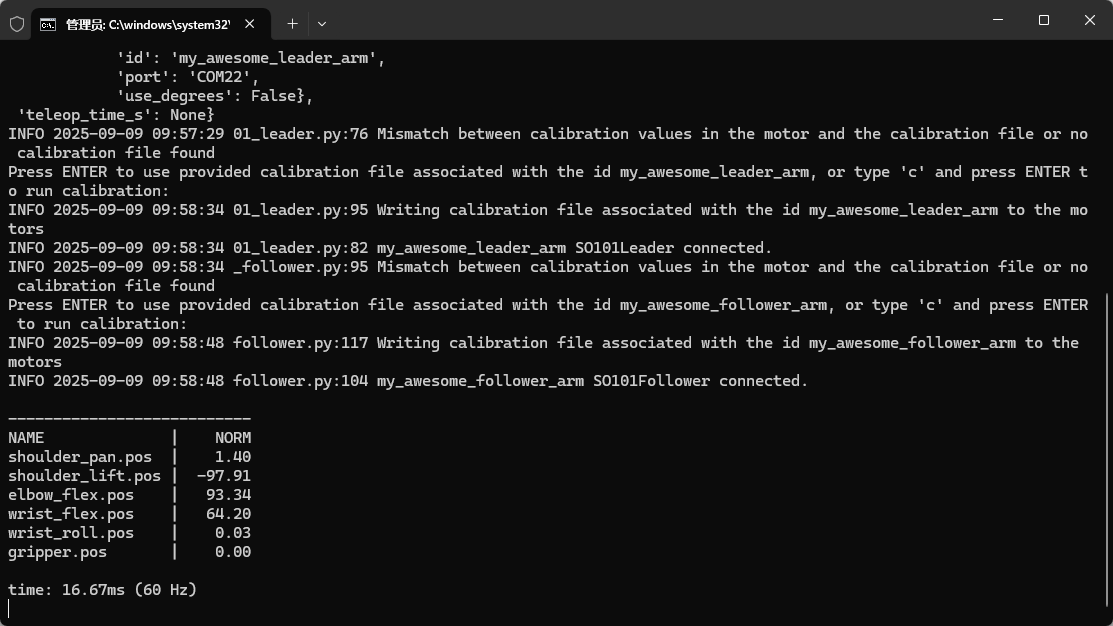
4.1.1 Follower Robotic Arm
Enter the command to start calibration.
lerobot-calibrate --robot.type=so101_follower --robot.port=COM24 --robot.id=my_awesome_follower_arm

Move all joints of the robot to the initial position of the robotic arm, as shown in the figure below.
If the arm has not been calibrated, press Enter to start calibration. If recalibration is required, enter c and press Enter to perform recalibration.

Perform calibration by manually adjusting each joint of the robotic arm; refer to the video for detailed instructions.
4.1.2 Main Robotic Arm (Leader)
Enter the command to start calibration.
lerobot-calibrate --teleop.type=so101_leader --teleop.port=COM22 --teleop.id=my_awesome_leader_arm
Follow the same steps as for the follower arm.
4.2 Teleoperation Without Vision
Enter the command to access the robotic arm control.
python -m lerobot.teleoperate --robot.type=so101_follower --robot.port=COM24 --robot.id=my_awesome_follower_arm --teleop.type=so101_leader --teleop.port=COM22 --teleop.id=my_awesome_leader_arm

When prompted, press Enter to continue.

When the interface shown in the figure below appears, control the follower arm via the leader arm.
Press Ctrl+C to terminate the program.
4.3 Teleoperation with vision
Connect the USB cables of both cameras to the computer.
Note
If using a docking station, do not connect both cameras to the docking station.
Ensure the fixed environment camera captures the entire motion of the follower arm.
Enter the command to detect the cameras ID and verify that images from both cameras are displayed.
lerobot-find-cameras opencv
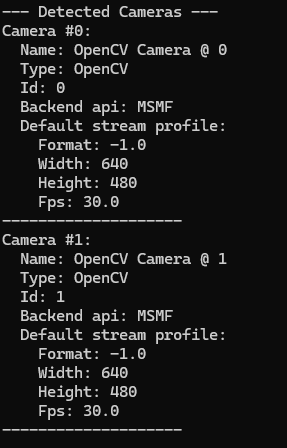
After execution, the captured images will be saved to outputs\captured_images.

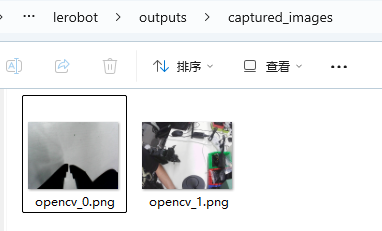
Differentiate the cameras by file name ID: opencv_0 corresponds to index_or_path: 0, and opencv_1 corresponds to index_or_path: 1.
Enter the command to visualize the teleoperation of the robotic arm.
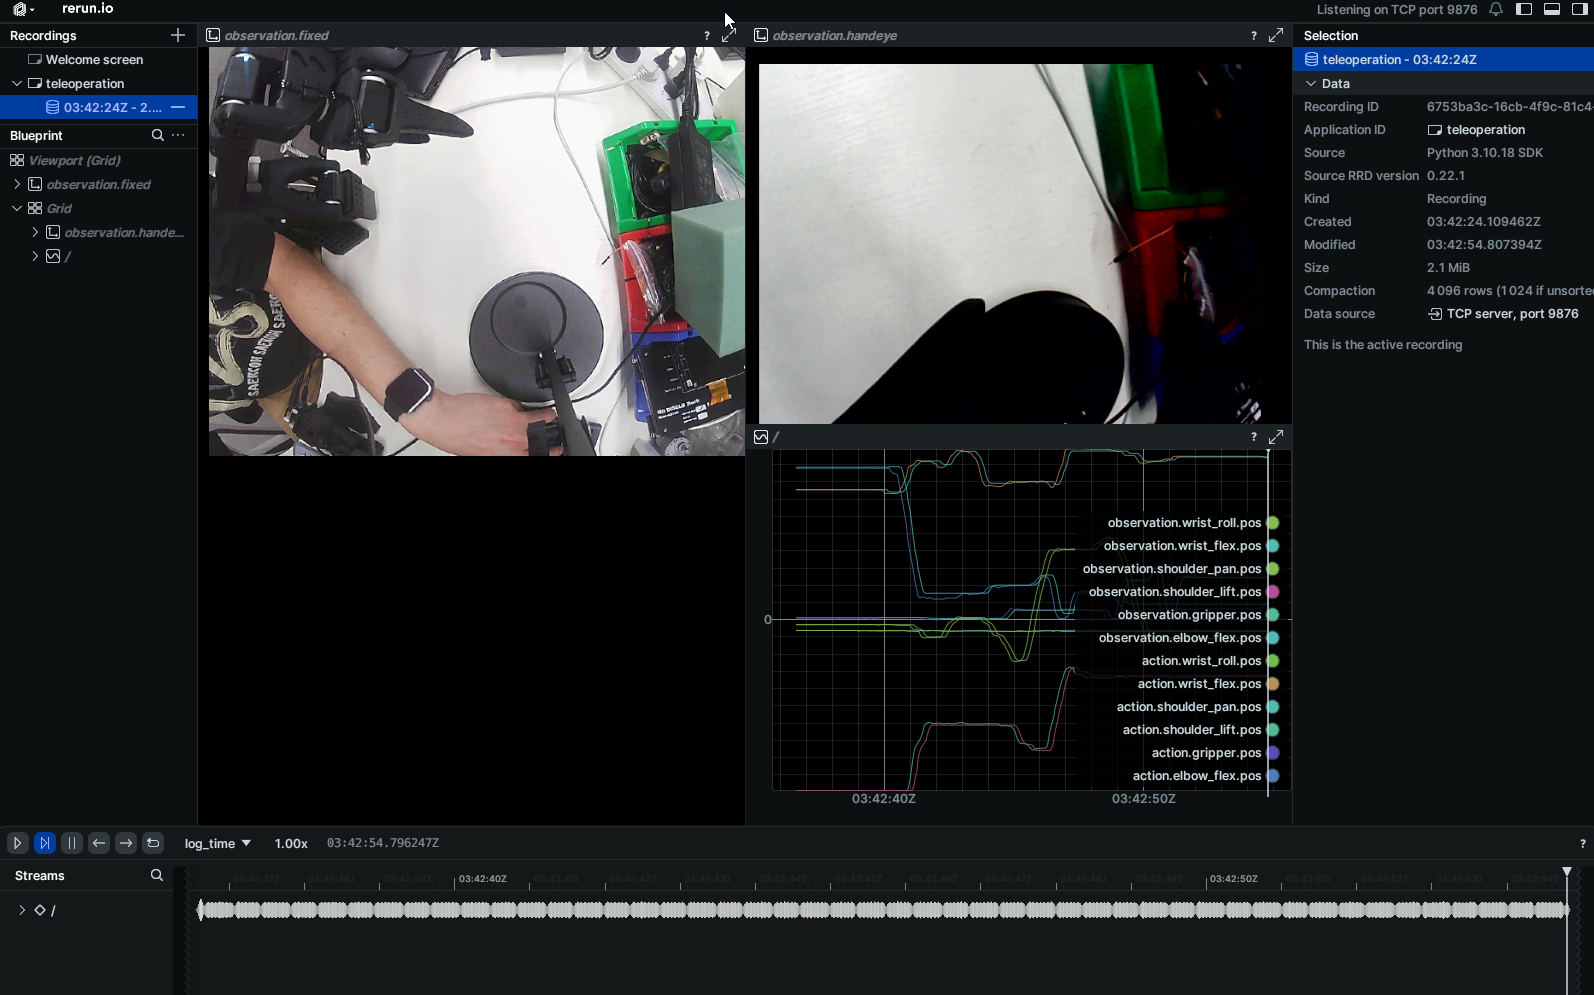
python -m lerobot.teleoperate --robot.type=so101_follower --robot.port=COM24 --robot.id=my_awesome_follower_arm --robot.cameras="{ fixed: {type: opencv, index_or_path: 1, width: 640, height: 480, fps: 30}, handeye: {type: opencv, index_or_path: 0, width: 640, height: 480, fps: 30}}" --teleop.type=so101_leader --teleop.port=COM22 --teleop.id=my_awesome_leader_arm --display_data=true

Note
fixed is the fixed environment camera, and handeye is the gripper camera.
When prompted, press Enter to continue.

While controlling the follower arm via the leader arm, the camera feeds will be transmitted in real time. To terminate the program, press Ctrl+C in the terminal.
5. Data Acquisition
Steps for data acquisition:
Initialize the robot and sensors.
Start the teleoperation interface.
Operate the robot to complete the task.
The system synchronously records all sensor data and control commands.
Save the data in the standard LeRobot dataset format.
Optional: perform real-time quality monitoring and visualization.
Note
Data acquisition requires proficient control of the robotic arm for grasping before operation to avoid inaccurate data due to improper handling.
Enter the command to start data acquisition, and optionally replace ${HF_USER} with your own username. Note that the username must be in English. In this example, the command is set to acquire 20 samples; to acquire more, change the number 20 of dataset.num_episodes=20 to the desired count.
python -m lerobot.record --robot.type=so101_follower --robot.port=COM24 --robot.id=my_awesome_follower_arm --robot.cameras="{ handeye: {type: opencv, index_or_path: 0, width: 640, height: 480, fps: 30}, front: {type: opencv, index_or_path: 1, width: 640, height: 480, fps: 30}}" --teleop.type=so101_leader --teleop.port=COM22 --teleop.id=my_awesome_leader_arm --display_data=true --dataset.repo_id=${HF_USER}/demo --dataset.num_episodes=20 --dataset.single_task="Grab the screwdriver"

When prompted, press Enter to continue.

When the next prompt appears, data recording has started. At this stage, control the leader arm to operate the follower arm for grasping the target object and placing it at the designated location.

Note
During recording, ensure the environment remains relatively static for best results; for example, the camera should capture only the robotic arm in motion, and avoid including hands or people in the frame.
After completing the action, press → to continue. When the prompt below appears, reset the environment.

After environment reset, press → to save the data. When the progress bar shown in the figure below reaches 100%, the data has been successfully saved. To discard the current round of data, press ← to re-record, and this round will not be saved.

After finishing a round, wait for the next recording indicator shown in the figure below. This indicates the start of the next round.

In this example, 20 rounds of data are acquired. To ensure data diversity, place the target object in different positions for each round.

When Recording episode 19 appears, it indicates that the system has entered the twentieth round of recording. After finishing the recording, Stop recording will be displayed, signifying the completion. Press Esc to terminate the program.
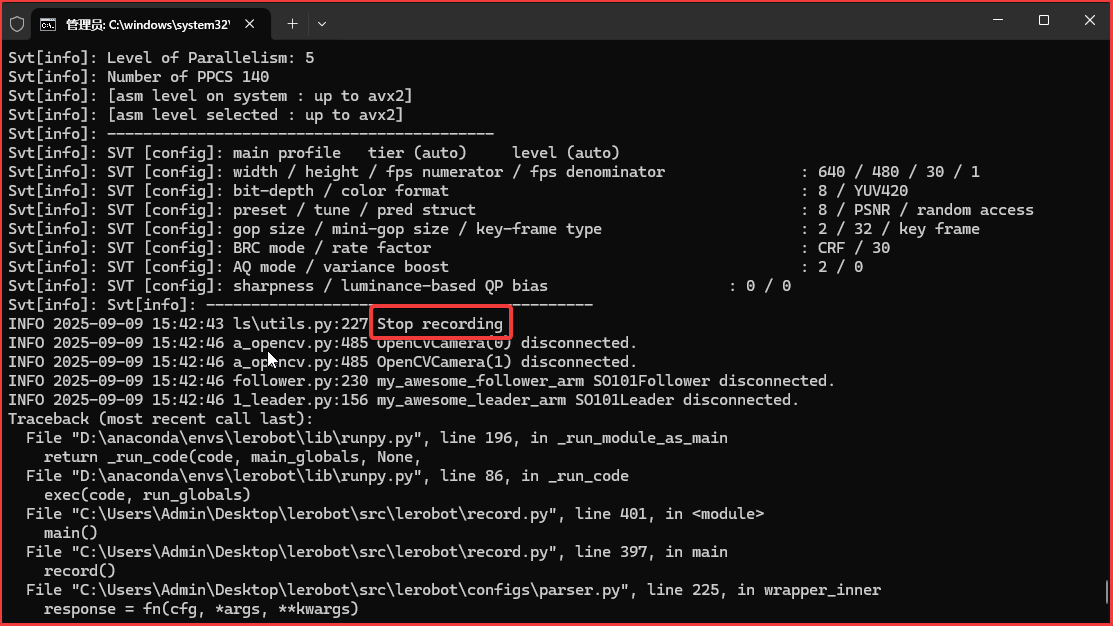
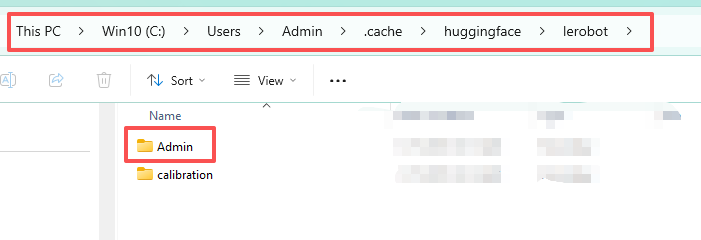
The data is saved by default to Admin\.cache\huggingface\lerobot.
6.Dataset Training
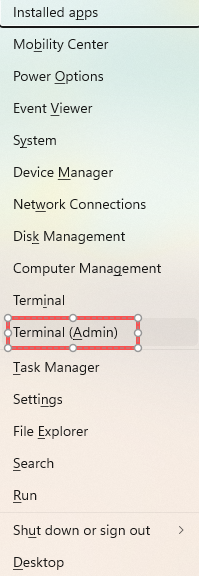
Press Win+X and click Terminal(Admin) with administrator privileges to open the command line terminal.
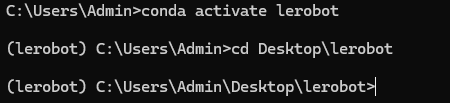
Enter the command to activate the virtual environment and navigate to the LeRobot working directory.
conda activate lerobot
cd .\Desktop\lerobot\

Note
It is not recommended to train on a computer without a discrete GPU.
The following steps require a computer with a discrete GPU.
Enter the command to install CUDA 11.8.
pip install torch==2.7.1 torchvision==0.22.1 torchaudio==2.7.1 --index-url https://download.pytorch.org/whl/cu118

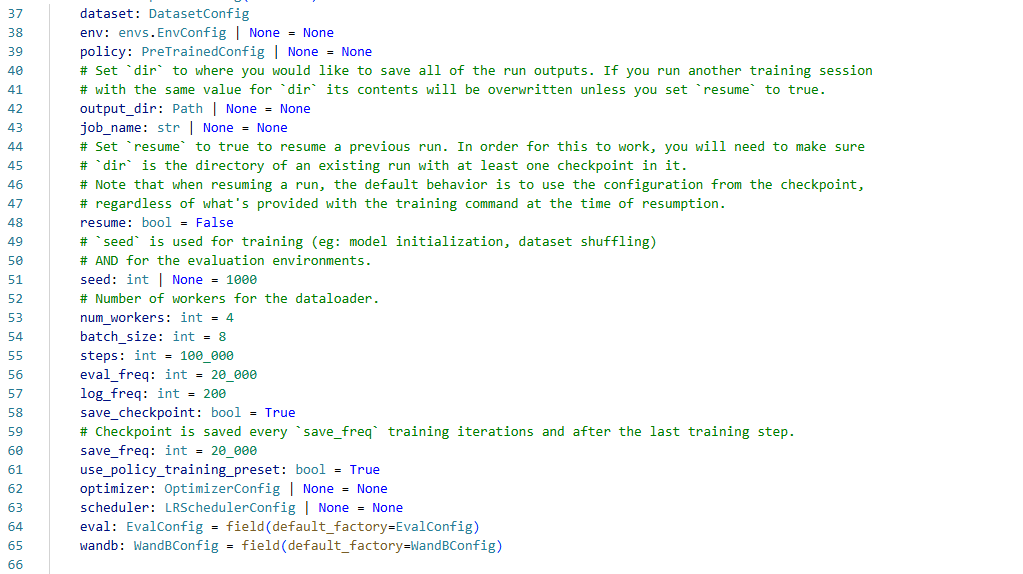
The model training configuration file is located in src\lerobot\configs\train.py, as shown in the figure below. Adjust the model training settings as needed.
Parameter description:
dataset: Dataset configuration object defines the dataset to be used for training.env: Environment configuration object is used to define the parameters of the robot’s simulation or real environment (optional).policy: Pre-trained model configuration defines the architecture and parameters of the policy network (optional).output_dir: Training output directory path, used to store model checkpoints, logs, and other files. If training is performed again using the same path, the existing content will be overwritten (unless “resume” is enabled).job_name: Used to identify the current training task (optional).resume: Whether to resume training from a checkpoint. Set to True to resume training; ensure that at least one checkpoint file exists in the output_dir.seed: Random seed (default 1000), used to control the randomness in model initialization, dataset shuffling, and evaluation environment, ensuring experiment reproducibility.num_workers: Number of data loader worker processes (default 4), which affects data loading speed.batch_size: Batch size (default 8), the number of samples processed per iteration.steps: Total number of training steps (default 100,000).eval_freq: Evaluation frequency (default every 20,000 steps), periodically evaluates model performance on the validation set.log_freq: Logging frequency (default every 200 steps), controls the interval for recording training metrics.save_checkpoint: Whether to save training checkpoints (default True).save_freq: Checkpoint saving frequency (default every 20,000 steps), a checkpoint will also be saved after the final training step.use_policy_training_preset: Whether to use the pre-set policy training configuration (default True).optimizer: Optimizer configuration object, defines parameters such as learning rate and weight decay (optional).scheduler: Learning rate scheduler configuration, defines the learning rate decay strategy (optional).eval: Evaluation configuration object, contains detailed settings for evaluation.wandb: Weights & Biases configuration object, used for experiment tracking and visualization.
Enter the command to start training.
python src/lerobot/scripts/train.py --dataset.repo_id=${HF_USER}/demo --policy.type=act --output_dir=outputs/train/act_so101_test --job_name=act_so101_test --policy.device=cuda --wandb.enable=false --policy.push_to_hub=false

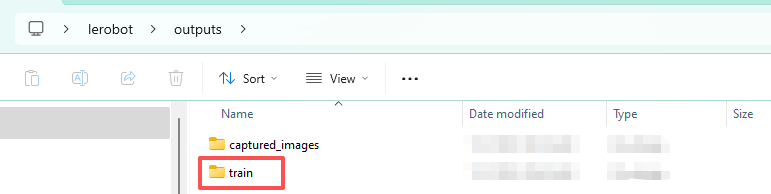
After training is complete, a folder named train will be generated in lerobot/outputs, with the specific path: C:/Users/Admin/Desktop/lerobot/outputs/train.
7 Model Testing
The SO-ARM101 open-source 6-axis robotic arm inference is achieved through a data-driven approach, allowing the robot to imitate human behavior. It treats complex robotic control problems as a supervised learning task, where the inference process relies on a trained model capable of multi-modal fusion of information extracted from the environment (mainly visual observations) and natural language instructions, directly mapping it to specific robot actions. This is essentially behavior cloning-based imitation learning. It enables the robot to learn from human demonstration data and develop end-to-end reasoning capabilities. This allows the robot to complete specific tasks from perception to action.
Inference deployment steps:
Load the trained policy model.
Initialize the physical robot and its sensors.
Establish the mapping from sensor data to policy input.
Establish the mapping from policy output to robot control commands.
Execute policy inference and robot control within the control loop.
Optional: Real-time visualization and monitoring.
7.1 Real-time Inference Testing
Press Win + R to open the Control Panel, type cmd, and open the terminal.

Enter the command to activate the virtual environment and navigate to the project directory.
conda activate lerobot
cd Desktop\lerobot
Enter the command to start inference.
Note
outputs/train/act_so101_test/checkpoints/100000/pretrained_model The 100000 refers to the steps parameter you set (total training steps).
python -m lerobot.record --robot.type=so101_follower --robot.port=COM24 --robot.id=my_awesome_follower_arm --robot.cameras="{ handeye: {type: opencv, index_or_path: 0, width: 640, height: 480, fps: 30}, front: {type: opencv, index_or_path: 1, width: 640, height: 480, fps: 30}}" --display_data=true --dataset.repo_id=${HF_USER}/eval_so101 --dataset.single_task="Grab the screwdriver" --policy.path=outputs/train/act_so101_test/checkpoints/100000/pretrained_model
When prompted, press Enter to continue.

When the following symbol appears, it indicates that the robotic arm has started inference.

When the following symbol appears, it indicates that the robotic arm inference has ended.

Press → to proceed to the next round of inference.
7.2. Common Issues During Inference
Issue 1: Distribution Shift and Poor Generalization
Description: The model performs well under the states it encountered during training (e.g., object position, lighting, background). However, performance drastically declines when faced with “out-of-distribution” data (slightly different situations). For example, if the training data used a white table, but inference is done on a wooden table, the robot may fail to recognize the object.
Reason: The model learns the static distribution of states in the training data, rather than a deep understanding of the physical world. It “remembers” rather than truly “understands” the task.
Issue 2: Compound Errors
Description: This is a classic problem in behavior cloning. In each inference step, the model introduces small motion errors. Since it operates in an open-loop with no real-time correction based on results, the next input state is the result of the previous erroneous action, deviating further from the ideal state in the training data. The errors accumulate step by step, eventually causing the robot to completely deviate from the correct trajectory and fail the task.
Reason: Errors accumulate during inference, gradually leading to significant deviation from the correct path.
Issue 3: Overfitting to Demonstration Style
Description: The model may not only learn the necessary actions to complete the task but also the demonstrator’s personal habits or specific style (e.g., an inefficient grip posture). This rigid style may become ineffective when the environment changes.
Reason: The model’s goal is to mimic the demonstration data as closely as possible, but the demonstration data may contain non-optimal or irrelevant behaviors that are not necessary for the task.