9. IOT Expanded Lesson
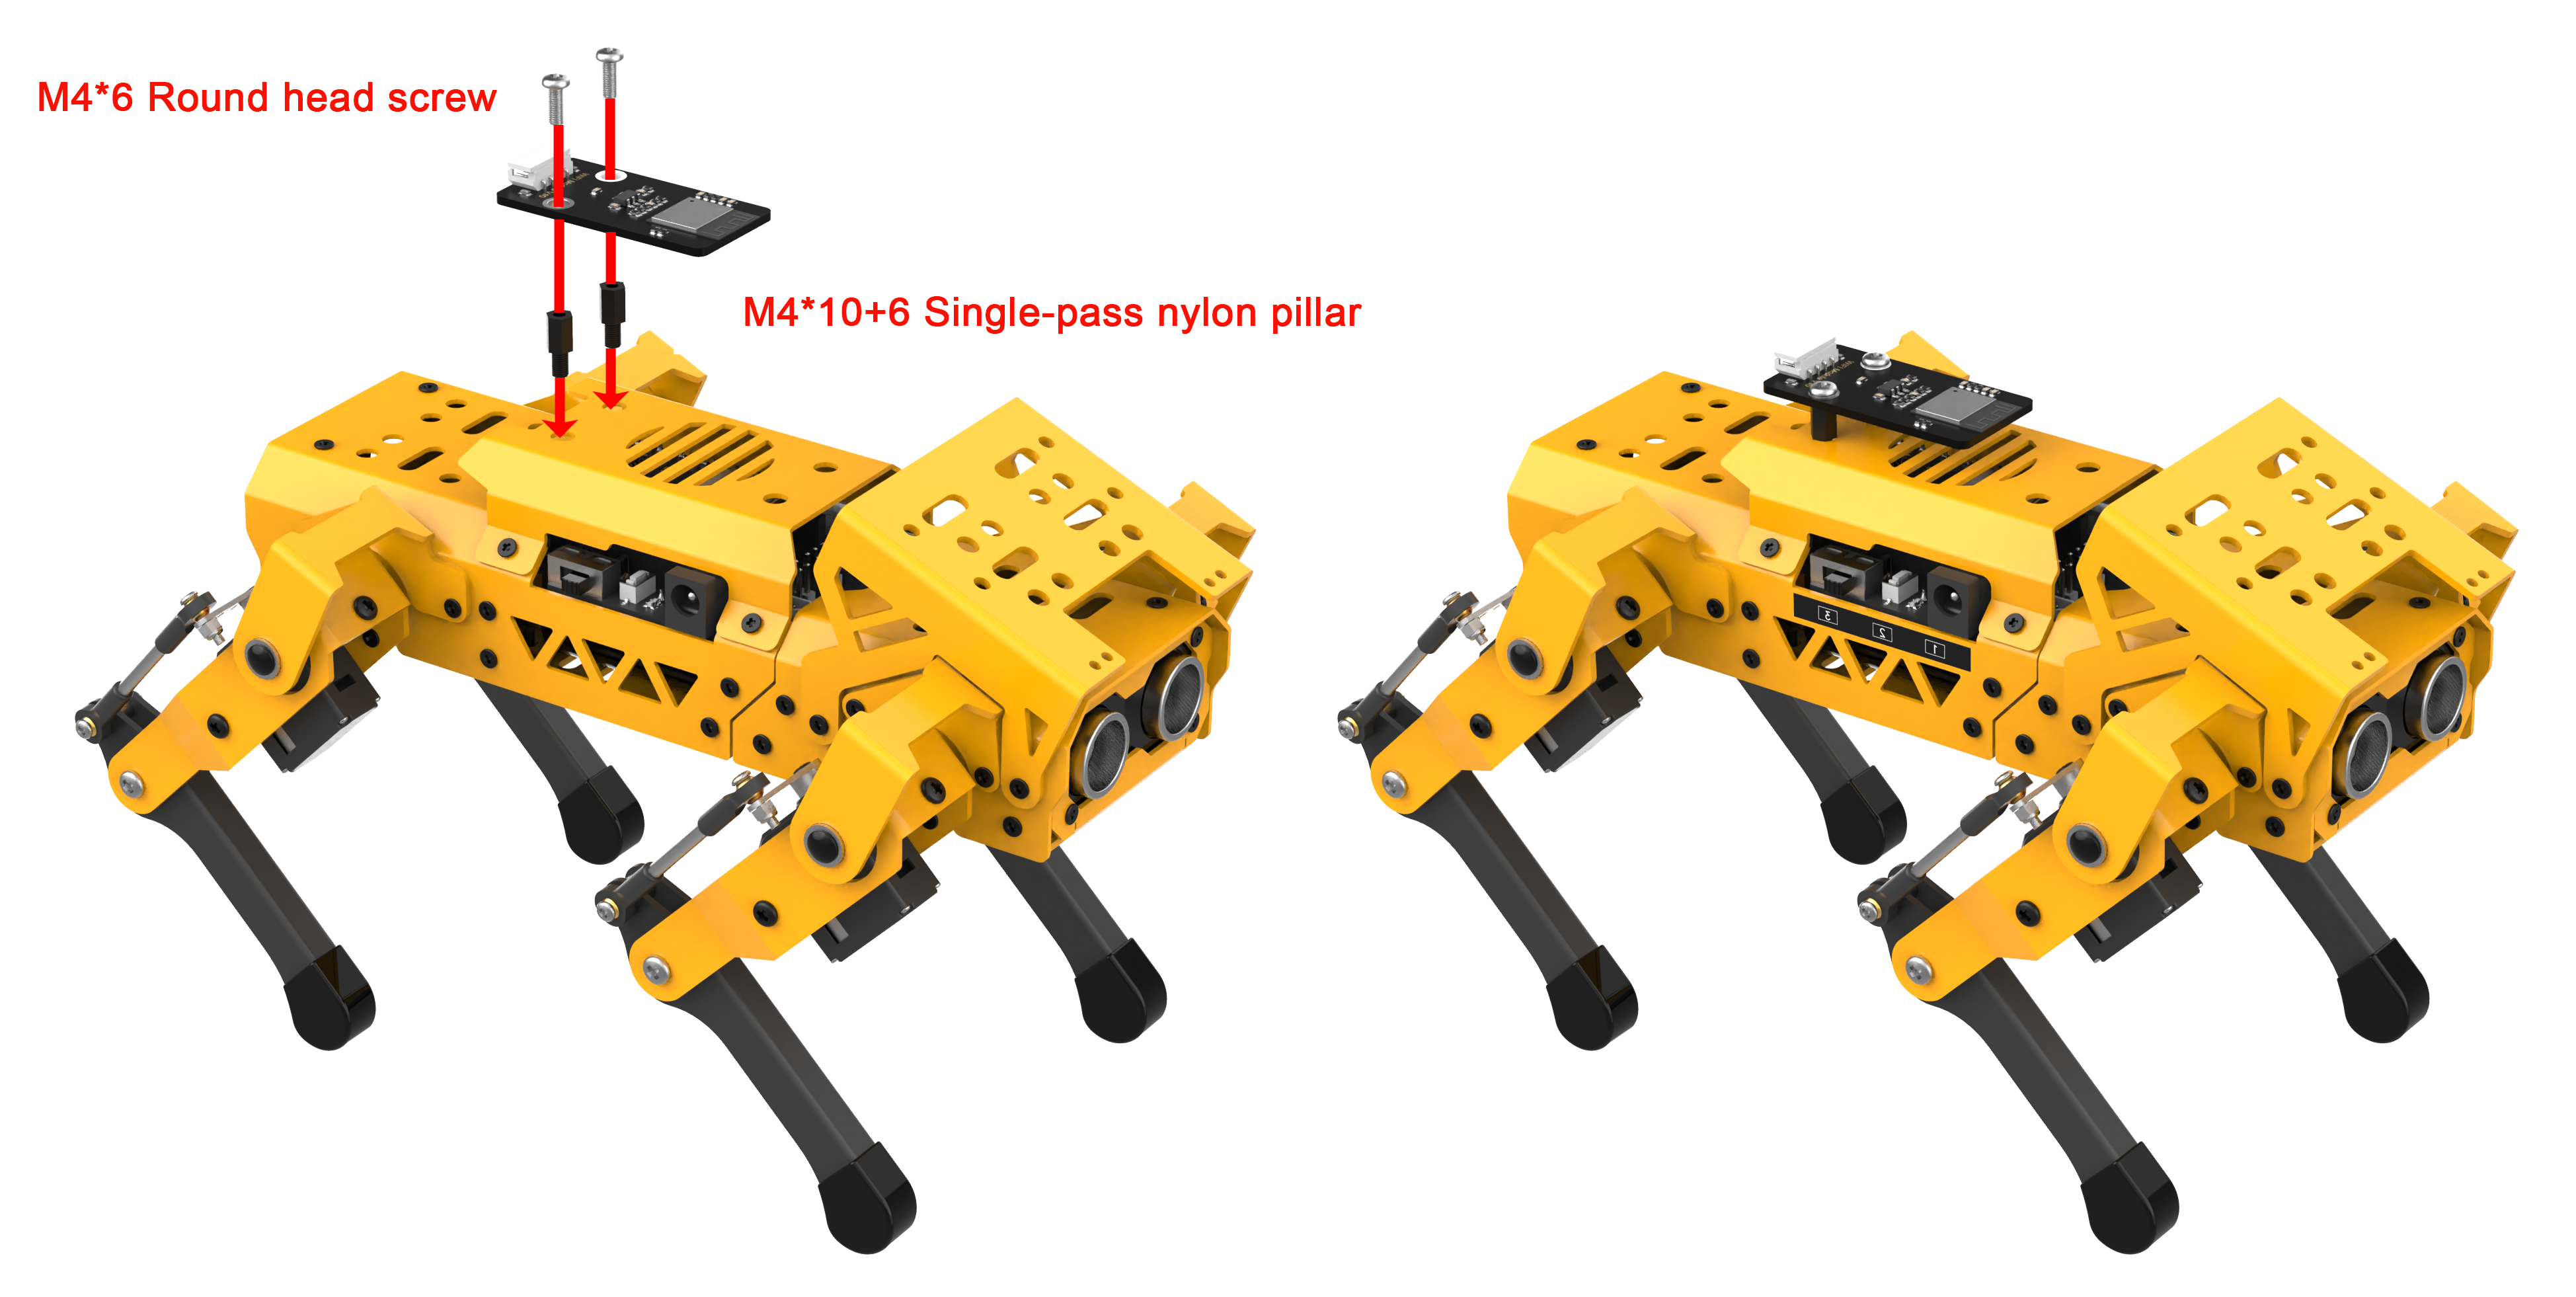
9.1 Sensor Assembly & Wiring
9.2 Program Download
9.2.1 MechDog IOT Program Download
Getting Ready
Before downloading the program, please power on the MechDog first. Then, connect it to the computer with a USB data cable. Failure to do so may result in the port cannot be detected.
Program Download
(1) Open the “Hiwonder Python Editor” software  .
.
(2) Drag the main.py program file, located in the same directory as this document, into the “Hiwonder Python Editor”. Make sure to drag it into the red box area for it to be effective.
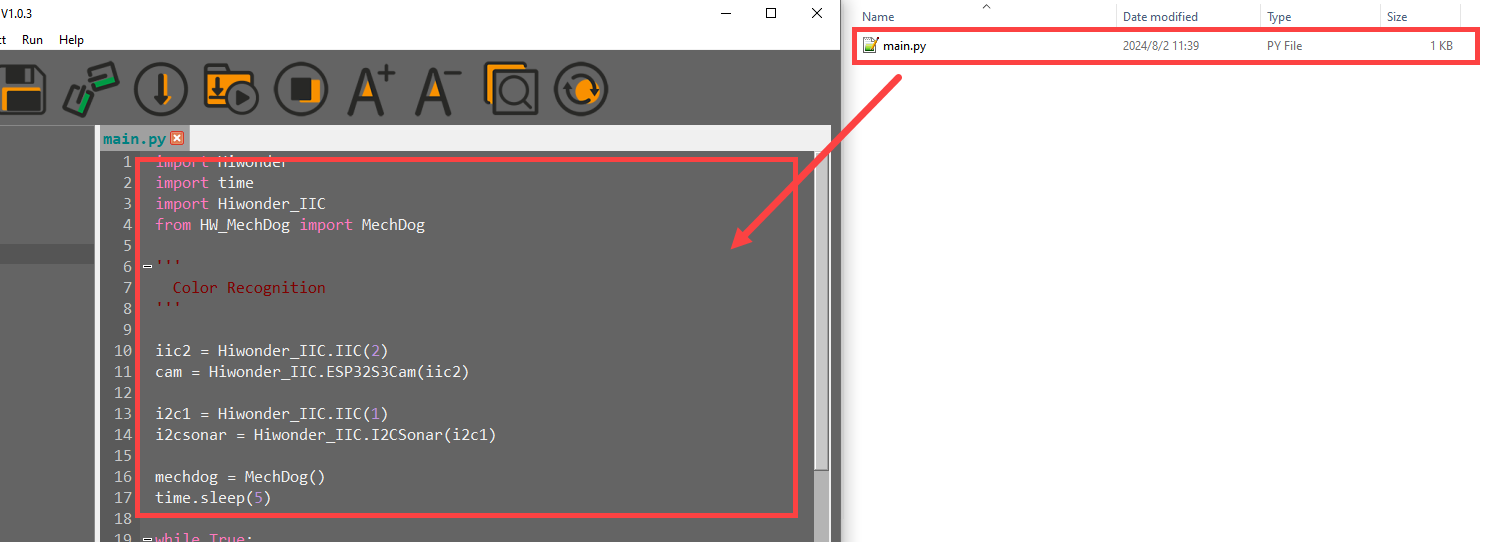
(3) Click the connection button  in the menu bar; it will change to a green icon
  once connected successfully.
(4) After successfully connecting, click the download button  in the menu bar to download the program to MechDog. Wait for the information interaction box below to indicate that the download is complete.

Program Outcome
Once the app is enabled, the MechDog can be controlled to perform various functions. For detailed information, please refer to the 9.3 APP Control .
9.2.2 Vision Module Program Download
This section aims to guide you to download the ESP32S3 vision module program. Take downloading the face detection program for demonstration. The method is also applicable to face recognition program.
Program Download
(1) Connect the ESP32S3 to the computer with a Type-C data cable.
(2) Locate and open the ESP32S3 Program->01 FaceDetection->FaceDetection.ino program file in the same directory as this section.

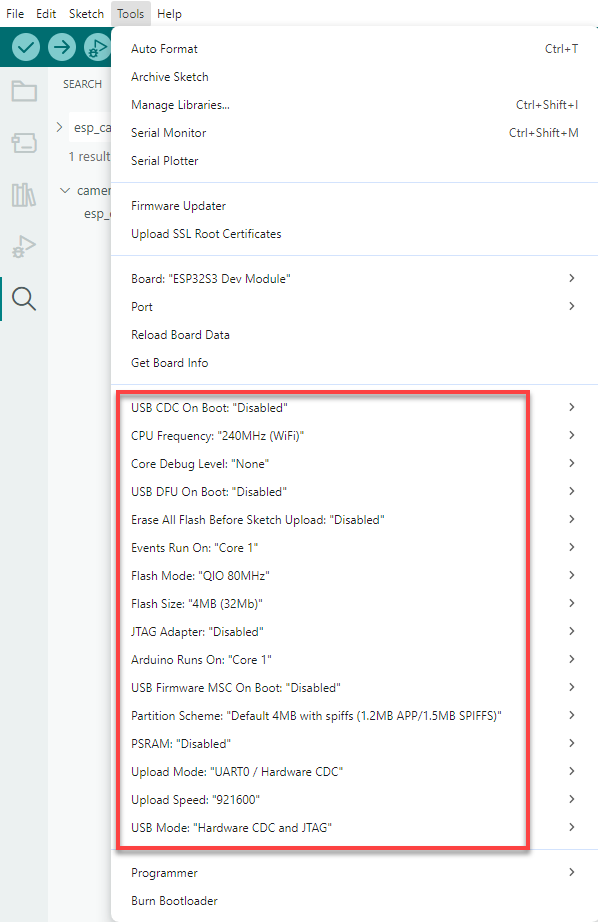
(3) Select the “ESP32S3 Dev Module” development board.

(4) Click the “Tool” in the menu bar, and select the corresponding configuration for the ESP32S3 development board.

(5) Click  to download the program to the ESP32S3, and then wait for the download to complete.

9.3 APP Control
9.3.1 App Installation
Apple users: Search for IoT Control directly in the App Store and download it.
Android users: Locate the IoT Control installation pack in the same directory as this lesson. Install it to your phone.
9.3.2 App Connection
Note
Before using the app, enable WiFi and location services in your phone settings.
This section takes installing Android version for demonstration. The method is applicable to iOS version.
(1) Turn on the MechDog. Open the IoT Control app on your phone.
(2) Tap the flashing icon  in the upper right corner to connect to the WiFi named
 MechDog_wifi
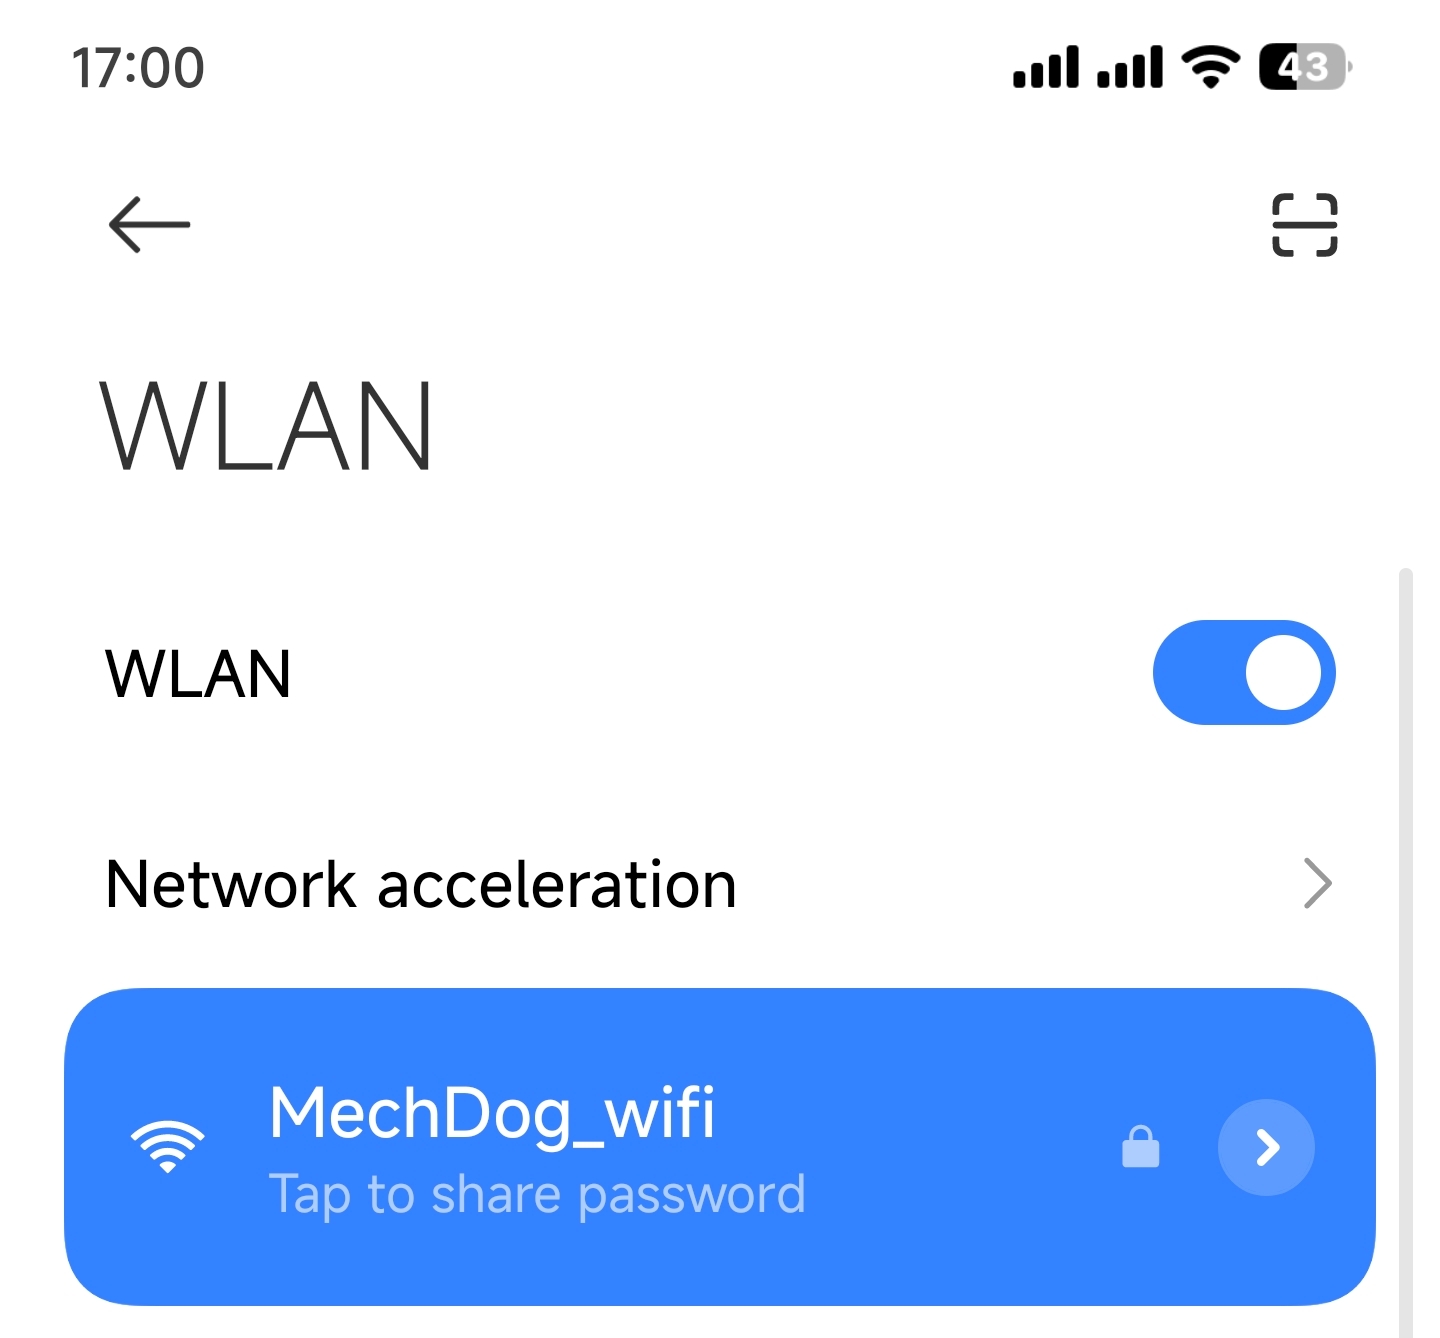
(3) After the connection is successful, the icon remains on.
9.3.3 Control Instruction
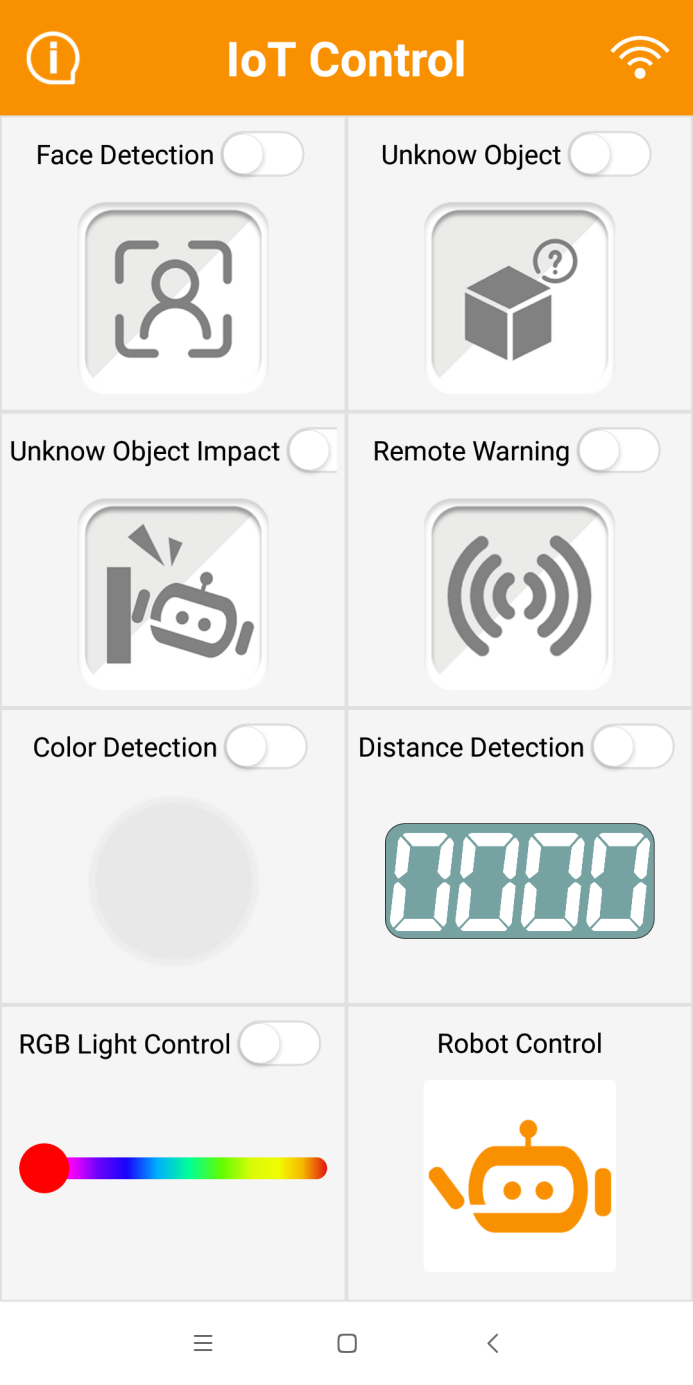
The app features 8 control modes, including Face Detection, Unknown Object, Unknown Object Impact, Remote Warning, Color Detection, Distance Detection, RGB Light Control, and Robot Control. The detailed introduction is shown in the following table.
| Function | Description |
|---|---|
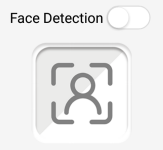 |
Once MechDog's vision module recognizes a face, the phone will vibrate. Note: Before experiencing this game, please download the face recognition program in the vision module. |
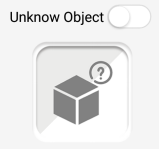 |
When MechDog's glowy ultrasonic sensor detects an object, the buzzer will sound. |
 |
When an unidentified object impacts the MechDog, the buzzer will sound. |
 |
Once enabling the function, the buzzer will continue to sound. |
 |
When MechDog's vision module recognizes a color, the corresponding color will be displayed within the lower circle. Note: Before experiencing this game, please download the color recognition program in the vision module. |
 |
After enabling this function, the detected distance will be displayed below. |
 |
Control the color of the glowy ultrasonic sensor. |
 |
Control MechDog to execute different action groups. |
9.4 Face Detection Instruction
9.4.1 Project Introduction
This lesson explains how the MechDog uses the ESP32S3 vision module to detect a face, then triggering a vibration prompt on the app.
9.4.2 Program Logic

9.4.3 Module Introduction
ESP32-S3 Vision Module
The ESP32-S3 Vision Module is a compact camera module that can function as a standalone system.
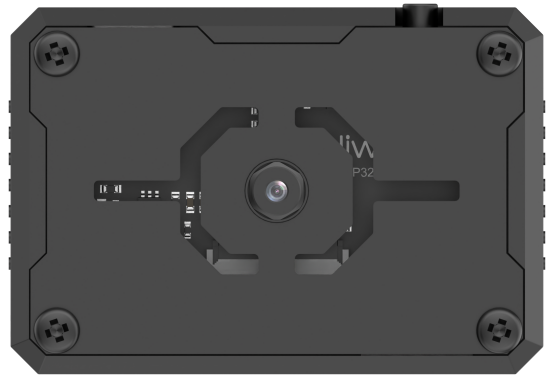
It captures images using its built-in camera, processes the data with the ESP32 microcontroller, and transmits the information wirelessly via the Wi-Fi module. Supporting multiple communication protocols and low power consumption, it is widely used in various IoT applications.
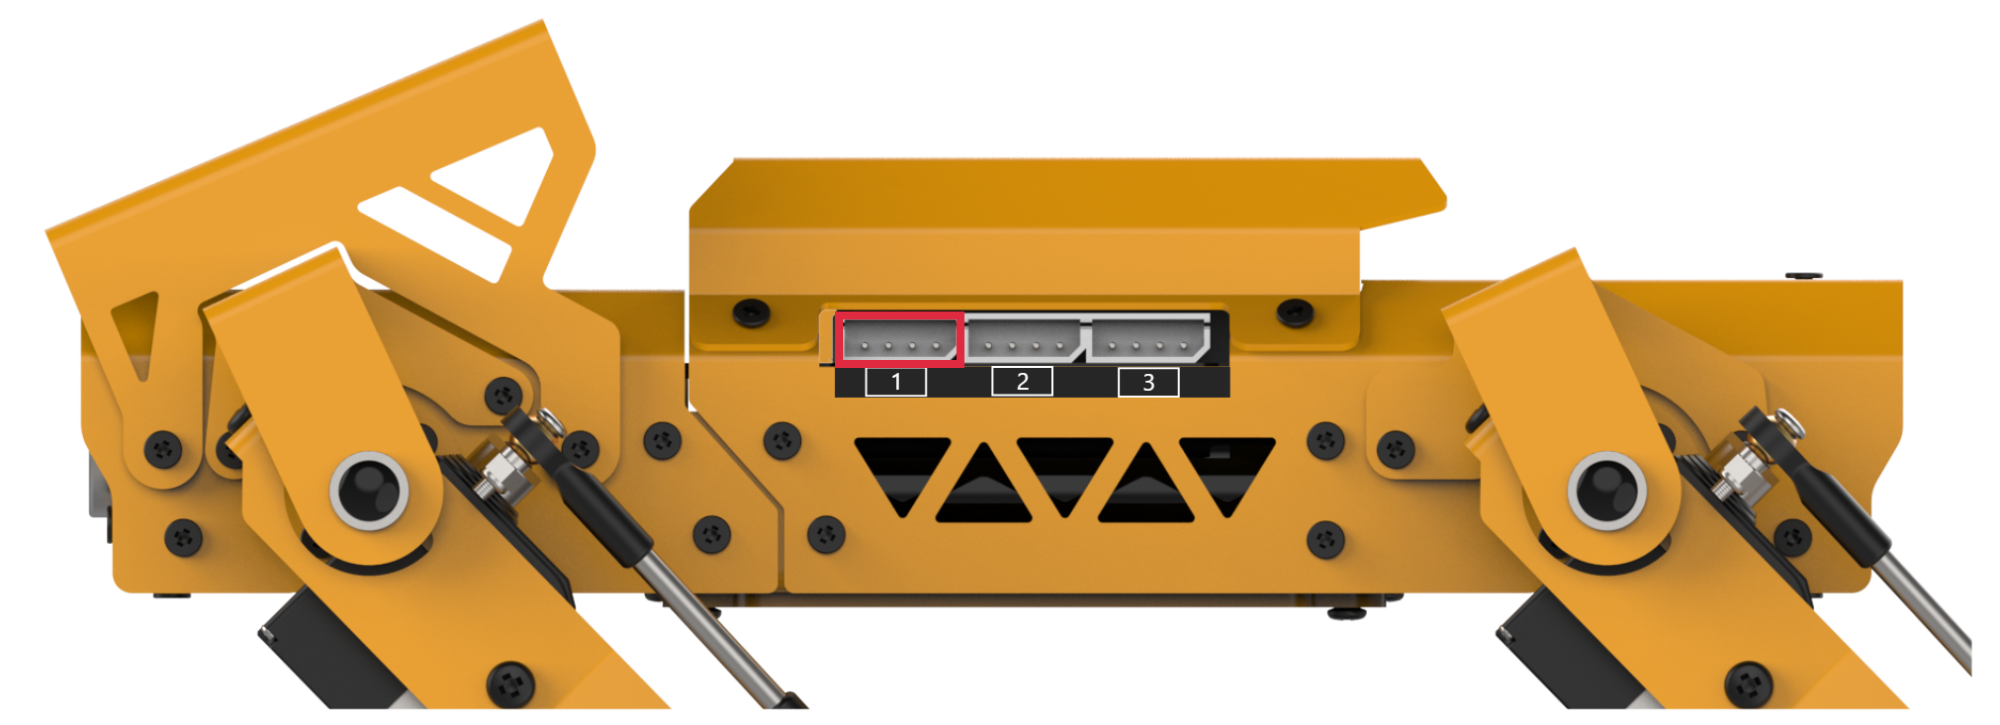
Module Wiring
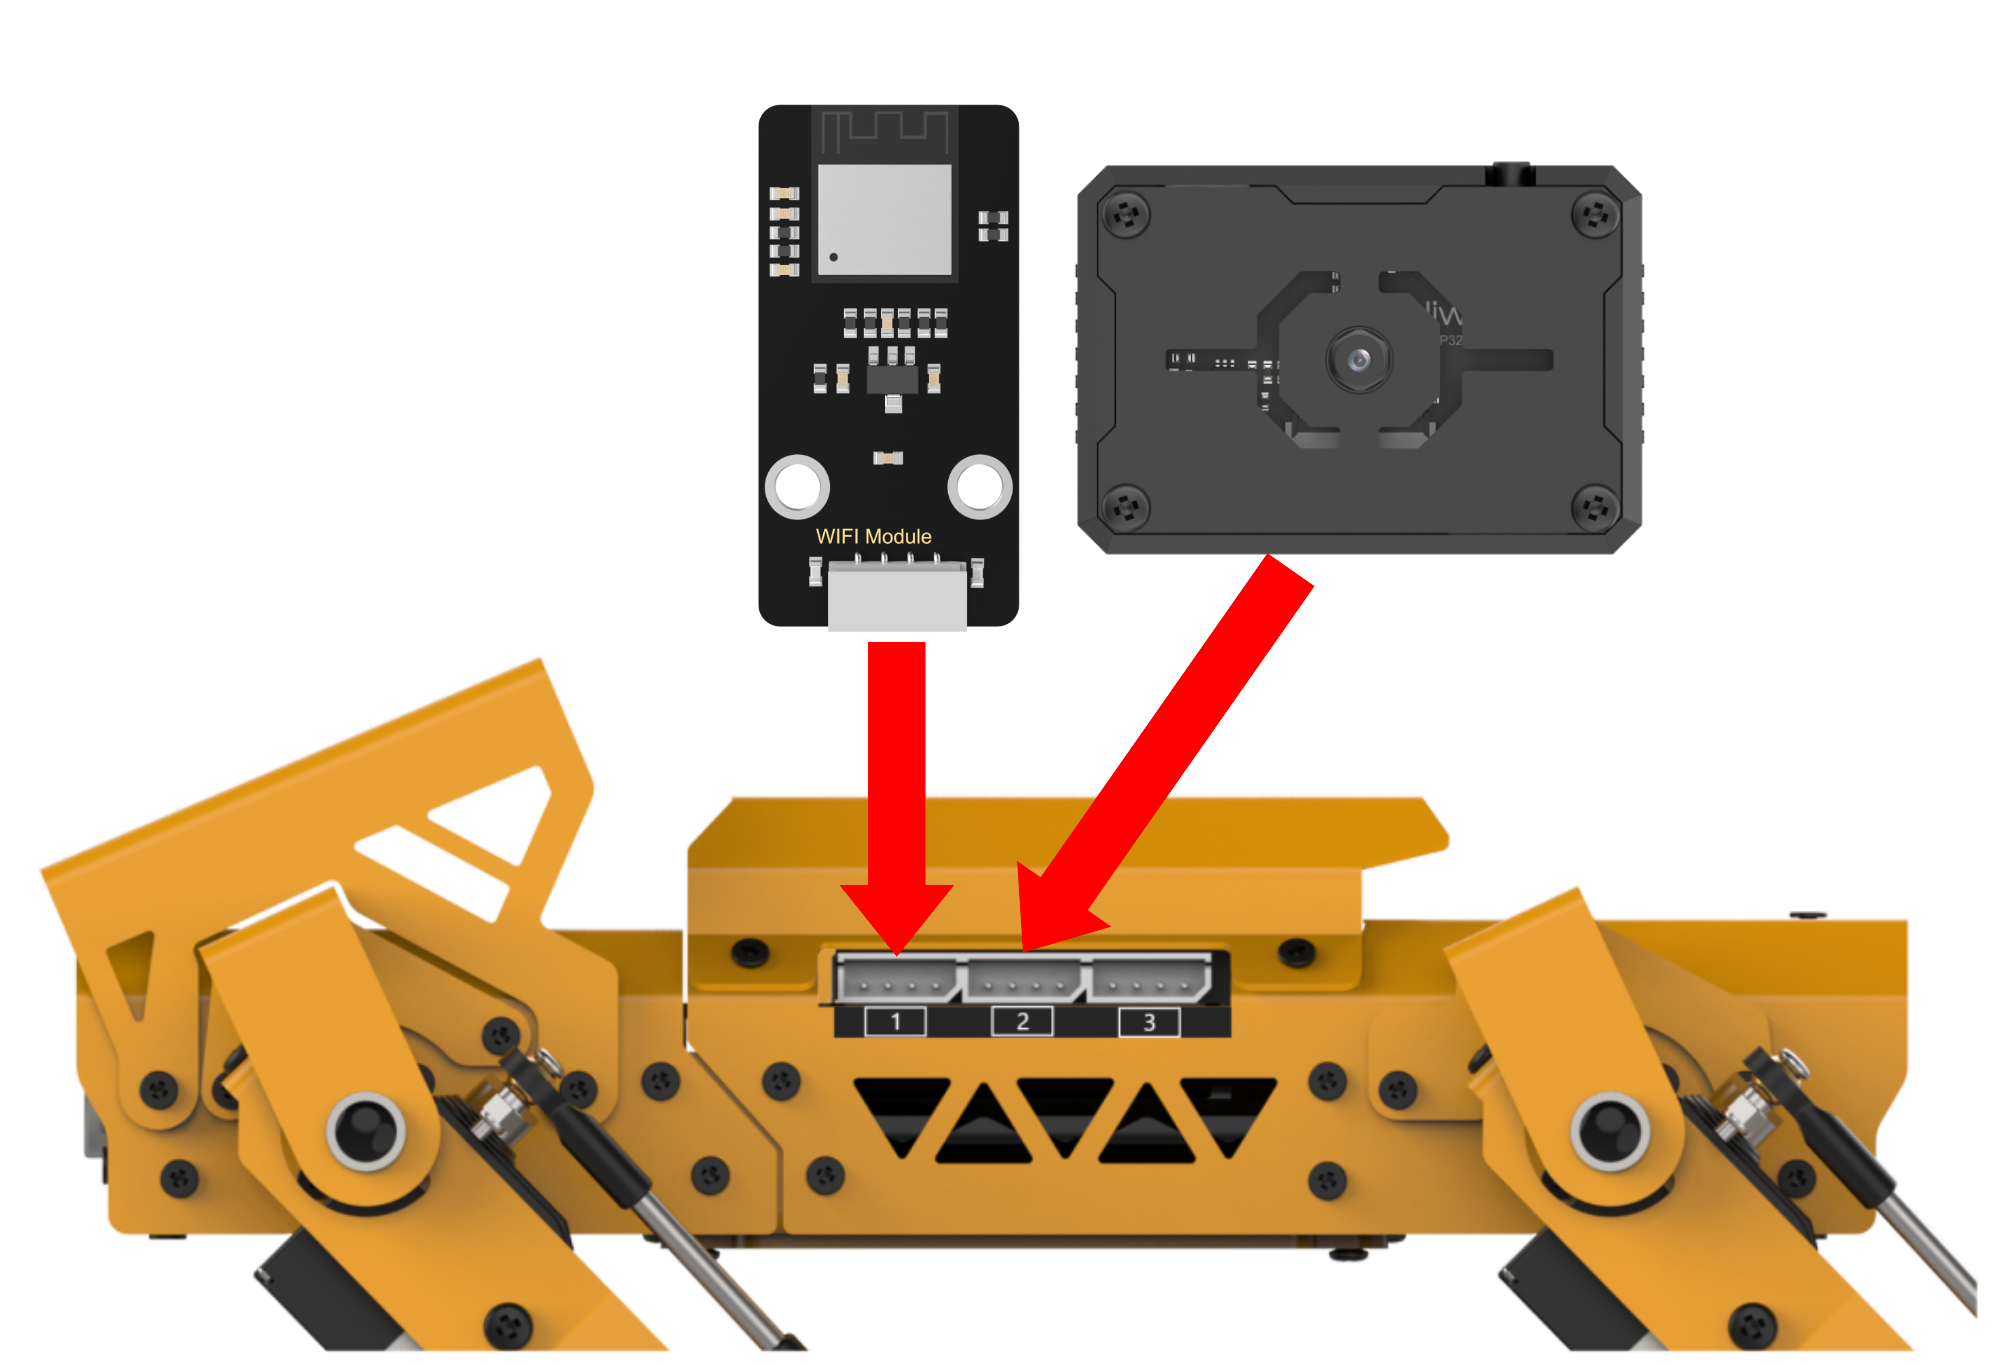
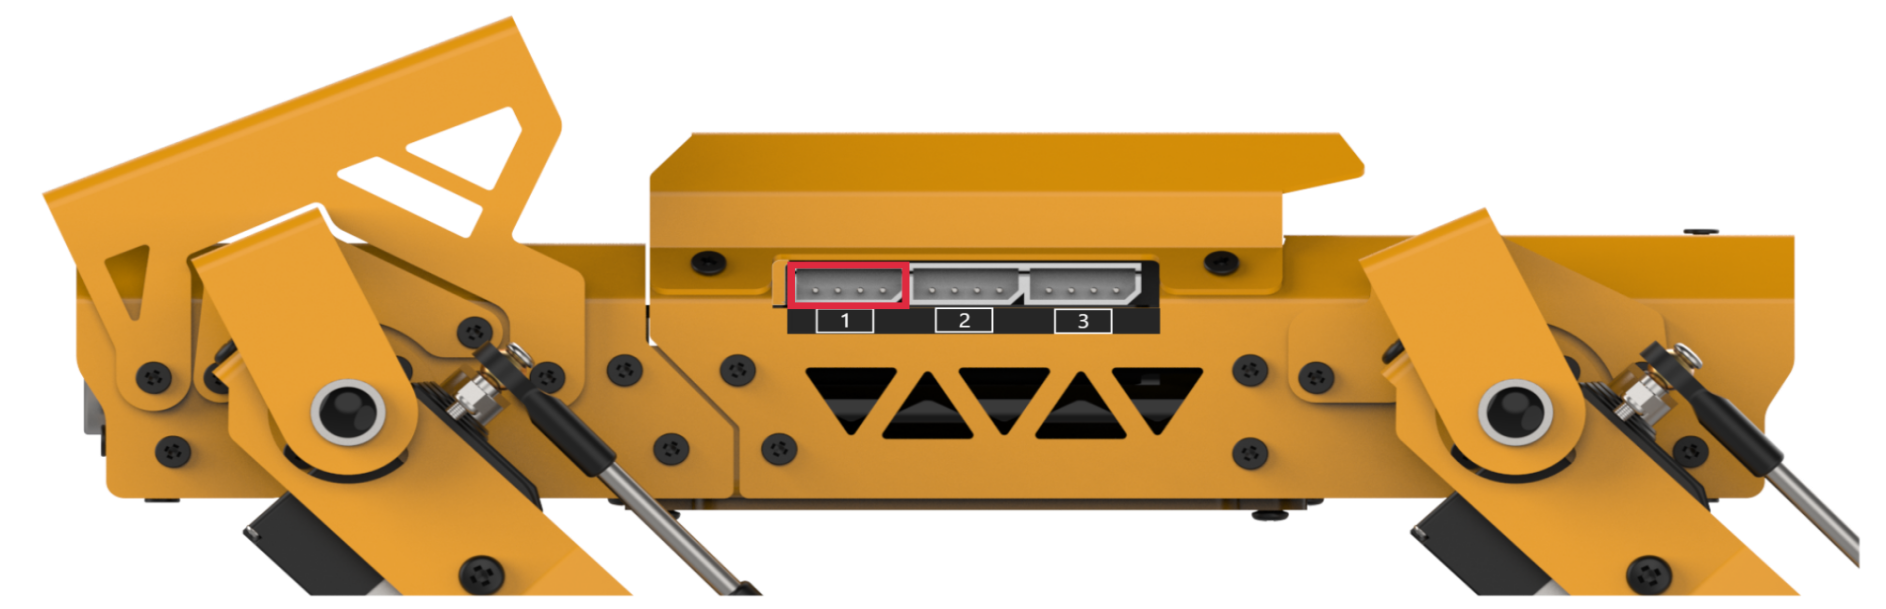
Use a 4-pin cable to connect the vision module to the IIC interface 1 on MechDog.
9.4.4 Program Download
(1) Connect the ESP32S3 to the computer with a Type-C data cable.
(2) Locate and open the FaceDetection -> FaceDetection.ino program file in the same directory as this section.

(3) Select the ESP32S3 Dev Module development board.

(4) Click the Tool in the menu bar, and select the corresponding configuration for the ESP32S3 development board.
(5) Click  to download the program to the ESP32S3, and then wait for the download to complete.

9.4.5 Program Outcome
When MechDog recognizes a face, the app will trigger vibration on your phone.
9.4.6 Program Analysis
Import Libraries
Import necessary library files, including Hiwonder library with sensor libraries and low voltage alarms, time library related to time, Hiwonder_IIC library utilized for I2C communication with modules, and the HW_MechDog library used to control MechDog movement.
1 2 3 4 5 6 7 | import Hiwonder import time from time import sleep_ms import Hiwonder_IIC from HW_MechDog import MechDog from Hiwonder_BLE import BLE import struct |
Create MechDog Object
Create a MechDog object. Set the vision module interface as interface 1. Initialize the glowy ultrasonic sensor, buzzer, and IMU module.
10 11 12 13 14 15 16 17 | mechdog = MechDog() iic1 = Hiwonder_IIC.IIC(1) iic2 = Hiwonder_IIC.IIC(2) i2csonar = Hiwonder_IIC.I2CSonar(iic1) esps3cam = Hiwonder_IIC.ESP32S3Cam(iic1) buzzer = Hiwonder.Buzzer() imu = Hiwonder_IIC.MPU() |
WiFi Configuration
Set the name of the WiFi module as MechDog_wifi. Configure its password as 12345678.
19 20 21 | sleep_ms(100) iic2.writeto(0x69 , "NIOT_MechDog|||12345678$$$") sleep_ms(1000) |
WiFi Data Reception
In the function for receiving WiFi data, use the function wifi_read() to read the command transmitted by the app. The command is then stored in the variable receive_data. Determine whether the received command is identical to the previous one sent. This is to prevent sending the same command twice. Next, parse the received data, obtaining the corresponding functional code.
104 105 106 107 108 109 110 111 112 113 114 115 116 | while True: try: # read and deal wifi if time.ticks_ms() > last_time_50ms: last_time_50ms += 100 receive_data = wifi_read() if receive_data != None: receive_data = bytes([x for x in receive_data if x != 0xd3]) if last_receive != receive_data: last_receive = receive_data rec = receive_data.decode('utf-8') if rec.find("CMD") != -1 and rec.find("$"): cmd = rec.split('|')[1:] |
Face Detection Activation
If the parsed command indicates the activation of the face detection, set the flag onoff_face to True.
118 119 120 121 122 123 | if int(cmd[0]) == 1: # warn if int(cmd[1]) == 1: onoff_face = True color_detec_flag = False else: onoff_face = False |
ESP32S3 Vision Module Function
In the ESP32S3 vision module function, if the face detection function is enabled, call the function iic1.readfrom_mem() to obtain face data from the vision module. If the acquired data is greater than 0, it signifies successful face recognition, setting the flag warn_face to True.
359 360 361 362 363 364 365 366 367 368 369 370 371 372 373 374 | try: if onoff_face == True: # face rec = iic1.readfrom_mem(ESP32CAM_ADDR , ESP32CAM_FACE , 4) if len(rec) == 4: values = struct.unpack('<BBBB', rec) if values[2] > 0: warn_face = True else: warn_face = False else: warn_face = False else: warn_face = False except: print("s3 no face func") |
Data Transmission
When the variable warn_face is True, set flags[0] as 1. Based on the communication protocol format command, use the function wifi_send() to send the data to the app.
172 173 174 175 176 177 178 179 180 181 182 183 184 | if time.ticks_ms() > last_time_1000ms: last_time_1000ms += 1000 flags = [0,0,0] if warn_face == True: # warn_face = False flags[0] = 1 if warn_undef_obj == True: # warn_undef_obj = False flags[1] = 1 if warn_hit == True: flags[2] = 1 buf = "CMD|1|{}|{}|{}|$".format(flags[0],flags[1],flags[2]) wifi_send(buf) |
9.5 Unknown Object Instruction
9.5.1 Project Introduction
This lesson enables MechDog to recognize an object via the ESP32S3 vision module. After an object is recognized, the app makes the phone to vibrate for prompt.
9.5.2 Program Logic
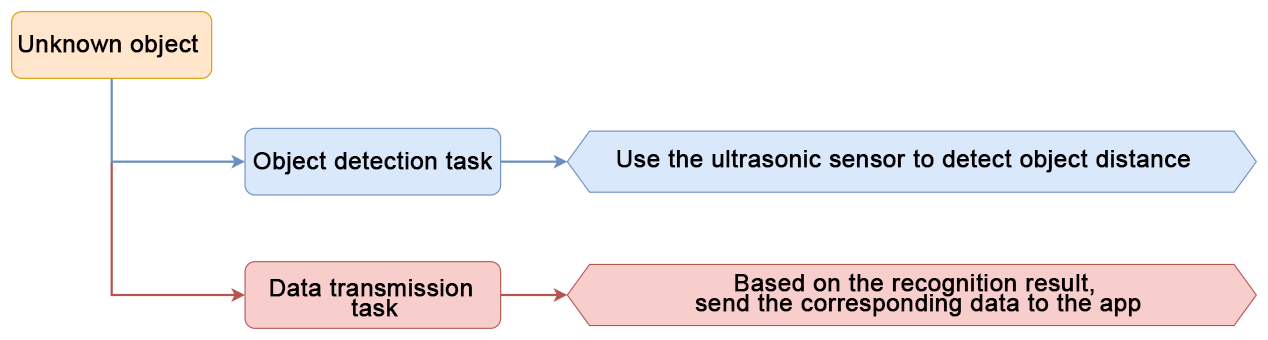
9.5.3 Glowy Ultrasonic Sensor
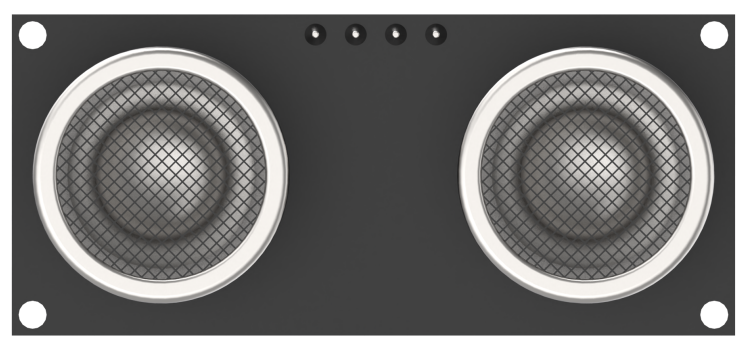
This is a glowing ultrasonic ranging module. It adopts an I2C communication interface, which can read the distance measured by an ultrasonic sensor through I2C communication.
The module will automatically transmit 8 square waves at 40khz during ranging, and then detect whether there is a signal return. If there is, a high level voltage will be output, and its duration corresponds to the time that the ultrasonic wave takes from transmitting to returning.
9.5.4 Program Outcome
When MechDog detects an unknown object within the distance less than 15cm, the app will trigger vibration on your phone.
9.5.5 Program Analysis
Import Libraries
Import necessary library files, including Hiwonder library with sensor libraries and low voltage alarms, time library related to time, Hiwonder_IIC library utilized for I2C communication with modules, and the HW_MechDog library used to control MechDog movement.
1 2 3 4 5 6 7 | import Hiwonder import time from time import sleep_ms import Hiwonder_IIC from HW_MechDog import MechDog from Hiwonder_BLE import BLE import struct |
Create MechDog Object
Create a MechDog object. Set the vision module interface as interface 1. Initialize the glowy ultrasonic sensor, buzzer, and IMU module.
10 11 12 13 14 15 16 17 | mechdog = MechDog() iic1 = Hiwonder_IIC.IIC(1) iic2 = Hiwonder_IIC.IIC(2) i2csonar = Hiwonder_IIC.I2CSonar(iic1) esps3cam = Hiwonder_IIC.ESP32S3Cam(iic1) buzzer = Hiwonder.Buzzer() imu = Hiwonder_IIC.MPU() |
WiFi Configuration
Set the name of the WiFi module as MechDog_wifi. Configure its password as 12345678.
19 20 21 | sleep_ms(100) iic2.writeto(0x69 , "NIOT_MechDog|||12345678$$$") sleep_ms(1000) |
WiFi Data Reception
In the function for receiving WiFi data, use the function wifi_read() to read the command transmitted by the app. The command is then stored in the variable receive_data. Determine whether the received command is identical to the previous one sent. This is to prevent sending the same command twice. Next, parse the received data, obtaining the corresponding functional code.
104 105 106 107 108 109 110 111 112 113 114 115 116 | while True: try: # read and deal wifi if time.ticks_ms() > last_time_50ms: last_time_50ms += 100 receive_data = wifi_read() if receive_data != None: receive_data = bytes([x for x in receive_data if x != 0xd3]) if last_receive != receive_data: last_receive = receive_data rec = receive_data.decode('utf-8') if rec.find("CMD") != -1 and rec.find("$"): cmd = rec.split('|')[1:] |
Unknown Object Detection Activation
If the parsed command indicates the activation of the unknown object, set the flag onoff_undef_obj to True.
124 125 126 127 | if int(cmd[2]) == 1: onoff_undef_obj = True else: onoff_undef_obj = False |
Distance Detection Loop
In the main function, loop to obtain the distance detected by the glowy ultrasonic sensor, which is stored in the variable rec_distance. Then, check the obtained object distance. If the distance is less than 500cm, assign the obtained distance to the variable distance, and reset the counting value of dis_count to 0. Otherwise, the value of dis_count is incremented by 1 for each iteration. If the value of dis_count is greater than 4, set the value of distance to 500. The purpose of setting dis_count to be greater than 4 is to filter out falsely detected distances.
268 269 270 271 272 273 274 275 276 277 278 279 | while True: if time.ticks_ms() > last_time_50ms: last_time_50ms += 50 rec_distance = i2csonar.getDistance() if rec_distance < 500: distance = rec_distance dis_count = 0 else: dis_count += 1 if dis_count > 4: distance = 500 dis_count = 0 |
Object Detection Check
When the value of onoff_undef_obj is True and the detected distance is less than 15, set the flag warn_undef_obj to True.
281 282 283 284 285 286 287 | if onoff_undef_obj == True: if distance < 15: # Unknown object detection warn_undef_obj = True else: warn_undef_obj = False else: warn_undef_obj = False |
Data Transmission
When the variable warn_undef_obj is True, set flags[1] as 1. Based on the communication protocol format command, use the function wifi_send() to send the data to the app.
172 173 174 175 176 177 178 179 180 181 182 183 184 | if time.ticks_ms() > last_time_1000ms: last_time_1000ms += 1000 flags = [0,0,0] if warn_face == True: # warn_face = False flags[0] = 1 if warn_undef_obj == True: # warn_undef_obj = False flags[1] = 1 if warn_hit == True: flags[2] = 1 buf = "CMD|1|{}|{}|{}|$".format(flags[0],flags[1],flags[2]) wifi_send(buf) |
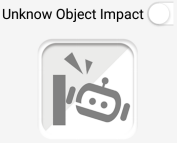
9.6 Unknown Object Impact Instruction
9.6.1 Project Introduction
This lesson programs MechDog to recognize an object via the IMU sensor. After the object is detected, the app controls the phone to vibrate.
9.6.2 Program Logic

9.6.3 IMU Sensor
The MechDog is equipped with an onboard IMU sensor. This sensor finds applications in various devices, including handheld game products, 3D controllers, portable navigation systems, and more. It comprises a 3-axis MEMS gyroscope, a 3-axis MEMS accelerometer, and an expandable Digital Motion Processor (DMP).
9.6.4 Program Outcome
When the MechDog experiences an impact caused by an unidentified object, the phone will generate vibrations.
9.6.5 Program Analysis
Import Libraries
Import necessary library files, including Hiwonder library with sensor libraries and low voltage alarms, time library related to time, Hiwonder_IIC library utilized for I2C communication with modules, and the HW_MechDog library used to control MechDog movement.
1 2 3 4 5 6 7 | import Hiwonder import time from time import sleep_ms import Hiwonder_IIC from HW_MechDog import MechDog from Hiwonder_BLE import BLE import struct |
Create MechDog Object
Create a MechDog object. Set the vision module interface as interface 1. Initialize the glowy ultrasonic sensor, buzzer, and IMU module.
10 11 12 13 14 15 16 17 | mechdog = MechDog() iic1 = Hiwonder_IIC.IIC(1) iic2 = Hiwonder_IIC.IIC(2) i2csonar = Hiwonder_IIC.I2CSonar(iic1) esps3cam = Hiwonder_IIC.ESP32S3Cam(iic1) buzzer = Hiwonder.Buzzer() imu = Hiwonder_IIC.MPU() |
WiFi Configuration
Set the name of the WiFi module as MechDog_wifi. Configure its password as 12345678.
19 20 21 | sleep_ms(100) iic2.writeto(0x69 , "NIOT_MechDog|||12345678$$$") sleep_ms(1000) |
WiFi Data Reception
In the function for receiving WiFi data, use the function wifi_read() to read the command transmitted by the app. The command is then stored in the variable receive_data. Determine whether the received command is identical to the previous one sent. This is to prevent sending the same command twice. Next, parse the received data, obtaining the corresponding functional code.
104 105 106 107 108 109 110 111 112 113 114 115 116 | while True: try: # read and deal wifi if time.ticks_ms() > last_time_50ms: last_time_50ms += 100 receive_data = wifi_read() if receive_data != None: receive_data = bytes([x for x in receive_data if x != 0xd3]) if last_receive != receive_data: last_receive = receive_data rec = receive_data.decode('utf-8') if rec.find("CMD") != -1 and rec.find("$"): cmd = rec.split('|')[1:] |
Impact Detection Activation
If the parsed command indicates the activation of the unknown object impact, set the function flag onoff_hit to True, and the command send flag warn_hit to False.
129 130 131 132 133 | if int(cmd[3]) == 1: onoff_hit = True warn_hit = False else: onoff_hit = False |
IMU Angle Detection
In the main function, call the imu.read_angle() function to obtain the inclination angle of the IMU. If the inclination angle exceeds 50 degrees, set the variable warn_hit to True. It sends commands to the app.
289 290 291 292 293 294 295 296 297 | if onoff_hit == True: # warn_hit angle = imu.read_angle() if angle[0] > 50 or angle[0] < -50: warn_hit = True else: warn_hit = False else: warn_hit = False |
Data Transmission
When the variable warn_hit is True, set flags[2] as 1. Based on the communication protocol format command, use the function wifi_send() to send the data to the app.
172 173 174 175 176 177 178 179 180 181 182 183 184 | if time.ticks_ms() > last_time_1000ms: last_time_1000ms += 1000 flags = [0,0,0] if warn_face == True: # warn_face = False flags[0] = 1 if warn_undef_obj == True: # warn_undef_obj = False flags[1] = 1 if warn_hit == True: flags[2] = 1 buf = "CMD|1|{}|{}|{}|$".format(flags[0],flags[1],flags[2]) wifi_send(buf) |
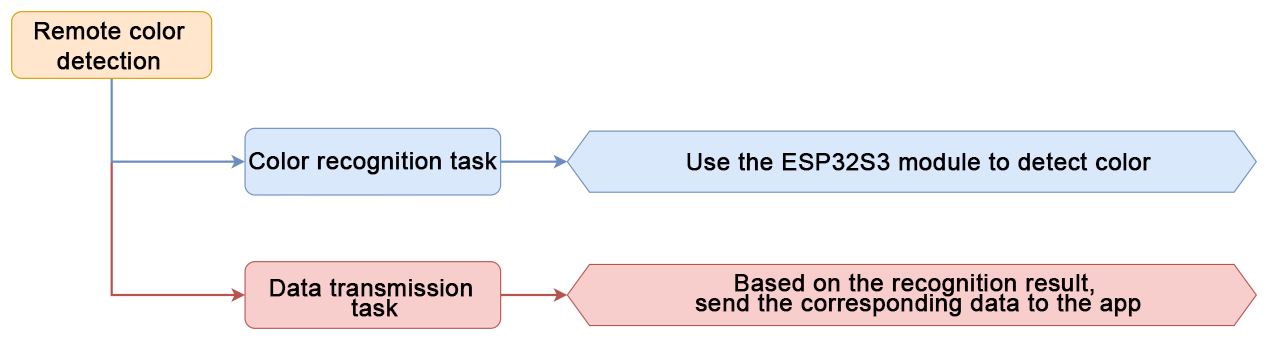
9.7 Remote Color Detection Instruction
9.7.1 Project Introduction
This lesson demonstrates on how to control the MechDog to recognize the color red, green, or blue, thereby displaying the corresponding color on the app.
9.7.2 Program Logic
9.7.3 ESP32-S3 Vision Module
Module Introduction
The ESP32-S3 Vision Module is a compact camera module that can function as a standalone system.

It captures images using its built-in camera, processes the data with the ESP32 microcontroller, and transmits the information wirelessly via the Wi-Fi module. Supporting multiple communication protocols and low power consumption, it is widely used in various IoT applications.
Module Wiring
Use a 4-pin cable to connect the vision module to the IIC interface 1 on MechDog.
9.7.4 Program Download
(1) Connect the ESP32S3 to the computer with a Type-C data cable.
(2) Locate and open the ColorDetection -> ColorDetection.ino program file in the same directory as this section.

(3) Select the ESP32S3 Dev Module development board.

(4) Click the Tool in the menu bar, and select the corresponding configuration for the ESP32S3 development board.

(5) Click  to download the program to the ESP32S3, and then wait for the download to complete.

9.7.5 Program Outcome
Once MechDog identifies red, green, or blue, it proceeds to transmit the obtained color data to the app. Then, the app displays the recognized color.
9.7.6 Program Analysis
Import Libraries
Import necessary library files, including Hiwonder library with sensor libraries and low voltage alarms, time library related to time, Hiwonder_IIC library utilized for I2C communication with modules, and the HW_MechDog library used to control MechDog movement.
1 2 3 4 5 6 7 | import Hiwonder import time from time import sleep_ms import Hiwonder_IIC from HW_MechDog import MechDog from Hiwonder_BLE import BLE import struct |
Create MechDog Object
Create a MechDog object. Set the vision module interface as interface 1. Initialize the glowy ultrasonic sensor, buzzer, and IMU module.
10 11 12 13 14 15 16 17 | mechdog = MechDog() iic1 = Hiwonder_IIC.IIC(1) iic2 = Hiwonder_IIC.IIC(2) i2csonar = Hiwonder_IIC.I2CSonar(iic1) esps3cam = Hiwonder_IIC.ESP32S3Cam(iic1) buzzer = Hiwonder.Buzzer() imu = Hiwonder_IIC.MPU(). |
WiFi Configuration
Set the name of the WiFi module as MechDog_wifi. Configure its password as 12345678.
19 20 21 | sleep_ms(100) iic2.writeto(0x69 , "NIOT_MechDog|||12345678$$$") sleep_ms(1000) |
WiFi Data Reception
In the function for receiving WiFi data, use the function wifi_read() to read the command transmitted by the app. The command is then stored in the variable receive_data. Determine whether the received command is identical to the previous one sent. This is to prevent sending the same command twice. Next, parse the received data, obtaining the corresponding functional code.
104 105 106 107 108 109 110 111 112 113 114 115 116 | while True: try: # read and deal wifi if time.ticks_ms() > last_time_50ms: last_time_50ms += 100 receive_data = wifi_read() if receive_data != None: receive_data = bytes([x for x in receive_data if x != 0xd3]) if last_receive != receive_data: last_receive = receive_data rec = receive_data.decode('utf-8') if rec.find("CMD") != -1 and rec.find("$"): cmd = rec.split('|')[1:] |
Color Detection Activation
If the parsed command indicates the activation of the remote color detection, set the function flag color_detec_flag to True.
135 136 137 138 139 140 | elif int(cmd[0]) == 0x02: # color detect if int(cmd[1]) == 0x01: color_detec_flag = True onoff_face = False else: color_detec_flag = False |
ESP32S3 Vision Module Function
In the ESP32S3 vision module function, if the remote color detection function is enabled, call the iic1.readfrom_mem() function to obtain color data from the vision module. If the obtained data is greater than 0, it means that the color has been recognized. The color data is then stored within the variable color_detec_num, and the color recognition count is reset. Next, the color_step variable is incremented by one, facilitating the identification of the following color.
339 340 341 342 343 344 345 346 347 348 349 350 351 352 353 354 355 356 357 | while True: try: if color_detec_flag == True: # color rec = iic1.readfrom_mem(ESP32CAM_ADDR , color_step , 4) values = struct.unpack('<BBBB', rec) if values[2] > 0: color_detec_num = color_list[color_step] color_count = 0 color_step += 1 if color_step > 2: color_step = 0 else: color_count += 1 if color_count > 3: color_count = 0 color_detec_num = 0 except: print("color read fail") |
Data Transmission
When the variable color_detec_flag True, set flags[0] as 1. Based on the communication protocol format command, use the function wifi_send() to send the color data to the app.
163 164 165 166 167 | if time.ticks_ms() > last_time_100ms: last_time_100ms += 100 if color_detec_flag == True: wifi_send("CMD|2|{}|$".format(color_detec_num)) print("co:{}".format(color_detec_num)) |
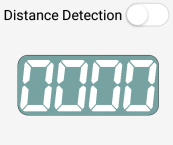
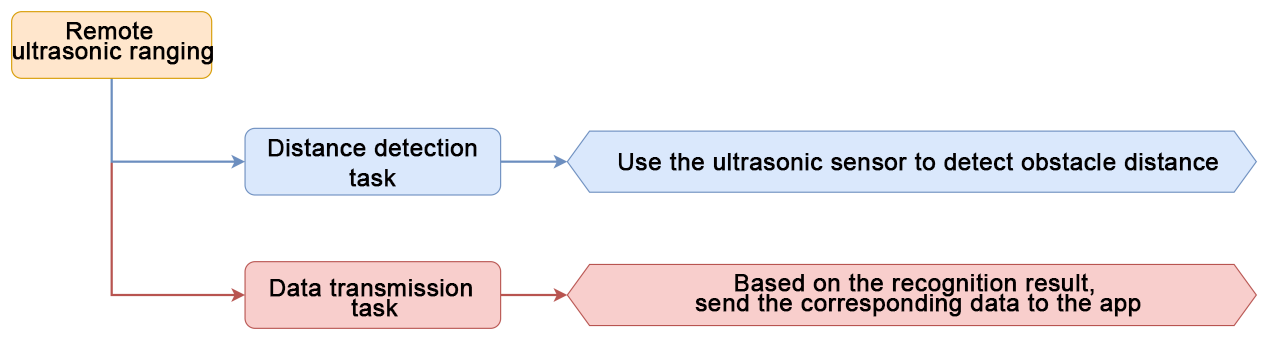
9.8 Remote Ultrasonic Ranging Instruction
9.8.1 Project Introduction
Program MechDog to utilize the ultrasonic sensor to detect the obstacle distance. The obtained distance is then displayed on the app.
9.8.2 Program Logic
9.8.3 Glowy Ultrasonic Sensor

This is a glowing ultrasonic ranging module. It adopts an I2C communication interface, which can read the distance measured by an ultrasonic sensor through I2C communication.
The module will automatically transmit 8 square waves at 40khz during ranging, and then detect whether there is a signal return. If there is, a high level voltage will be output, and its duration corresponds to the time that the ultrasonic wave takes from transmitting to returning.
9.8.4 Program Outcome
MechDog will detect the real-time obstacle distance, and display the obtained distance on the app.
9.8.5 Program Analysis
Import Libraries
Import necessary library files, including Hiwonder library with sensor libraries and low voltage alarms, time library related to time, Hiwonder_IIC library utilized for I2C communication with modules, and the HW_MechDog library used to control MechDog movement.
1 2 3 4 5 6 7 | import Hiwonder import time from time import sleep_ms import Hiwonder_IIC from HW_MechDog import MechDog from Hiwonder_BLE import BLE import struct |
Create MechDog Object
Create a MechDog object. Set the vision module interface as interface 1. Initialize the glowy ultrasonic sensor, buzzer, and IMU module.
10 11 12 13 14 15 16 17 | mechdog = MechDog() iic1 = Hiwonder_IIC.IIC(1) iic2 = Hiwonder_IIC.IIC(2) i2csonar = Hiwonder_IIC.I2CSonar(iic1) esps3cam = Hiwonder_IIC.ESP32S3Cam(iic1) buzzer = Hiwonder.Buzzer() imu = Hiwonder_IIC.MPU() |
WiFi Configuration
Set the name of the WiFi module as MechDog_wifi. Configure its password as 12345678.
19 20 21 | sleep_ms(100) iic2.writeto(0x69 , "NIOT_MechDog|||12345678$$$") sleep_ms(1000) |
WiFi Data Reception
In the function for receiving WiFi data, use the function wifi_read() to read the command transmitted by the app. The command is then stored in the variable receive_data. Determine whether the received command is identical to the previous one sent. This is to prevent sending the same command twice. Next, parse the received data, obtaining the corresponding functional code.
104 105 106 107 108 109 110 111 112 113 114 115 116 | while True: try: # read and deal wifi if time.ticks_ms() > last_time_50ms: last_time_50ms += 100 receive_data = wifi_read() if receive_data != None: receive_data = bytes([x for x in receive_data if x != 0xd3]) if last_receive != receive_data: last_receive = receive_data rec = receive_data.decode('utf-8') if rec.find("CMD") != -1 and rec.find("$"): cmd = rec.split('|')[1:] |
Ultrasonic Ranging Activation
If the parsed command indicates the activation of the remote ultrasonic ranging, set the flag sensor_flag to True.
142 143 144 145 146 | elif int(cmd[0]) == 0x03: # sensor distance if int(cmd[1]) == 0x01: sensor_flag = True else: sensor_flag = False |
Distance Detection Loop
In the main function, loop to obtain the distance detected by the glowy ultrasonic sensor, which is stored in the variable rec_distance. Then, check the obtained object distance. If the distance is less than 500cm, assign the obtained distance to the variable distance, and reset the counting value of dis_count to 0. Otherwise, the value of dis_count is incremented by 1 for each iteration. If the value of dis_count is greater than 4, set the value of distance to 500. The purpose of setting dis_count to be greater than 4 is to filter out falsely detected distances.
268 269 270 271 272 273 274 275 276 277 278 279 | while True: if time.ticks_ms() > last_time_50ms: last_time_50ms += 50 rec_distance = i2csonar.getDistance() if rec_distance < 500: distance = rec_distance dis_count = 0 else: dis_count += 1 if dis_count > 4: distance = 500 dis_count = 0 |
Distance Storage
When the value of sensor_flag is True, the distance is stored in the sensor_distance variable.
299 300 | if sensor_flag == True: # get sensor distance sensor_distance = int(distance) |
Data Transmission
This is the data send function. When the variable sensor_flag is True, use the function wifi_send() to send the data to the app, based on the communication protocol format command.
169 170 | if sensor_flag == True: wifi_send("CMD|3|{}|$".format(sensor_distance)) |
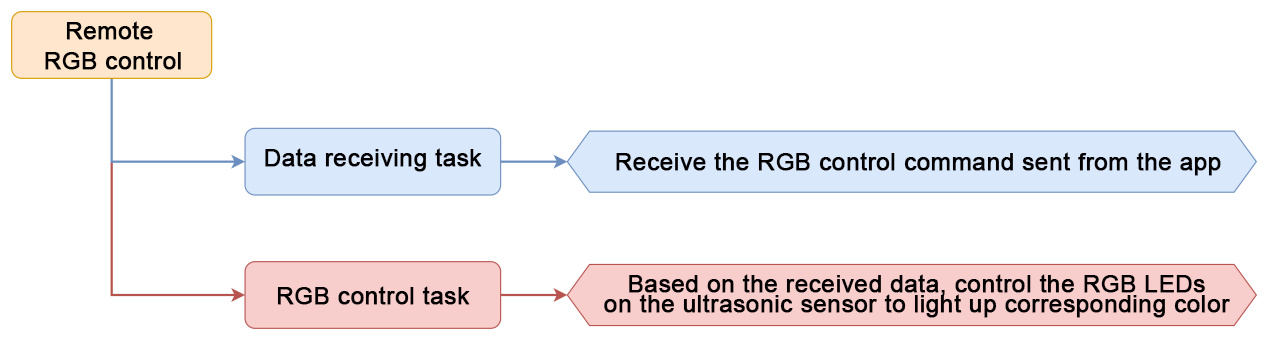
9.9 Remote RGB Control Instruction
9.9.1 Project Introduction
In this section, MechDog is programmed to control the color of RGB LEDs on the ultrasonic sensor via the app.
9.9.2 Program Logic
9.9.3 Glowy Ultrasonic Sensor

This is a glowing ultrasonic ranging module. It adopts an I2C communication interface, which can read the distance measured by an ultrasonic sensor through I2C communication.
The module will automatically transmit 8 square waves at 40khz during ranging, and then detect whether there is a signal return. If there is, a high level voltage will be output, and its duration corresponds to the time that the ultrasonic wave takes from transmitting to returning.
9.9.4 Program Outcome
Based on the command sent from the app, control the RGB LEDs on MechDog’s ultrasonic sensor to light up corresponding color.
9.9.5 Program Analysis
Import Libraries
Import necessary library files, including Hiwonder library with sensor libraries and low voltage alarms, time library related to time, Hiwonder_IIC library utilized for I2C communication with modules, and the HW_MechDog library used to control MechDog movement.
1 2 3 4 5 6 7 | import Hiwonder import time from time import sleep_ms import Hiwonder_IIC from HW_MechDog import MechDog from Hiwonder_BLE import BLE import struct |
Create MechDog Object
Create a MechDog object. Set the vision module interface as interface 1. Initialize the glowy ultrasonic sensor, buzzer, and IMU module.
10 11 12 13 14 15 16 17 | mechdog = MechDog() iic1 = Hiwonder_IIC.IIC(1) iic2 = Hiwonder_IIC.IIC(2) i2csonar = Hiwonder_IIC.I2CSonar(iic1) esps3cam = Hiwonder_IIC.ESP32S3Cam(iic1) buzzer = Hiwonder.Buzzer() imu = Hiwonder_IIC.MPU() |
WiFi Configuration
Set the name of the WiFi module as MechDog_wifi. Configure its password as 12345678.
19 20 21 | sleep_ms(100) iic2.writeto(0x69 , "NIOT_MechDog|||12345678$$$") sleep_ms(1000) |
WiFi Data Reception
In the function for receiving WiFi data, use the function wifi_read() to read the command transmitted by the app. The command is then stored in the variable receive_data. Determine whether the received command is identical to the previous one sent. This is to prevent sending the same command twice. Next, parse the received data, obtaining the corresponding functional code.
104 105 106 107 108 109 110 111 112 113 114 115 116 | while True: try: # read and deal wifi if time.ticks_ms() > last_time_50ms: last_time_50ms += 100 receive_data = wifi_read() if receive_data != None: receive_data = bytes([x for x in receive_data if x != 0xd3]) if last_receive != receive_data: last_receive = receive_data rec = receive_data.decode('utf-8') if rec.find("CMD") != -1 and rec.find("$"): cmd = rec.split('|')[1:] |
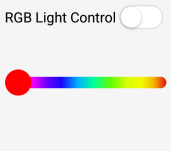
RGB Control Function
When the parsed command is to enable the function remote RGB control, call the i2csonar.setRGB() function to control the RGB LEDs to light up corresponding color. This function contains four parameters. Parameter 1 represents the RGB LED ID to be set. If it is set to 0, it indicates both RGB lights simultaneously displaying the same color. Parameters 2, 3, and 4 correspond to the values of the R, G, and B elements, respectively, ranging from 0 to 255.
148 149 | elif int(cmd[0]) == 0x04: # rgb i2csonar.setRGB(0 , int(cmd[1]) , int(cmd[2]) , int(cmd[3])) |
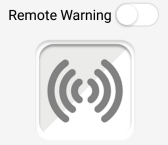
9.10 Remote Warning Instruction
9.10.1 Project Introduction
This lesson aims on controlling the buzzer on the MechDog to sound via the app.
9.10.2 Program Logic

9.10.3 Buzzer
This is a 5V onboard buzzer. It can be controlled to sound different tones by controlling the output frequency of the PWM signal.
9.10.4 Program Outcome
After the remote warning function is enabled, the buzzer on the MechDog will sound.
9.10.5 Program Analysis
Import Libraries
Import necessary library files, including Hiwonder library with sensor libraries and low voltage alarms, time library related to time, Hiwonder_IIC library utilized for I2C communication with modules, and the HW_MechDog library used to control MechDog movement.
1 2 3 4 5 6 7 | import Hiwonder import time from time import sleep_ms import Hiwonder_IIC from HW_MechDog import MechDog from Hiwonder_BLE import BLE import struct |
Create MechDog Object
Create a MechDog object. Set the vision module interface as interface 1. Initialize the glowy ultrasonic sensor, buzzer, and IMU module.
10 11 12 13 14 15 16 17 | mechdog = MechDog() iic1 = Hiwonder_IIC.IIC(1) iic2 = Hiwonder_IIC.IIC(2) i2csonar = Hiwonder_IIC.I2CSonar(iic1) esps3cam = Hiwonder_IIC.ESP32S3Cam(iic1) buzzer = Hiwonder.Buzzer() imu = Hiwonder_IIC.MPU() |
WiFi Configuration
Set the name of the WiFi module as MechDog_wifi. Configure its password as 12345678.
19 20 21 | sleep_ms(100) iic2.writeto(0x69 , "NIOT_MechDog|||12345678$$$") sleep_ms(1000) |
WiFi Data Reception
In the function for receiving WiFi data, use the function wifi_read() to read the command transmitted by the app. The command is then stored in the variable receive_data. Determine whether the received command is identical to the previous one sent. This is to prevent sending the same command twice. Next, parse the received data, obtaining the corresponding functional code.
104 105 106 107 108 109 110 111 112 113 114 115 116 | while True: try: # read and deal wifi if time.ticks_ms() > last_time_50ms: last_time_50ms += 100 receive_data = wifi_read() if receive_data != None: receive_data = bytes([x for x in receive_data if x != 0xd3]) if last_receive != receive_data: last_receive = receive_data rec = receive_data.decode('utf-8') if rec.find("CMD") != -1 and rec.find("$"): cmd = rec.split('|')[1:] |
Remote Warning Activation
If the parsed command indicates the activation of the remote warning, set the flag buzzer_flag to True.
151 152 153 154 155 | elif int(cmd[0]) == 0x05: # buzzer if int(cmd[1]) == 0x01: buzzer_flag = True else: buzzer_flag = False |
Buzzer Control
In the main function, if the flag buzzer_flag is set to True, call the buzzer.playTone() function to activate the buzzer. This function contains three parameters. Parameter 1 represents the duty ratio of the buzzer. Parameter 2 indicates the duration of the sound. Parameter 3 determines the mode of sound: blocking or non-blocking. In blocking mode, the program waits for the buzzer to finish sounding before executing other operations. In non-blocking mode, the program can continue executing other operations while the buzzer is sounding.
314 315 316 317 | if time.ticks_ms() > last_time_1000ms: # buzzer run last_time_1000ms += 1000 if buzzer_flag == True: buzzer.playTone(1000 , 500 , False) |
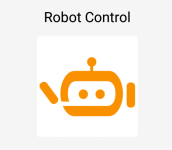
9.11 Remote Control Instruction
9.11.1 Project Introduction
In this section, let’s learn the app’s robot control function, enabling MechDog to execute action groups.
9.11.2 Program Logic
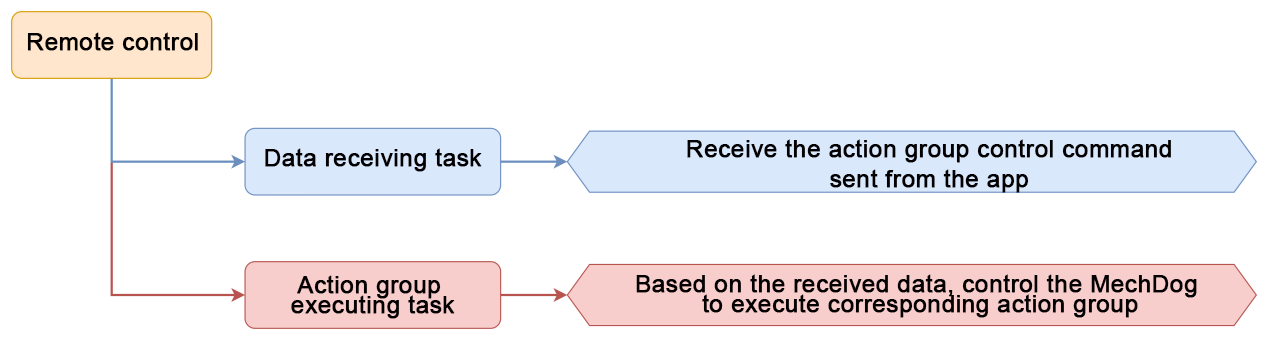
9.11.3 Program Outcome
MechDog contains 16 built-in action groups. They can be called to make MechDog perform corresponding actions. The specific action groups are listed in the table below:
| Action Group Name | Corresponding Action |
|---|---|
| left_foot_kick | Kick with left foot |
| right_foot_kick | Kick with right foot |
| stand_four_legs | Stand on four legs |
| sit_down | Sit down |
| go_prone | Lie down |
| stand_two_legs | Stand on two legs |
| handshake | Shake hand |
| scrape_a_bow | Bow |
| nodding_motion | Nod |
| boxing | Boxing |
| stretch_oneself | Stretch |
| pee | Pee |
| press_up | Perform push-ups |
| rotation_pitch | Pitch |
| rotation_roll | Roll |
| normal_attitude | Initial posture |
9.11.4 Program Analysis
Import Libraries
Import necessary library files, including Hiwonder library with sensor libraries and low voltage alarms, time library related to time, Hiwonder_IIC library utilized for I2C communication with modules, and the HW_MechDog library used to control MechDog movement.
1 2 3 4 5 6 7 | import Hiwonder import time from time import sleep_ms import Hiwonder_IIC from HW_MechDog import MechDog from Hiwonder_BLE import BLE import struct |
Create MechDog Object
Create a MechDog object. Set the vision module interface as interface 1. Initialize the glowy ultrasonic sensor, buzzer, and IMU module.
10 11 12 13 14 15 16 17 | mechdog = MechDog() iic1 = Hiwonder_IIC.IIC(1) iic2 = Hiwonder_IIC.IIC(2) i2csonar = Hiwonder_IIC.I2CSonar(iic1) esps3cam = Hiwonder_IIC.ESP32S3Cam(iic1) buzzer = Hiwonder.Buzzer() imu = Hiwonder_IIC.MPU() |
WiFi Configuration
Set the name of the WiFi module as MechDog_wifi. Configure its password as 12345678.
19 20 21 | sleep_ms(100) iic2.writeto(0x69 , "NIOT_MechDog|||12345678$$$") sleep_ms(1000) |
WiFi Data Reception
In the function for receiving WiFi data, use the function wifi_read() to read the command transmitted by the app. The command is then stored in the variable receive_data. Determine whether the received command is identical to the previous one sent. This is to prevent sending the same command twice. Next, parse the received data, obtaining the corresponding functional code.
104 105 106 107 108 109 110 111 112 113 114 115 116 | while True: try: # read and deal wifi if time.ticks_ms() > last_time_50ms: last_time_50ms += 100 receive_data = wifi_read() if receive_data != None: receive_data = bytes([x for x in receive_data if x != 0xd3]) if last_receive != receive_data: last_receive = receive_data rec = receive_data.decode('utf-8') if rec.find("CMD") != -1 and rec.find("$"): cmd = rec.split('|')[1:] |
Action Group Processing
When the parsed command is remote control, the obtained action group type is stored in the variable action_type. The action group type can be either a built-in action group or a custom action group. Next, the corresponding action group number to be executed is stored in the function action_num().
156 157 158 | elif int(cmd[0]) == 0x06: action_type = int(cmd[1]) action_num = int(cmd[2]) |
Action Execution
In the main function, different functions are called to execute the action group based on its type. If the action group type is a built-in action, the function action_run() is called to execute the corresponding built-in action group number. If the action group type is a custom action group, the function mechdog.action_run() is called to execute the custom action group number. After executing the action group, the action_type variable is reset to identify the next action group.
302 303 304 305 306 307 308 309 310 311 312 | if action_type == 1: # action run action_run(action_num) action_type = 0 elif action_type == 2: if action_num == 100: mechdog.move(90,0) time.sleep(2) mechdog.move(0,0) else: mechdog.action_run(str(action_num)) action_type = 0 |